• Home
  • about emily
  • before + after
  • HGTV + DIY Network
  • good press
  • contact
  • Let’s Organize These Posts:

    • Art Attack
    • Backyard
    • Barn
    • Basement
    • Bathroom
    • Beach
    • Bedrooms
    • Being Thrifty
    • Business-y
    • Buying and Renting and Selling
    • Casual Celebrations
    • Closets
    • Curb Appeal
    • Dainty Details
    • Deck
    • Decor
    • Dining Room
    • DIY
    • Dog-Related
    • Entryway
    • Flooring
    • For the Kids
    • Garage
    • Gardening
    • Helping The Economy
    • HGTV + DIY Network Projects
    • Holiday-Related Projects
    • Home Safety
    • Kitchen
    • Lighting
    • Living Room
    • Merry Travels
    • Office Space
    • Organized
    • Other Pads
    • Outdoor Living
    • Scooter Fun
    • Stairwell
    • Sunroom
    • Supporting Sponsors
    • The Art Room
    • Tools
    • Uncategorizable
    • Wedding
    • Windows
    • Work-pads
  • Search

  • Hi, I’m Emily

    Emily Fazio

    I'm a home improvement enthusiast, living a very merry DIY lifestyle.

    You can find me writing for HGTV and DIY Network, follow me on facebook and instagram, or drop me a note if you'd like. I love notes.

    Thanks for visiting!

  • BROWSE POSTS BY CATEGORY:

    • Art Attack (7)
    • Backyard (92)
    • Barn (8)
    • Basement (27)
    • Bathroom (43)
    • Beach (13)
    • Bedrooms (73)
    • Being Thrifty (53)
    • Business-y (12)
    • Buying and Renting and Selling (23)
    • Casual Celebrations (36)
    • Closets (17)
    • Curb Appeal (44)
    • Dainty Details (8)
    • Deck (23)
    • Decor (286)
    • Dining Room (37)
    • DIY (577)
    • Dog-Related (24)
    • Entryway (59)
    • Flooring (58)
    • For the Kids (32)
    • Garage (17)
    • Gardening (70)
    • Helping The Economy (30)
    • HGTV + DIY Network Projects (283)
    • Holiday-Related Projects (80)
    • Home Safety (12)
    • Kitchen (84)
    • Lighting (31)
    • Living Room (77)
    • Merry Travels (21)
    • Office Space (21)
    • Organized (41)
    • Other Pads (14)
    • Outdoor Living (12)
    • Scooter Fun (8)
    • Stairwell (20)
    • Sunroom (22)
    • Supporting Sponsors (43)
    • The Art Room (3)
    • Tools (43)
    • Uncategorizable (1)
    • Wedding (28)
    • Windows (14)
    • Work-pads (10)
  • Search

  • Pages

    • blog
    • Good Press: Special Features, Freelance Projects, and Long-Term Clients
    • Privacy Policy
    • about emily
    • before + after
      • before + after – transforming my first home
      • before + after, our current home
    • contact me
    • choose a badge and share the merrypad.com love
  • Home
  • about emily
  • before + after
  • HGTV + DIY Network
  • good press
  • contact

How to Build Inset Shelves in a New Tiled Shower

January 12, 2012

This whole bathroom renovation has the potential to quickly move along. On Day 2 we installed the bathtub, and on Day 3, we:

  • Built custom inset shelving
  • Installed moisture barriers
  • Installed HardiBacker 500
  • And… tackled more plumbing snafus

Those are some custom shelves. Check out DIYNetwork.com for more detail on how we built them in our shower!

I started out the morning with a goal of designing and building the inset shelves as storage for shampoo, conditioner, and soap. We had debated for days whether we’d build two or three shelves, on which walls they’d be best suited, and what heights we should plan to have them positioned. If you’re like me, you know that the placement of those shelves could make you happy and at ease, or easily annoyed every day.

In the end, we designed two long horizontal shelves on the wall opposite the shower head. At the end, they would be well out of the way of flailing elbows and hair, and also out of sight for anyone entering the bathroom. Furthermore, the wall that was going to be updated was a more recent addition to the space (we assume it was added the last time the bathroom was renovated, maybe in the 1990s) and was not a load-bearing wall. Here’s what it looked like in the pre-demolition state. It did have two shallow shelves, but was never enough room for all of my stuff.

Tiny bathroom shelves that need to be bigger.

Step 1: Determine the Shelf Height

There were many considerations as we planned the placement of the shelves, namely, the tile. I chose white subway tiles, which were cheery and clean and white and inexpensive, and readily in stock. We found them priced even lower than originally reported in the shopping post (at only 23 cents/tile), and because I bought it with a coupon, the entire 70-sq. ft. load only cost me $116. Tack on $16 for mortar and grout, and call it a happy day. Had I chose a fancier tile, $116 would only have covered 10 sq. ft. of one wall!

To figure out where the shelves should be installed on the wall, I comped up a faux-wall layout on the hardwood floor. I used the floorboards as a straight line, the real 3″x6″ subway tiles, and the 1/8″ spacers to demonstrate where the grout would fit. Manufactured subway tiles are actually self-spacing, but we voted to have thicker grout lines.

I wavered between allowing the shelves to be 4 or 5 tiles high (5 felt a little tall, but when I put shampoo bottles in position, it felt just right to accommodate the hand pump).

Deciding how big to make shelves in a shower for a DIY bathroom remodel.

Dry-fitting the tiles on the floor to determine the necessary height of the shelves. Would it be enough space for a shampoo bottle?

I scribed the tile orientation, grout thickness, and shelf placement onto a piece of graph paper. I realize that our chicken scratch and overlapping drawings aren’t something you can follow, but it really helped to have the plan drawn out, every measurement notated, and the whole vision triple-checked.

Designing shelves that will be built inside a shower during a DIY bathroom renovation.

Planning the placement of shower shelves.

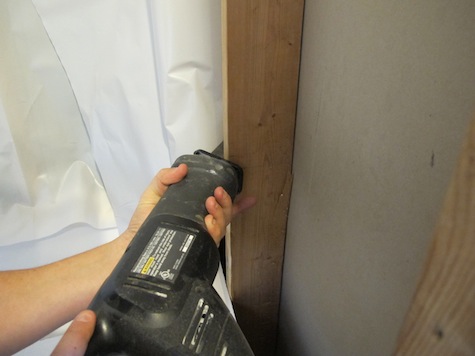
Step 2: Measure and Cut the Wall Studs

Tampering with the chosen wall wouldn’t affect the structure of the house, so we started by cutting into the center stud with a reciprocating saw to open up space for the lower shelf.

Building the frame for custom shelving in a DIY shower renovation.

From there, I built upwards, adding first the lower shelf, side pieces for support, and the top of the lower shelf/bottom of the upper shelf. Originally, I bought a few new 2×4 boards from the store to do the job, but I found some scraps from a previous project and put those to work instead.

Building the frame for custom shelving in a DIY shower renovation.

You may have noticed in the tile layout that I showered earlier that the top of the lower shelf and the bottom of the upper shelf was designed specifically to accommodate a full run of the 3″ tall subway tiles, so in addition to factoring in the thickness of the HardiBacker that we were going to install around the studs and shelves, we had to figure out a way to bulk up the middle 2×4 with another 0.75″ width.

Happily, a leftover piece of shiplap from a previous project was the perfect size for the job. Stacking it with the 2×4, we continued to build upwards to complete the new framing for our shower shelves and found ourselves done by lunchtime. Radical progress.

Building the frame for custom shelving in a DIY shower renovation.

Step 3: Add Cement Board and Tape to Shelves

Next, you’ll have to cut cement board to surround the wooden framework. Cement board can be dusty, and that dust is not safe to breathe, so the cuts were made outside on the deck. In the snow. In 10-degree weather while we wore mittens and wielded quick-to-dull utility knives. There are no pictures of this.

We attached it piece by piece to the wooden framing, and then added tape to seal all exposed edges.

Those are some custom shelves. Check out DIYNetwork.com for more detail on how we built them in our shower!

Framed and taped custom inset shower shelves.

Step 4: Install Moisture Barriers

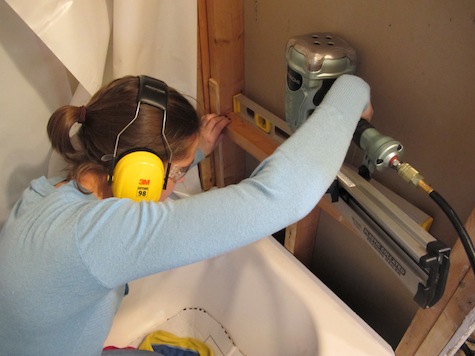
Enthusiastic about those shelves, we decided to keep forging ahead. The next step as we saw it was to install a moisture membrane over the shelves and silicone seal the lower edge of the plastic to the bathtub all the way around. I had actually installed it along the back wall just before we got started building the shelves, as you can see in the picture above, but the rest needed to wrap carefully around the new framing to protect the wall and guard against moisture touching the wood.

The 6mil moisture barrier was easily installed. I affixed the plastic with as few staples as possible using an electric staple gun and took precautions about how the plastic would need to overlap for water protection when coating the new shelves.

Very quickly, the entire shower was wrapped to ward off moisture.

Securing cement board to a shower surround before installing tiles.

Step 5: Replace Shower Plumbing (if Necessary)

Adding cement board to the third wall of the shower required more extensive prep work.

For one thing, the existing CPVC and copper plumbing wasn’t sunken beneath the level of our 2×4 studs (get an idea of what I mean in this next photo). Laying the cement board over the pipes would have crushed them, so we were left with one solution: a total shower plumbing replacement.

Problem with existing CPVC and copper plumbing.

We ended the third day of renovation with a trip to the store to get new pipe and fittings, but were satisfied to have covered two of the shower walls with cement board and even designed and built the custom shelves.

To read more stories about this renovation:

Shopping for materials

Day 1: Demo day 

Day 2: Installing the bathtub

admin
Share

Bathroom  / DIY  / HGTV + DIY Network Projects

Emily
I'm a home improvement enthusiast, living a very merry DIY lifestyle. I've been a freelancer writer for 10+ years and you can find my work on popular home and garden sites, like HGTV.com. Follow me on facebook and instagram, or drop me a note.

You might also like

Scooter Storage Design
January 17, 2011

Leave A Reply


Leave a Reply Cancel reply

Your email address will not be published. Required fields are marked *

This site uses Akismet to reduce spam. Learn how your comment data is processed.

  • HI, I’m Emily

    Emily Fazio

    I'm a home improvement enthusiast, living a very merry DIY lifestyle. Follow me on facebook and instagram, or drop me a note if you'd like. I love notes.

    Thanks for visiting!

  • Instagram

    merrypad

    Merrypad // Emily Fazio
    pumpkin patch is doing great✌️#year1 #squashbl pumpkin patch is doing great✌️#year1 #squashblossoms #pumpkinpatch
    I’ve overdone it. #2023gardennotes I’ve overdone it. #2023gardennotes
    I’m not great at weeding my mulched beds, but I I’m not great at weeding my mulched beds, but I am very good at transplanting thousands of pachysandra like little bouquets so within 3 years they’ll consume the entire area ✌️ #earnyourallowance #pachysandra #gardening #merrypadathome
    One magic blossom from the peony roots transplante One magic blossom from the peony roots transplanted in April ❤️
    IT’S SCAPE SZN! IT’S SCAPE SZN!
    The biggest learning from my first year of pumpkin The biggest learning from my first year of pumpkin farming: no need to start seeds weeks in advance. These sprouted in 3 days indoors, and I was able to easily move them to the farm with minimal disturbance before they outgrew their tiny little upcycled egg carton pods. The seedlings I started in April in larger containers were very lanky at transplant and do not seem as hearty. They THRIVE when transplanted at this size! 📓 #gardennotes #garden2023 #pumpkinfarming #gourdfarming
    #2023garden pathways sponsored by pine tree bark 👩‍🌾👍 

#repurposedwood #merrypadathome
    Load More... follow emily: @merrypad


  • Like Us On Facebook

    Facebook Pagelike Widget


  • Popular Posts

    • How to fix an IKEA drawer. The Easy Fix For Broken IKEA Drawers 74.2k views
    • DIY sideboard rehab. 7 Steps for Restoring an Old Midcentury Sideboard Buffet 62.7k views
    • How to design and make a barn quilt. How to Make Your Own Barn Quilt 55.2k views
    • How to hang art on brick surfaces using specialty clips. The Easy Way to Hang Art on Brick or Stone 44.6k views
    • Our DIY flagstone patio. Building a Flagstone Patio in One Day 40.4k views
    • DIY driveway removal. How to Remove an Old Asphalt Driveway 36.9k views
    • Fix an ikea dresser drawer. Life Support For An IKEA Dresser 35.7k views
    • Tips for dying pasta different colors, and a Halloween Recipe for the kids. How to Dye Pasta Different Colors (Halloween Recipe) 35.2k views
    • Goodbye, gold fireplace covering. Less Is More: How to Remove a Fireplace Surround 31.6k views
    • After: Custom wooden garden fence. Designing a Durable Wooden Fence For Our Beautiful Backyard Garden 29.6k views


  • BROWSE POSTS BY CATEGORY:

    • Art Attack (7)
    • Backyard (92)
    • Barn (8)
    • Basement (27)
    • Bathroom (43)
    • Beach (13)
    • Bedrooms (73)
    • Being Thrifty (53)
    • Business-y (12)
    • Buying and Renting and Selling (23)
    • Casual Celebrations (36)
    • Closets (17)
    • Curb Appeal (44)
    • Dainty Details (8)
    • Deck (23)
    • Decor (286)
    • Dining Room (37)
    • DIY (577)
    • Dog-Related (24)
    • Entryway (59)
    • Flooring (58)
    • For the Kids (32)
    • Garage (17)
    • Gardening (70)
    • Helping The Economy (30)
    • HGTV + DIY Network Projects (283)
    • Holiday-Related Projects (80)
    • Home Safety (12)
    • Kitchen (84)
    • Lighting (31)
    • Living Room (77)
    • Merry Travels (21)
    • Office Space (21)
    • Organized (41)
    • Other Pads (14)
    • Outdoor Living (12)
    • Scooter Fun (8)
    • Stairwell (20)
    • Sunroom (22)
    • Supporting Sponsors (43)
    • The Art Room (3)
    • Tools (43)
    • Uncategorizable (1)
    • Wedding (28)
    • Windows (14)
    • Work-pads (10)


  • a little bit of everything, friends, DIY, and inspiration

    • Dadand.com < My husband and his BFF
    • HGTV
  • Some Legal

    Merrypad incorporates the occasional affiliate link to Amazon.com and Minted; we link to many other websites and products, but if it is in context of a paid sponsorship, it is always noted as such. Please review the privacy policy and contact me if you have any additional questions.

    Theme customized by Pete Fazio Creative, the guy from dadand.com.


© Copyright Merrypad