In search of a way to display children’s artwork, recreated a collage that would stand the test of time (it’s true: we still have this displayed 13 years later). My homemade piece cost $35. The inspiration art that I pinned cost upwards of $950! Pinch me.
My inspiration? This kid’s art collage originally showcased on Apartment Therapy:

Inspiration art
The backstory?
Pete has been collecting his daughter’s artwork for years. From scribbles to her first animal sketches and finger paintings to daycare crafts. I’ve encouraged him to keep the best original pieces to look back on (within reason, we don’t have the space to save each coloring book). In the last year or so, she’s amassed quite a pretty gallery.
My parents had saved a lot of the art that my sister and I created growing up, and I always enjoyed looking back through it and seeing my skills progress with age.
I figured that in the future we will all appreciate having some of her work, regardless of its significance to her at age 5.

A collection of kids’ artwork stored in a folder.
The materials and investment:
- 20-3/4″x28-5/8″ IKEA Ribba Frame, $19.99 (I actually already owned this one, it’s the one I repaired recently)
- 1 standard uncut mat board, white, $4
- Mat cutter
- Color printouts (I didn’t have a color printer, so The UPS Store, $7)
- Scissors
- Tape
Interior designer Jan Eleni charges $950 for a quality 40-piece collage of her client’s children’s art. Yes, they’re lovely pieces, but I wanted to honor the artwork on my smaller budget.
Unlike Jan, I decided that I wanted to frame the art in a matted print form. Instead of trimming art to size and taping it directly onto a piece of paper behind glass, I set out to cut a custom mat. The questionable part was whether I’d be able to make a mat with spaces for multiple pieces of art. And if I was able to, I wasn’t sure if I’d be able to do it well.
Step 1: Measure the Mat
First, I cut the newly purchased 36″x48″ mat board to size so that it would fit into the IKEA frame.
Then, I carefully calculated and marked where the openings would be on the back of the mat. Most mat cutters will require you to cut from the backside to achieve angled cuts. Avoid erasing pencil marks later and only put your markings on the back.

There were several things I considered as I planned:
- I wanted a 2″ solid frame all the way around the perimeter of the mat.
- Each thumbnail opening needed to be the same size.
- I wanted the horizontal and vertical spacing between each thumbnail to be an even width.
- The exact dimensions of each thumbnail weren’t important, as long as they were all landscape in orientation and evenly spaced
- I really didn’t want this to look like the matted collages with lots of ovals that everyone bought in the 70s. My goal was to make it look streamlined and modern.
I started by marking a 2″ border on the edge of the mat:

And then I got math-y.
First, I decided how wide I wanted each line between the thumbnails to be. (How about a 1/2″? Sounds great.). Then, I considered about how many thumbnails I should try and fit across horizontally and vertically (4-5 across? 8-10 up and down?). These measurements can obviously vary based on your project.
Factoring in the size of the mat, the 2″ border, and 1/2″ spacers, I calculated how much space would be available for each thumbnail. Happily, I landed on nice round-ish numbers, determining that each opening should be 2.5″ x 3.75″. I marked each line that I’d need to cut, using the mat cutter as a long straight edge.
Step 2: Cut the Mat
If you read all of that, maybe you think it sounds easy. In reality, there was a lot of measuring, calculating, mismeasuring, re-calculating, and re-measuring. That’s why the back of the mat looked like this even before it was cut.

Anyways, you can measure 15 times, but only cut once. Finally, I felt like it was going to work out.

Of course, there were two minor 2 issues, both due to my own carelessness:
1) I forgot to rotate the paper as I cut it in the mat cutter, so half of the beveled edges of the mat angle in the wrong direction. Slaps head.

2) An unknown substance was on the coffee table where I was cutting. Maybe a yogurt-covered spoon. Because of that carelessness, I do have a dumb oily stain on the clean side of the mat. The other side of the mat was too marked up with pencil and it could not be flipped. You can’t really see it once it is behind glass, but still.

Those issues aside, I was really happy with how it turned out.
Step 3: Scan and Print Artwork
Next, I began selecting my 32 pieces of artwork. I scanned them one at a time, rotating and cropping (if necessary) to fit into a horizontal layout. You can easily turn the mat horizontally and use 32 vertical pieces of art, but there didn’t seem to be as many of those in our stash.
I resized each scanned piece to be around 3.75-4″ wide, focusing on how a proportionate resize affected the height of the image (they needed to stay over 2.5″ tall). Then, I formatted the whole set 4-up onto 8.5″ x 11″ pages of a word document.
UPS had a great printer and I printed 8 pages for $7.

Printouts of the artwork scaled to thumbnail size.
Step 4: Attach Thumbnails to Mat
I trimmed each piece of printed art with a generous border and took care in taping every image into one of the open thumbnails on the freshly cut mat. I found it easiest to angle the cut mat on the windowsill to let some light shine through the paper to monitor spacing and cropping.

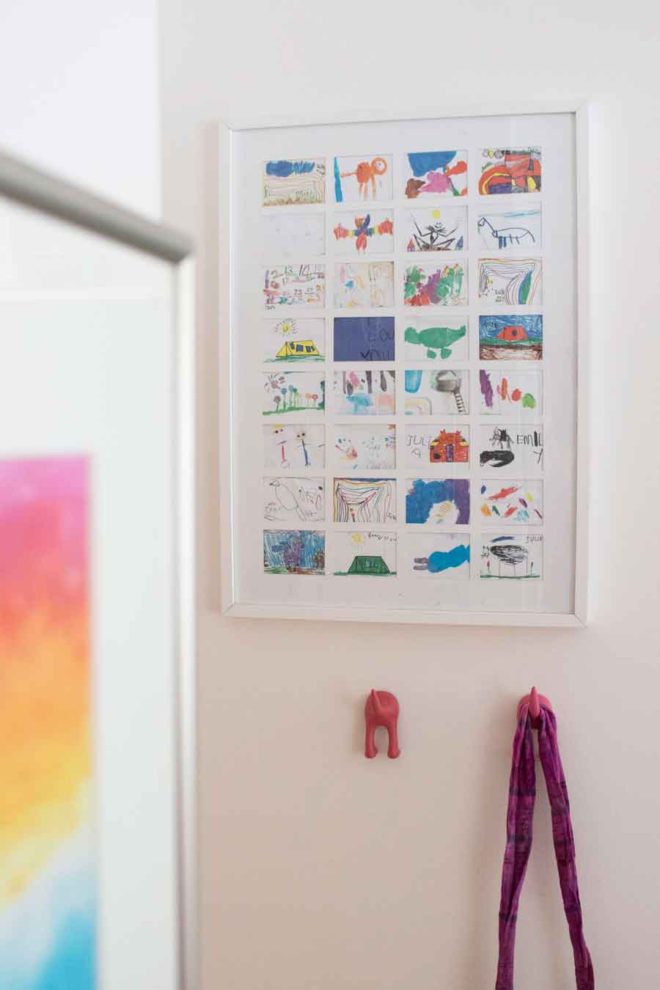
All said and done, I placed the mat and art into my IKEA frame, and stood back, pleased.
Pretty. What a perfect little way to make your kid proud.

Side note: The Bat and The Nightmare Before Christmas were not drawn by a 5-year-old. Pete often freehand sketches special pieces for her to color. Now accepting inquiries from coloring book publishers.


21 Comments
This is a pretty ambitious project but it turned out great, love the sweet & eclectic collection of illustrations you chose.
There are so many things to love about this project! Love the special meaning of the artwork AND that you DIY-ed the pants off of this!
I love the way that turned out, Emily! Has Julia seen it yet? I’m sure she loves it!
She hasn’t, and I hope she’ll like it :)
I’m sure she will! :)
Wow! Thanks for the inspiration to save my little guys art work. LOVE this!
Glad you like, Michelle!
She knows it as the guest room, she doesn’t live with me. But I know what you’re saying.
absolutely awesome! I’m in LOVE with this project and can’t wait to do this when we have kiddos! I HAD to show it to Eric!!! :)
This looks so amazing! You did a wonderful job, I will be doing this, maybe even a book of sorts for every year in school!
That’d be a great idea! She saw it this evening and only commented on why I didn’t use ALL of her art. Might want to plan on making a mat with 1000 thumbnails.
Great idea!! I always prefer art with meaning.
Thanks Michelle – I agree with you 100%.
Same here! If it’s made by someone you know = the best kinda of art. And the amount of time you put into cutting that mat should be an art piece in and of itself. Hah.
Wow! That’s really cool, Emily. I’m sure Julia loves seeing her art displayed, too.
This is semi-related. Did you see the kid’s art duvet featured on YHL this week? That was pretty cool, too.
I did see that – when the post started I thought for a minute that it was going to be the same project I was concocting. It turned out really cute.
Absolutely incredible! I love it!!! I’m sure Julia will too! Does Pete love it? (He must)
Yes, he does!
What a neat way to display your kids’ artwork! Looks great!
that is AWESOME!!!! love it!
ditto to all the above comments!