• Home
  • about emily
  • before + after
  • HGTV + DIY Network
  • good press
  • contact
  • Let’s Organize These Posts:

    • Art Attack
    • Backyard
    • Barn
    • Basement
    • Bathroom
    • Beach
    • Bedrooms
    • Being Thrifty
    • Business-y
    • Buying and Renting and Selling
    • Casual Celebrations
    • Closets
    • Curb Appeal
    • Dainty Details
    • Deck
    • Decor
    • Dining Room
    • DIY
    • Dog-Related
    • Entryway
    • Flooring
    • For the Kids
    • Garage
    • Gardening
    • Helping The Economy
    • HGTV + DIY Network Projects
    • Holiday-Related Projects
    • Home Safety
    • Kitchen
    • Lighting
    • Living Room
    • Merry Travels
    • Office Space
    • Organized
    • Other Pads
    • Outdoor Living
    • Scooter Fun
    • Stairwell
    • Sunroom
    • Supporting Sponsors
    • The Art Room
    • Tools
    • Uncategorizable
    • Wedding
    • Windows
    • Work-pads
  • Search

  • Hi, I’m Emily

    Emily Fazio

    I'm a home improvement enthusiast, living a very merry DIY lifestyle.

    You can find me writing for HGTV and DIY Network, follow me on facebook and instagram, or drop me a note if you'd like. I love notes.

    Thanks for visiting!

  • BROWSE POSTS BY CATEGORY:

    • Art Attack (7)
    • Backyard (92)
    • Barn (8)
    • Basement (27)
    • Bathroom (43)
    • Beach (13)
    • Bedrooms (73)
    • Being Thrifty (53)
    • Business-y (12)
    • Buying and Renting and Selling (23)
    • Casual Celebrations (36)
    • Closets (17)
    • Curb Appeal (44)
    • Dainty Details (8)
    • Deck (23)
    • Decor (286)
    • Dining Room (37)
    • DIY (577)
    • Dog-Related (24)
    • Entryway (59)
    • Flooring (58)
    • For the Kids (32)
    • Garage (17)
    • Gardening (70)
    • Helping The Economy (30)
    • HGTV + DIY Network Projects (283)
    • Holiday-Related Projects (80)
    • Home Safety (12)
    • Kitchen (83)
    • Lighting (31)
    • Living Room (77)
    • Merry Travels (21)
    • Office Space (21)
    • Organized (41)
    • Other Pads (14)
    • Outdoor Living (12)
    • Scooter Fun (8)
    • Stairwell (20)
    • Sunroom (22)
    • Supporting Sponsors (43)
    • The Art Room (3)
    • Tools (43)
    • Uncategorizable (1)
    • Wedding (28)
    • Windows (14)
    • Work-pads (10)
  • Search

  • Pages

    • blog
    • Good Press: Special Features, Freelance Projects, and Long-Term Clients
    • Privacy Policy
    • about emily
    • before + after
      • before + after – transforming my first home
      • before + after, our current home
    • contact me
    • choose a badge and share the merrypad.com love
  • Home
  • about emily
  • before + after
  • HGTV + DIY Network
  • good press
  • contact

Flooring Prep and Grout Conditioning in Our Bathroom Remodel

February 9, 2012

A girl really grows tired of storing 4’x8′ underlayment boards against the wall in the dining room. If you’ve ever renovated any part of your home, you’ll appreciate that the whole house sort of gets flipped inside out in the process. I’m getting more and more eager to return to a place of normalcy, getting the toilet off the workbench in the basement, removing the tall stack of floor tiles from the guest bed, and exploring/assembling the vanity that’s still stored in the attic.

And don’t get me started on the number of tool bags, cans, and garbage bins that are dispersed through the office and upstairs landing… it’s a home improvement war zone.

One thing at a time. On Day 10, we came a whole leap closer to being able to have a finished bathroom floor once again (and we’re thisclose away from being able to shower again too).

Underlayment happiness.

The vinyl resilient concrete tiles are burning a hole in my… guest bed (convenient current storge re). I’ve been really, really excited to get these tiles installed because now that the shower is done, the new floor should full the room together nicely and take it from WHOA to WOW. Before I was able to get started on the tiles, however, I had to clean up the floor and prepare the necessary underlayment. This underlayment had been leaning against the wall in my dining room for a month, and it was time that it made its way upstairs. The underlayment installation meant that tiling the bathroom floor was inevitably close, so I was understandably excited about this step of the job. I was also tired of walking on plywood and ragged out flooring that had been beneath the old vinyl tiles.

It was an unseasonably warm day for January in New York when I got to ripping the underlayment apart, so we set up shop on the deck.

In an effort to cover as much of the floor as we could with a single board, I started out by carefully measuring the floor, from the end where the toilet sits, back towards the entry where the vanity would sit. The 4’x8′ board was long enough to extend all along the front of the shower; it’s always nice not to have seams in a place where you’re stepping or bouncing on daily (not that we bounce in and out of the shower and in front of the toilet, but it’s a commonplace to stand and walk around, and loosened staples on seams could really compromise the floor with time.)

Using our drywall t-square to create long, straight lines, we employed the circular saw and jigsaw to make all necessary cuts. Cutting the first board to size was initially intimidating (I couldn’t mess up without going to buy another board that can only be brought home loosely tied to the top of the Jeep). Board retrieval itself was quite the adventure on a snowy evening. I digress. Cutting the hole for the toilet plumbing was a little nerve-wracking.

Cutting subfloor for our bathroom floor during its remodel.

Having repeatedly measured for this plumbing hole and the incoming pipe that provides toilet water, we rocked, because the cut was accurate on the first try. Pure Pete pride in this picture!

Successfully cut the subfloor to fit around the toilet flange.

Cutting the last pieces of underlayment to size were quick and easy in comparison. When it came time to install, we used the air compressor and staple gun to blast 1″ staples on every single “X”. The staples are the only thing holding the underlayment in place, no glue, no adhesive, but considering the hundreds of staples that we popped into place, it should be well-set for years to come.

The installation was very quick and easy with the gun. We followed a tutorial offered by the SurePly manufacturers with no problem. Lots of good tips, actually!

We doubled up the staples for added reinforcement around the entire perimeter of the room and along the cut edge of every board.

Extra staples in the subfloor during a bathroom remodel.

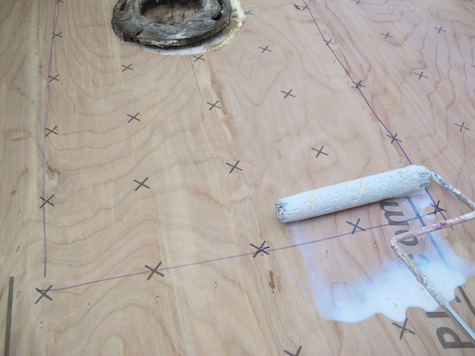
With the underlayment in place, I pounced on the opportunity to prime the floor while it was clean. The primer, a VOC-free floor enhancer shown here, is designed to help self-stick tiles adhere to flooring, and was especially advised for me as I was installing directly over brand-spankin’ new underlayment. At $5, it’s worth the investment to keep those tiles in place really well.

Prep the subfloor with bond enhancer before using adhesive tile.

The instructions advised me to paint the enhancer on the floor with a thick-nap roller, not unlike how you’d paint the walls. Applying it the evening and not giving it much opportunity to puddle, I laid it on thick. Half of the bottle went further than you’d think; the liquid was like milk, not like paint. I have half of the bottle of this primer left (for future tiling projects, if this one here goes well).

Rolling conditioner on plywood to enhance bond of vinyl tiles.

I rolled myself right out the door, and left the room for 3 hours to let it cure and set.

Rolling conditioner on plywood to enhance bond of vinyl tiles.

You really wouldn’t know by looking at it the finished floor that any treatment had been done, but it feels a little different.

And speaking of curing and setting, I finished the shower tile too. After the grout had set for 24-hours, I cleaned up the surface of the tiles with a dry rag and then conditioned the exposed grout to repel stains and water. I may have been squeezing the bottle with the brush a little too hard, as I had a lot of over-run down the walls into the tub, but I wanted that tile to be sealed. Really sealed. I went through two bottles of the stuff even though the bottle indicated that one bottle should have been enough.

Adding grout sealer to shower to prevent absorption in new grout.

To read more stories about this renovation:

Shopping for materials

Day 1: Demo day 

Day 2: Installing the bathtub

Day 3: Building custom shower shelves, moisture barriers, and cement board

Day 4: Replacing the shower valve and finishing the cement board

Days 5, 6, 7, 8: A 4-day tiling marathon

Day 9: Focusing on the walls


Share

Bathroom  / DIY  / Flooring  / HGTV + DIY Network Projects

Emily
I'm a home improvement enthusiast, living a very merry DIY lifestyle. I've been a freelancer writer for 10+ years and you can find my work on popular home and garden sites, like HGTV.com. Follow me on facebook and instagram, or drop me a note.

Leave A Reply


Leave a Reply Cancel reply

Your email address will not be published. Required fields are marked *

This site uses Akismet to reduce spam. Learn how your comment data is processed.

  • HI, I’m Emily

    Emily Fazio

    I'm a home improvement enthusiast, living a very merry DIY lifestyle. Follow me on facebook and instagram, or drop me a note if you'd like. I love notes.

    Thanks for visiting!

  • Instagram

    merrypad

    Merrypad by Emily Fazio
    Instagram post 17902304861708711 Instagram post 17902304861708711
    Highly recco mining those #herkimerdiamonds ✌️ Highly recco mining those #herkimerdiamonds ✌️
    Pt. 2: Well before Halloween, the last of the garl Pt. 2: Well before Halloween, the last of the garlic went into the home garden: 10 rows [L>R] 6 whole Nootka Rose as an experiment, 3x8 Mennonite-grown cloves from Aman’s, and 6x8 (and, I think, total 112? notes are cryptic) “normal.”
#gardennotes #growinggarlic #garden2023 #whatisnormal #merrypadathome
    Out of sight but [documented so it’s] not out of Out of sight but [documented so it’s] not out of mind! #garden2024 kicks off with my favorite biennial: elephant garlic! 15 cloves planted from small, to medium, to enormous. #gardennotes
    Annual garlic notes for #garden2023, pt. 1: this i Annual garlic notes for #garden2023, pt. 1: this is getting ooc, and I love it. 👩‍🌾🧑‍🌾

🧄 65% of the planting is in a new plot in the country. 🧄 Seeing if NR grows bigger with more sunlight. 🧄 Big @chasefarms cloves from 2021 were really productive in our home garden; can’t wait to see how they can show up next year in the new space. 🧄

Hand-turned a small bed, but big thanks to my sister, who rolled into town just in time to help me double its size (and did not complain once).
    One straggler from #garlic2021 debuted with 7 stal One straggler from #garlic2021 debuted with 7 stalks and 7 scapes, and I can’t wait to see this mammoth looks like when it’s pulled next month. #garlic2022 

Also, fierce springtime performance by parsley, chamomile, and self-seeded cilantro.
    Annual garlic notes #garden2022 ~315 cloves total Annual garlic notes #garden2022
~315 cloves total
50 in new, unfenced garden
Still need thick mulch on everything
Did a terrible job tracking varieties when I harvested, so it’s all a mix of hardneck now 😒
Added some big cloves from @chasefarms and look forward to adding some @fruition_seeds in #garden2023 when @porterfarmscsa delivers.
    Load More... follow emily: @merrypad


  • Like Us On Facebook

    Facebook Pagelike Widget


  • Popular Posts

    • How to fix an IKEA drawer. The Easy Fix For Broken IKEA Drawers 67k views
    • DIY sideboard rehab. 7 Steps for Restoring an Old Midcentury Sideboard Buffet 56.8k views
    • How to design and make a barn quilt. How to Make Your Own Barn Quilt 50k views
    • How to hang art on brick surfaces using specialty clips. The Easy Way to Hang Art on Brick or Stone 40.1k views
    • DIY driveway removal. How to Remove an Old Asphalt Driveway 35.1k views
    • Our DIY flagstone patio. Building a Flagstone Patio in One Day 32.8k views
    • Tips for dying pasta different colors, and a Halloween Recipe for the kids. How to Dye Pasta Different Colors (Halloween Recipe) 32.5k views
    • Fix an ikea dresser drawer. Life Support For An IKEA Dresser 29.8k views
    • Goodbye, gold fireplace covering. Less Is More: How to Remove a Fireplace Surround 29.5k views
    • After: Custom wooden garden fence. Designing a Durable Wooden Fence For Our Beautiful Backyard Garden 23k views


  • BROWSE POSTS BY CATEGORY:

    • Art Attack (7)
    • Backyard (92)
    • Barn (8)
    • Basement (27)
    • Bathroom (43)
    • Beach (13)
    • Bedrooms (73)
    • Being Thrifty (53)
    • Business-y (12)
    • Buying and Renting and Selling (23)
    • Casual Celebrations (36)
    • Closets (17)
    • Curb Appeal (44)
    • Dainty Details (8)
    • Deck (23)
    • Decor (286)
    • Dining Room (37)
    • DIY (577)
    • Dog-Related (24)
    • Entryway (59)
    • Flooring (58)
    • For the Kids (32)
    • Garage (17)
    • Gardening (70)
    • Helping The Economy (30)
    • HGTV + DIY Network Projects (283)
    • Holiday-Related Projects (80)
    • Home Safety (12)
    • Kitchen (83)
    • Lighting (31)
    • Living Room (77)
    • Merry Travels (21)
    • Office Space (21)
    • Organized (41)
    • Other Pads (14)
    • Outdoor Living (12)
    • Scooter Fun (8)
    • Stairwell (20)
    • Sunroom (22)
    • Supporting Sponsors (43)
    • The Art Room (3)
    • Tools (43)
    • Uncategorizable (1)
    • Wedding (28)
    • Windows (14)
    • Work-pads (10)


  • a little bit of everything, friends, DIY, and inspiration

    • Dadand.com < My husband and his BFF
    • HGTV
  • Some Legal

    Merrypad incorporates the occasional affiliate link to Amazon.com and Minted; we link to many other websites and products, but if it is in context of a paid sponsorship, it is always noted as such. Please review the privacy policy and contact me if you have any additional questions.

    Theme customized by Pete Fazio Creative, the guy from dadand.com.


© Copyright Merrypad