I’m all about doing the necessary things to get toilets reinstalled these days. Runner-up to the shower, it’s the happiest thing about the bathroom at the moment. True story: We were relinquished to that cold freestanding basement toilet for 37 days, which was about 36.75 days longer than I actually expected it to be. But I’m more than a little bit tired of talking about toilets, and the basement toilet, the fact that it’s not heated down there, and the fact that it’s the middle of winter in Rochester, NY, so I’m glad we made enough progress on Day 12 to install the throne before bedtime.
I mentioned last week that the addition of real flooring makes a bathroom come to life and feel finished, but it gets even better with the addition of baseboard.

The decision to add baseboard at this point in the renovation was a strategic one:
- It’s hard to reach the wall behind the toilet with a nail gun and/or paintbrush once the toilet’s hooked up.
- The vanity I selected for the sink doesn’t rest on the floor, but instead stands on metal legs. We’d need the trim in place before we installed it.
- The new door trim was going to intersect the baseboards, so the door trim needed to be incorporated too, even though we were some number of days off from doing the window trim. (Whoever would have thought that door trim could come before the toilet and vanity? Not this girl.)
The baseboard trim throughout the house happens to be very tall along the wall and very wide around the windows and doors to conceal the lath and plaster construct. This heavier trim is a feature of the house that I still really like; built in the 1940s, the house does have some nice architectural details that many modern constructions don’t, and the lack of economy-style moulding is one of those details. For consistency, I decided that even though the bathroom was drywalled (not lath + plaster), I still wanted to make the room flow with the rest of the house, so the decision to plan for wide window trim and tall baseboards was something I adopted early.
Fortunately, the door trim was easy. I kept it really simple by framing the edge of the doorway with 1×6 boards, and lap jointing the piece that runs along the top to extend the whole width. The visible seams and nail gun holes were patched with wood filler.

We ran pieces of pine corner guard moulding up along the top and left edges to finish it (the right edge butts against the wall), and although the addition of this moulding cost just under $2/linear foot, it was well worth the investment to make it match the other doors in the house, some of which you can see when you look right out of the bathroom. When it was done and painted (a tutorial you’ll see further down), it looks really nice:


When it came to the baseboard trim, it was a good thing I had put in some hours practicing how to route, cut, and install baseboard moulding in my home office, because while totally DIY-able, the angles and mechanics of it does require me to use a little pocket of my brain that doesn’t seem to be challenged all that often.
Let’s venture through this install together.
The materials and tools used for the bathroom trim include:
- Dual-bevel compound miter saw (none of my cuts were done by hand)
- Drill with 1/8″ drill bit
- Hammer (and/or air compressor and nail gun)
- Nails (4″ finishing nails and 1-1/4″ headless cut brad nails)
- Painter’s caulk
- Wood filler
- Sandpaper
- Paint
I had bought 1×8 boards to serve as the tall baseboard trim (#2 quality for cost efficiencies, but with as few knots as possible, and as straight as I could find). At the same time, I also bought some finishing base shoe to serve as added detail around the perimeter of the room (the wooden stainable variety runs about $0.59/linear foot, and I prefer it over the paintable vinyl because as wood, it feels more hearty, even when painted. Planning beforehand, I had measured the wall lengths carefully ahead of time and bought only the lengths I needed to minimize scrap and eliminate the need to have two sections making up one wall length (I wanted nice fluid, smooth lines in my trim, nothing patchwork-y, just a lesson I learned when I was doing my practice install the first time in the office). This meant that I brought home one 1x8x10′ board, one 1x8x8′ board, and two 1x8x6′ boards, as well as the base shoe in the same length.
Before I installed, I routed what would be the top outward facing edge of each board to round it off. I did a whole tutorial on why and how I made those precision cuts right here, and again, it was a step I was taking to make sure it matched the trim in the rest of my house. Even though I was working with simple lumber, the simple act of just rounding off the edge of the board really look it from looking like a store-bought piece of wood to a more finished piece of trim.


After routing, I also primed the exposed face of each board because it was easier to roll primer on edge-to-edge while they were flat, instead of upright installed on the wall. I didn’t paint at this point because nail holes and connections would need to be patched, caulked, and sanded before the finishing paint went on.
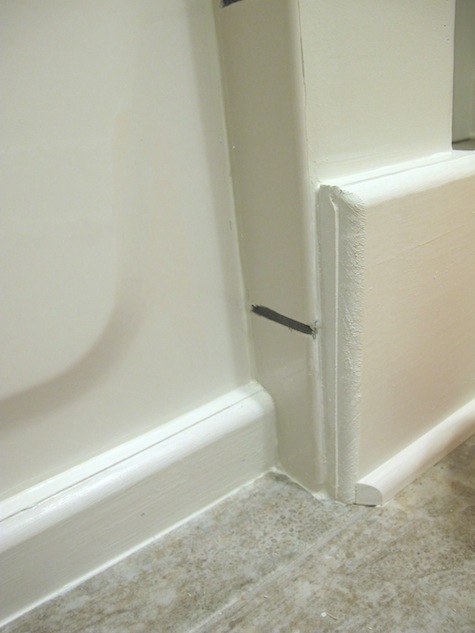
Like with the trim in the office, when it came to actually cutting the boards to length for installation, I found it highly imperative to cut boards for only one wall at a time, dry fitting each piece together as I went. Because there was detailing in the routed edge of each board, doing lapped joints for simplicity wasn’t an option, but it was well worth the extra patience to make each board meet in the corners at 45-degree angles. Fortunately for me, the room was square, and the pieces fit together quite easily.

Tips: Do not write down all the measurements and trying to cut multiple pieces at once. Don’t trust your memory on which angles the boards needed to be mitered at, the brain does crazy things. At least mine does. There were z-e-r-o errors when I took my time measuring and running to the basement to cut one board at a time. By really visualizing what I was doing, the end result turned out beautifully. Even though in this next picture they aren’t nailed in or caulked, you can tell how simply they fit together. (And side note: that piece of trim that sits on top of the pipe encasement was customized so that it sits flush on top of the metal, you’ll see a better picture of how that fits further down the post.)

As I finished cutting all of the tall baseboards, I dry-fit them into place on the wall and began to secure them with the 4″ finishing nails directly into the studs (thank you, new stud finder). I found it easiest to pre-drill through the trim itself close to the top of each board, and then hammer the nail into the stud through that pre-drilled hole. I also used a nail set to sink the nail a little bit (down about 1/8″-1/16″) to hide it completely. Just a few nails in each board was enough to secure them in place, and with the boards attached, I patched each hole with wood filler and left them to dry.

Moving on to install the base shoe, I planned and cut my trim the same way as I had the tall boards. It really went pretty quickly, each piece matching up in the corners perfectly. I used a nail gun with the 1-1/4″ brad nails to secure it to the taller baseboard (I’m doubtful that those nails are holding the wall tightly in any way given that the drywall didn’t run all the way to the floor, but it’s not like we’re going to be stepping on them or prying at them at all now that they’re installed). The nails were deploying from the gun with enough pressure to make them sink in the wood just a little bit, and like with the tall baseboard, I was able to quickly patch the holes with wood filler.

With the caulking gun, I went around the room quickly and sealed 1) the seam between the wall and the tall baseboard, 2) each corner, 3) the seam between the tall board and the base show, 4) all seams in the new door trim. A good trick to smoothing out a lumpy caulking application is to dampen your finger and run it along all of the caulked seams while it’s still malleable; I didn’t waste my time with taping and caulking between the lines of painter’s tape like I see in my many tutorials these days, I was just careful, and reminded myself that it was paintable so touch-ups would be acceptable. It was mine to mess up, fortunately, it looks awesome, very sealed, and very smooth.
After waiting a few hours to let everything cure, I was able to sand down areas that had been patched with wood filler and begin applying paint. I chose a straight-outta-the-can semi-gloss white, the same exact can that I used to paint the ceiling. Working my way around the room, I taped along the floor to make sure I wouldn’t hit the tiles and grout when I was just targeting the base shoe. I was able to cut into every edge with ease (although you’re always laying at an awkward angle), and after two coats, it was looking spiffy.


Around that corner nearing the tub, Pete routed the edge that meets the subway tile. Good thinking, really spiffy. He gets all the credit for that one.
In fact, it was so done, that we were able to reinstall the toilet that same night!

The only thing to really note about the toilet installation is that I did buy a jumbo wax ring to hopefully create the best seal possible, as well as a new bolt and gasket set because our old one seemed a little deteriorated (good thing it was only $5, much less expensive to repair than buying a new toilet).

As far as I’m concerned, installing a toilet is a two-person job between lifting and aligning the bolts, and squishing the wax ring down with even force. It’s the best-looking toilet I’ve ever seen. And I’m suddenly feeling weird about showing it to you because toilets are so, ahem, personal.

But the toilet is in. And if you’ve been following the series, you’d know I was really, really tired of using the cold, freestanding toilet in the corner of the basement for 36 days.
From this perspective, in fact, you might think our bathroom is completely finished! Behind me, not so much.

A good day 12! And a more good Day 13 can be found here. I can’t believe we’re almost done!
If you missed the beginning of this bathroom renovation series, catch up for yourself by perusing these posts:
Day 3: Building custom shower shelves, moisture barriers, and cement board
Day 4: Replacing the shower valve and finishing the cement board


8 Comments
I almost YAYed out loud (YOL? prediction: it’s going to be the new thing) in my office for you when you said you you don’t have to use the basement toilet anymore.
The trim looks AWESOME. I really, really, really want to get cracking on my guest bathroom again. Maybe I can take some of the vacation days I’ve racked up…
PS- I love the description for step/post 10. And I enjoyed the coffee break photo from your tiling marathon when it popped up in the “I take a lot of photos.” section a couple of days ago. Another high five for coffee addicts.
Haha, YOL. No one was YOL’ing louder than me, that’s for sure. The trim did turn out well – it’s so amazing how it pulls a room together!
Isn’t it amazing how trim (or sometimes just painted trim, or painted walls that make trim pop) make sure a huge difference? Loving that last shot on DIY, it does look just about finished. Can’t wait to see the vanity go in, etc. You can bet there will be more YOLing :)
Hi Emily,
I live in Rochester, too. I was wondering which IKEA you go to get some of your things? I love the bathroom cabinet you got, but I don’t know if I should drive the 5 hours to Pittsburgh or 6 hours to New Jersey to get it. Please advise!
That cabinet happened to be a find when I was traveling in D.C.. I try and plan big purchases when I’m in the states, and just wait until I’m traveling by car for other reasons (work, vacation, or visiting friends and family). For little things, I usually, I head up to Burlington or Toronto!
Hope it helps!
Hi! How tall is the baseboard that you used in the bathroom? Looks like 5 or 6 inches? Can you tell me why you used that size for the small bathroom? Thank you.
Hi Jaypee, I think it was 6″, and we used that size to match the rest of the home. All the trim was the same size throughout.