You know, most of the time I feel pretty good about the progress we make around our house. I went into writing this post (last Tuesday) doing little fist pumps in glee, happy to be able to say that we finished installing all of the baseboard trim in the house…. until I realized that we started re-installing it around New Year’s Eve. And now it’s the middle of February. So… crap, we move slow. Maybe it’s because we let an eager 7-year old help along the way.

In any case, the trim is in and looking fine; if you’ve never had the firsthand experience of installing baseboard, you should know that it has an addictive way of taking a home from looking like a construction zone to a beautiful space that looks like it was built that way. Trim is so addictive that ordinarily I’d have stayed up all night to finish installing it, instead of doing it piecemeal over the course of 6 weeks (the reasons I’ve been up all night are solely baby-related). Trim is sweet, and I am forgiving of myself for taking my sweet time.
When I last updated you, we were on the brink of purchasing a carload of conventional quarter round to cover the wide expansion gap (our existing trim wasn’t quite deep enough to cover the space left between the drywall and the edges of the floorboard, so basically we had to add on a bit). We sampled a few different scrap pieces of quarter round in various sizes, and then looked into the base shoe finishing options as well. I think I best explained base shoe photographically in this post – its shape is a unlike quarter round in the sense that it has one longer side that is a little flat.

I could go into how much time we spent comparing the options, it probably ate a week of our time because neither of us can make snappy decisions when our days start at 4am, but base shoe just looked better. It’s taller stance felt in better proportion to the existing trim that we were reinstalling, so that was that. We bought a whole bunch of wooden pre-primed product at the local big box, which is what you see above. Everything still needs to be painted, but it definitely saved us the extra step of priming the new base shoe.
Trim installation is made easy by a number of products, including a compound miter saw, nail gun, and caulk. I installed enough trim in our last house to realize that a regular hammer and nails are just a waste of time (harder to manage with accuracy, demands more patching and touchups), and would recommend anyone borrow/buy/rent an air compressor and a finishing nail gun to get the job done quickly and easily, bang bang. Instead of using the 5/8″ to 1-5/8″ finishing nail gun that we’ve used in the past (and love), we decided to buy a smaller pin nailer that shoots out, you guessed it, tiny nails, or, pins. And because this is the type of specialty tool that neither of us would be using very often (can also be said for our roofing nailer and the flooring nailer), I saved myself a bunch of loot and bought the new tool from Harbor Freight instead of a going with a bigger name brand product (paid just $25 after using a coupon, I love using coupons to buy tools).

It has worked phenomenally, and hooks right up to the hose of our existing pancake compressor. The best $25 we ever spent. One big difference between this and the other finishing nail gun that we own is that the pressure created by the tool isn’t enough to create a divot in the wood surface; with the pin nailer, the holes that it left are small enough to not even be filled at all. They’re barely visible to the naked eye, and we suspect that they’ll be filled and hidden completely when we paint.

The stairs themselves, as I’ve alluded to in previous posts, were a really complicated component to the entire hardwood installation. So hard, in fact, that I’ve decided there is no way I could create a tutorial to show you how exactly Pete was able to get them finished. I have a lot of photos that I took with intent of trying to explain the process we went through, but in hindsight, if you were to be in a similar situation, it’s probably worth the several thousand dollars that the flooring company quotes you for a stair installation, so you can sit back with your feet up and a cup of hot coffee and watch them do it in a few hours, versus you trying to spend a week getting the cuts right and stressing out about them in general. If we have to do it again (as if), I’m paying out.
The house is still far from being in a “normal” state, when you consider that there is 400 sq. ft. of flooring in the background of that above photo, but still, it’s hard to believe that just a few months ago was this:

Our finished stairs do look good, so short of the major time investment that we endured, we’re really happy with where we landed.
We used maple bullnose boards that we bought at Lumber Liquidators, though we did spend one long evening trying to figure out if we could self-manufacture something sexier, something that maybe had a little chunkier, something contemporary and stair porn-worthy. If we were hiring out, maybe we would have found someone who could grant us this look and ensure that it would look great, but being our first stair project, we decided to follow through with what we knew our maple flooring product would vibe with, both in finish, and in the way the tongue and groove was made to work.
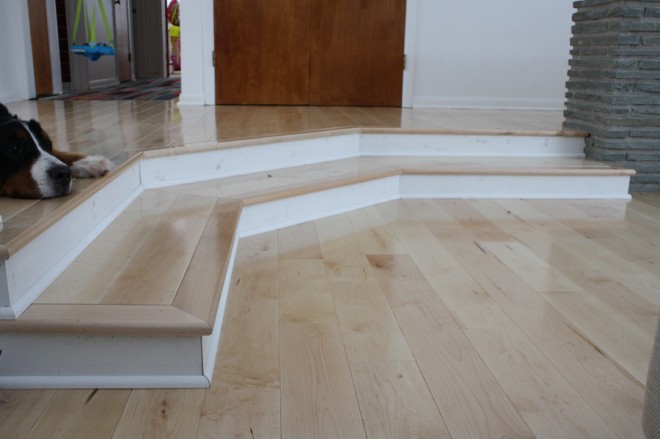
One thing I will note is that the bullnose from Lumber Liquidators is about 1/32″ shorter in height than the floorboards that it aligns with. It’s a small difference, not enough to cause you to trip, but something you notice when you walk up the stairs with bare feet. You can sort of see the variance in this photo, even though at the time I was taking a detail shot to show off the attention Pete paid to cutting and sanding boards to sit around our uneven flagstones in the planter. If, or when, the floors are sanded and refinished, this is something that will be leveled out.

Finishing the trim will require new paint throughout. Prior to getting to that, we’ve been spending time getting the new gaps properly caulked. Because we weren’t left with very many wide expanses to have to fill in, we decided to try a DAP indoor/outdoor sealant product sold in a toothpaste tube package. Instead of using the caulking gun which can inevitably be hard to control the pressure of (and be a little gloppy when you’re working in small, fine spaces), we were able to make a really, really tiny hole in the tip of the DAP tube and apply the product in a very fine stream with awesome precision.

The painting will be a quick and easy finishing step at this point. Our house is finally back to looking like normal, for the first time since last October when we set out to install the hardwood floors. Hurrah!
I owe you a serious before and after now that we are at this point–many of you have been asking for it–so I’ll get on it. Stay tuned.


4 Comments
We’re renovating a cabin and our hardwood floors are going in soon… this post made me happy we only have 1000 sqft and no stairs!
Awesome! Yes, cheers to no stairs, and good luck with your project!!
Cody looks like he’s 100% back to normal! Center of attention. Yay.
He sure is, always refusing to move out of my way when I’m taking pictures. ;)