This post was originally published on DIY Network’s blog Made + Remade in April 2015.
I’ve known for awhile that my bedroom closet had a lot of potential, and I knew that scheming a new organizational system in there was a necessity for myself (and really, it’s for no one but myself). In hindsight, especially looking at the before and after pictures in the below post, I can really appreciate how impacting of a change this was overall – I am so incredibly pleased with how I’ve reinvented this small closet space, I want to shout it for all to hear (and then I want to go shopping, because I’ve basically granted myself permission to buy more shirts).
If you’re looking for inspiration for your own easy closet makeover, check out this post first to get a better sense of why I was reinventing my closet space. And then keep on reading below, because I think you’ll be pleased with how simple and low-cost this project can be.
Step 1: Clear house.
Remove all of your clothes and shoes from the closet; hang them temporarily in other parts of the house. Photo evidence not necessary.
Step 2: Eliminate the existing storage.
In my closet, the shelf and the hanging rod would be removed.

Removing the shelf and rod carefully left me with “brackets,” as I keep referring to them as, a.k.a. the wooden braces that surround the closet.

Keep in mind that if you can salvage any of this wood, it’ll save you money along the way. The wood can be repainted and reinstalled in a different layout, and the existing hanging rod could also be reused too.
Regardless of what type of existing system you’re removing, do it all with great care. Work slowly and carefully and avoid damaging the drywall. My shelving “system” was nailed in place, so I used a prybar (and shim), and a hammer to remove all of it.

Embrace any surprises that you may find along the demo process; I found two different layers of paint dating back to the 1950′s, and it’s kind of endearing to think about how this little closet has changed over the years. I realized that I was not only going to have to re-paint the closet, but I’d also need to spend some time repairing the walls with joint compound to patch some irregularities in the drywall caused by the nails and the layers of paint.

Step 3: Make necessary repairs, and repaint your blank slate.
I spent a half an hour patching the wall, a full day letting it dry, and another hour sanding a fresh surface and cleaning up. The result? A nice, smooth base for primer and paint.

I do love color in a home, but white has been our go-to when it comes to paint, and I’ve grown to really like it. I used a paint/primer combo product, but white is surprisingly hard to coat evenly, so it still took thee coats over two days to get a nice, consistent finish in the space.
Step 4: Build your shelving.
This is a big step. And because you and I have vastly different closet orientations, what works for me might not also work for you, but it may give you some clever ideas.
On the righthand end of the closet, I planned to use the space for shoe storage and 3 open shelves, which would extend the storage space from floor to ceiling.
Along the lefthand side of my closet, the area that I previously couldn’t reach, I planned to build hanging rods to fit between the short 24″ width of the closet. See below image. The two rods would be hung at 44″ and 76″ which is a little out of the ordinary (36″ and 72″ are more typical), but I’m tall, so I can reach that high, and by raising the lower bar a little higher off the floor, my laundry basket fits nicely, and I have a little extra length to accommodate my smallassortment of dresses.
If you’re doing the math, while my old closet bar was 5′ long, I could really only reach 2′ of it because the closet door opening is only that wide. By stacking two2′ rods and installing them towards the previously unused back of the closet, I’ve created a small walk-in changing area and simultaneously almost doubled my accessible hanging space to 4′ total!

Here’s a list of what materials I used to build my closet brackets and shelving:
- 2 1x3x8′ fine pine boards: cut 4 pieces at 13″ for the hanging rod brackets, cut 6 pieces at 10″ for the open shelving brackets
- 1 1-5/16″x4′ wooden dowel
- 2 metal closet flange sets
- 7 1×6 cedar boards, each 24″ in length
- 3″ nails with brad heads
- cordless screw driver
- polyurethane
- hammer
The pine boards cut to 13″ in length would be for the hanging rods; I knew that I would need to hang the rod about 11″ out from the wall so that the hangers had enough space behind the rod. The shelves on the opposite wall needed to be a little shallower to avoid bumping into the door trim, so the boards were cut 10″ in length.
I used a palm router with a roundover bit to round one edge of each board, as a finishing detail that makes it look slightly more polished than a perfectly square mounting bracket. I’m leaving my boards natural wood because I really like a light wood on white finish, but I sanded the boards down lightly, and then applied a coat of polyurethane to seal the wood.

All of these brackets were nailed into the walls. It makes for a permanent and strong installation that will hold up for a long time (case in point, my old closet braces were as old as my house). Use a level throughout the installation process.
The benefit of installing the board with brad head nails is that they can be countersunk using a nail set, whereas if you used a traditional nail head, the round metal head would still be visible on the surface of the board.

Use a stud finder to identify studs; you’ll be best off if you can land at least one of the nails into a stud. If not, you might find that 2-3 nails is enough to make it well-affixed. Consider using heavy-duty adhesive between the wall and bracket for added reinforcement.

Installing a hanging rod on a wooden brace like this is simply more secure than installing it directly into the drywall. The flanges for closet rods manufactured these days come in various materials and colors, and you can find them at your local hardware store. One side holds the rod static in place, the other side has an opening at the top so you can slide the rod downward into place – ideal design for an everyday DIYer.

When it comes to finding a rod, you might find that you can save some money by purchasing a wooden dowel and cutting it to size. Most stores have them up to 4′ in length. Dowels packaged and marketed specifically as being closet rods tend to be priced higher… just an observation. My 4′ dowel was $6, whereas a 6′ “closet rod” dowel (shortest length in store) was over $20!
For the open shelving, I chose cedar panels for the shelf itself. I love the scent of cedar, and if it helps to keep moths off of my sweaters, I love it even more. For those reasons, I kept the wood natural (no polyurethane) but sanded it down really well to lessen the chance of it snagging any clothing fibers.
The boards themselves, once balanced on the brackets, I nailed into the wall-mounted brackets.

If you’re keeping tabs on my materials list, note that I cut 7 lengths of cedar. 6 were used for these three open shelves, and the 7th single 1×6 length was placed on top of the higher hanging rod, for a little extra storage that didn’t disrupt the hanging space. You can see this in the lighting photo at the end of Step 6.
Step 5. Create shoe storage.
To maximize footwear storage in my small closet, I ditched the idea of shoe cubbies and opted to purchase and install spring-loaded tension rods.

Each rod cost $5 for the size I needed (a 20-28″ spring-span), and I bought 8 rods for a total of $40, figuring it would be enough space to store ~20 pairs of shoes. I think that price is fairly comparable to the cost of most shoe cubbies (whether built or purchased), and the rods gave me the flexibility to install at increments that make sense for what I own.

Step 6: New lighting.
The porcelain ceiling light socket is a classic and simple fixture in many homes, but I was clearly not the only one to dabble it with ceiling paint. With the other closet upgrades in the works, I saw it as a good opportunity to update the light.

I gravitated towards a lot of midcentury inspired fixtures while looking for a new product, which led me to scour local secondhand shops until I found a solution that was appropriate for my space, authentically 1950′s, and in beautiful shape. This flush mount light was less than $50, and with three bulbs instead of one, promises to maximize the lighting potential in my new closet.

Turn off the power, and replace the ceiling light. Secure the new light in place using the hardware provided (my vintage light had all of the original hardware included – another perk that sold me on the product). On at night, it kind of looks like a full moon, right? Makes me very happy.

Step 7: Install finishing touches.
Finishing details might include hooks for jewelry and scarves, wall adornments to make your little closet feel like an extension of your decorated bedroom, or a gigantic mirror that just barely fit in the back of your car (seriously, it almost didn’t make it home). If you’re looking for a full-length mirror, you’ll find that costs for custom cut mirror glass can range from $80-150. Save yourself some money and look at secondhand and salvage shops instead – large mirrors (installed most commonly above sink areas, I’m guessing) can cost less than $50 if you get lucky.
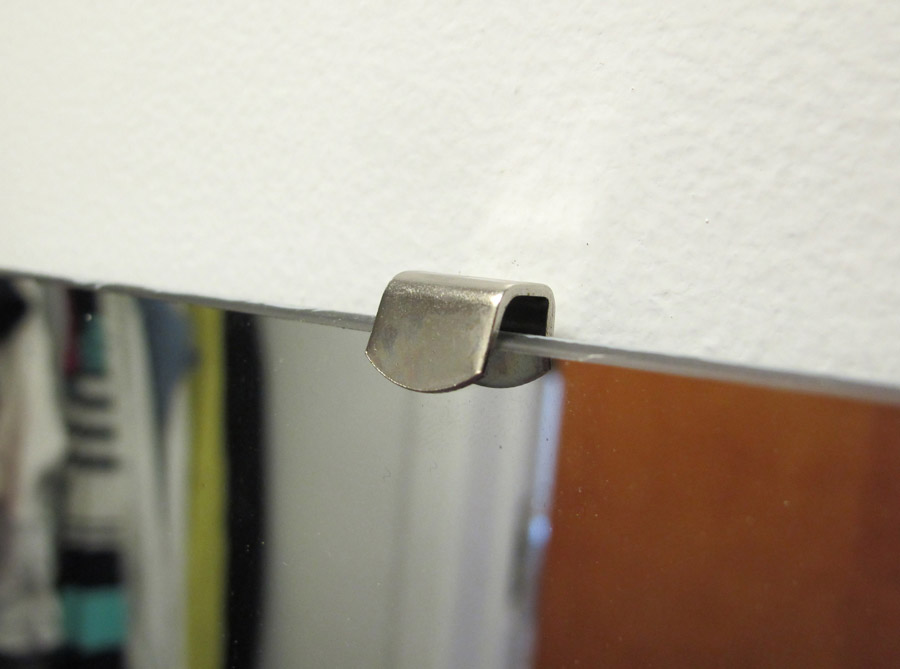
Installed vertically using mirror clips and heavy-duty adhesive for good measure, this 36″ x 60″ mirror consumes the wall space on the wall opposite the door and makes for a perfect get-ready spot. Hi!

The Finished Closet
The mirror is probably the most impacting part of the whole closet. Mirrors are used frequently to make a room look bigger, and boy, this big mirror makes my tiny 10 sq. ft. closet feel very grand.
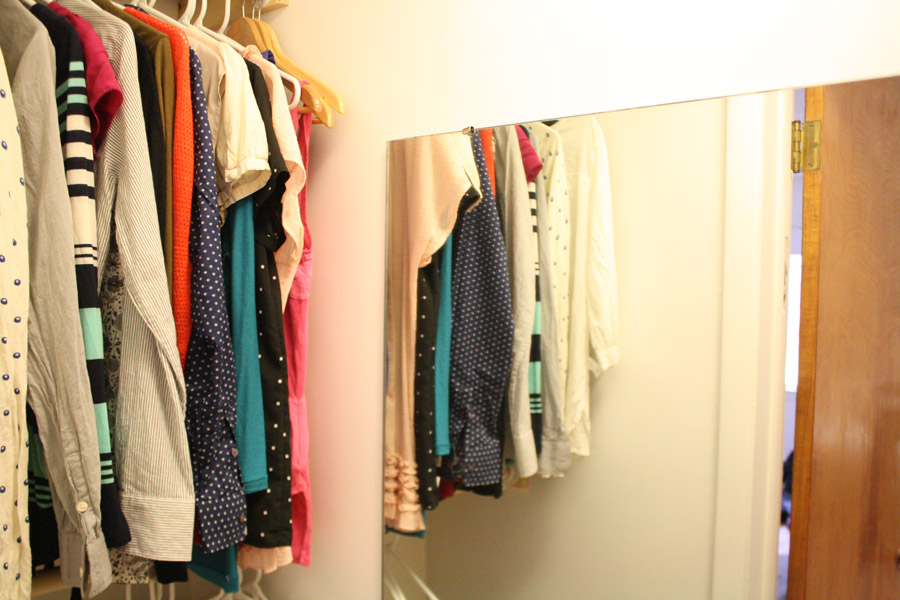
It’s nice to know that I have some closet space to grow into now, whereas before, I felt limited because so much of the space wasn’t easily accessible. I moved some of my jewelry storage onto one shelf, and a few items and a photo that had previously been on a bookshelf in the bedroom.

It’s hard to believe that this is where I was just last week:

The new and improved closet will serve me well for a long time!


3 Comments
Good job! You’ve given me some great ideas for the smaller closets in the secondary bedrooms here. I especially like the shoe storage idea. So easy.
I can’t tell you how many “make the most of your tiny closet space!” articles I’ve read looking for something exactly like this, with the tiny door in a long closet and inefficient use of the space to either side. I’d gotten as far as the two hanging bars so I guess I’m on the right track. Thank you!!
Hope it works for you! I love how functional the space is now, and am doing some variation of this in two other closets of our home too!