This post was originally published on DIY Network’s blog Made + Remade in April 2015.
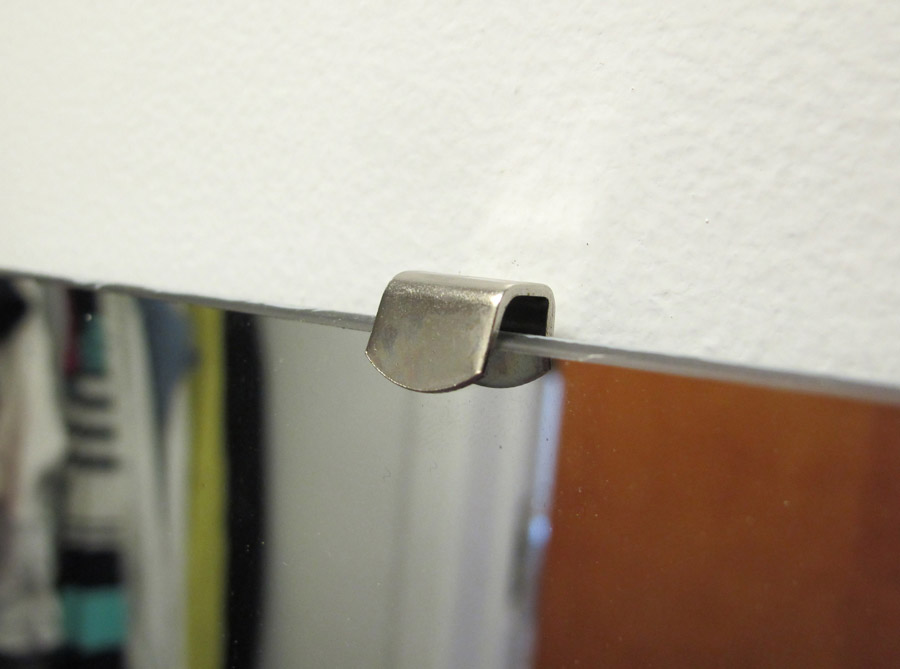
So, you want to install a mirror on the wall? Of course you do – mirrors are magic-makers! A large mirror can do wonders to reflect light and brighten a dreary space, make practical a walk-in closet, and make a tiny space feel twice as big. If you’re installing a piece of mirror glass that isn’t built into a frame, you’ll want to familiarize yourself with this hardware: the tiny, but very strong mirror clip. You can find them at any hardware store.
Unframed mirrors are my favorite for aesthetic reasons – it’s an easy modern look. The edges are always crisp and even, and they lay flush with the wall, and by lacking a frame, these mirrors feel more “seamless” and expansive in the home. There’s a lot to know about the types of mirrors available – learn more here.
My 36″x60″ mirror was the perfect addition to my remodeled closet, and installing it with mirror clips makes it a more permanent fixture.
To hang the mirror, I first measured out its size on the wall. The mirror itself didn’t land centered on studs (if it does, you lucky duck, just screw right into those!), so I knew I would need to use heavy duty anchor bolts to affix the mirror clips to the wall.
- I used 1/4″ anchor bolts, each of which required a 3/8″ hollow in the drywall. Those are big, scary holes, but don’t fret!
- The holes for mine are spaced out to be 24″ apart horizontally (top and bottom), and 58″ apart vertically (which is narrower than the 60″ height – this is because the mirror clips have a little wiggle room, and I wanted to be certain that the large holes were fully covered by the height of the mirror itself).
- I also added two clips on the sides, the holes for which aren’t visible in the below photo, but they are centered between the top and bottom clips, and spaced 35″ apart horizontally, also slightly narrower than total width of the mirror to ensure the holes would be hidden.

Install each of the mirror clips. Thread the clip onto the bolt first, and then twist the toggle onto the end of the bolt. Twist it on at least a few threads, so that it isn’t likely to pop off the end of the bolt during installation.

The anchor bolt is spring-loaded, and folds through the 3/8″ hole. When you push it through the drywall, you’ll feel the hardware pop and spring loose again on the backside of the drywall. If you tug on it lightly, you will be able to feel the toggle catch on the backside of the drywall; you should not be able to pull it back through the hole.

Using a drill or screw driver, tighten the bolts.
Tip: Pull outward on the bolt and mirror clip, so that the toggle inside of the wall grips on the drywall; this contact will allow the bolt to tighten through the toggle (otherwise, the toggle is just spinning freely behind the wall).
Tighten the lower two toggles completely – these two will support the entire weight of the mirror (no pressure, little guys). Only tighten the upper two toggles (and side bolts, if applicable) to approx. 90%. The bolts will need to be secure enough to hold the mirror clip firmly against the wall, but the clip itself will need to have the wiggle room to slide along the bolt.

Make sure that your clips on the bottom are secure and level (the photo below was taken at an angle looking into the closet, so it looks wonky).

When you’re ready, you’ll lift the mirror, and place the lower edge into those bottom clips. Lean it back against the wall, and check for level – both vertical and horizontal. If your mirror is especially big, once you’re satisfied that it is level, it wouldn’t hurt to take a moment to squeeze some heavy-duty adhesive on the backside of the mirror. Source a mirror-friendly adhesive that won’t damage or deteriorate the finish on the glass over time.
Lean the mirror back against the wall, and adjust the top and side clips so that they are aligned to slide over the edges of the glass.

Lower the clips around the mirror. They should fit right into place, locking the mirror into the metal’s grasp. The clips will stay in place – this is easy-to-use hardware.
Enjoy your new wall-mounted mirror! They’re a great addition to your home – and this one makes my closet makeover complete.

See how I transformed my bedroom closet from a small reach-in design, to a modest walk-in with lots of storage options.


Comment
Last time I made a huge mistake when installed my bathroom mirror right up to my bathroom cabinet. It was a beautiful mirror gifted by my grand pa. It was large enough to deal with. I was careless and the result was a broken mirror in front of me. I was shocked and left the broken mirror and looking for my next renovation. Thanks for your advice.