This post was originally published on DIY Network’s blog Made + Remade in January 2013.
One of the most necessary and ambitious tasks I’ve taken on since I moved into my house, is figuring out how to make the unfinished basement a purposeful and resourceful storage space. Aside from in the bedrooms, my little home only has one small closet, and it’s only large enough to hold sheets, towels, and basic household cleaning projects, nowhere near enough space for the tools we’d prefer to keep indoors, or seasonal storage.
There are a lot of things to consider if you’re planning to do any remodeling to your basement, and a lot that you can take on yourself.
Keep on reading to see what I’ve done to improve my home, taking it from a 350 sq. ft. wasted space, to a functional and organized extension of our everyday home without spending a lot of money or taking on a major renovation. It’s home improvement in the most practical, and resourceful sense.
1. Open it up.
My unfinished basement felt very partitioned; previous owners had their “game room” section. There was a “laundry room” section. A “bathroom” with a horribly rotten floor and no door. A uselessly wrapped staircase, so nothing could be stored beneath it. I love a nice, open basement, so I gutted the whole thing out (it’s wise to read up on load bearing walls before you do anything rash, mine were clearly not bearing any load, nor were many of them even attached to the ceiling joists or the floor). Removing the “bathroom” surround and the boards that encompassed the underside of the staircase opened up an extra 100 sq. ft. of available space.
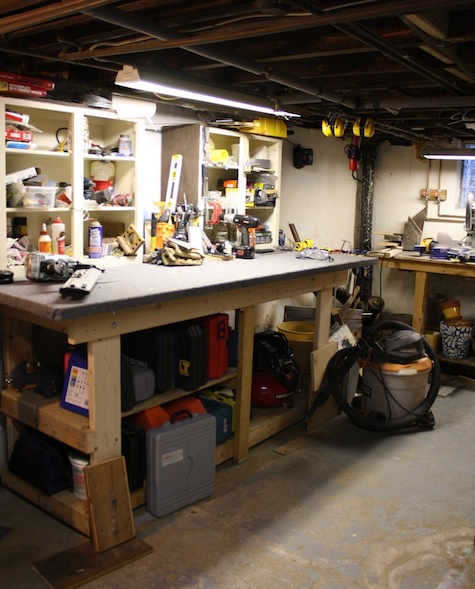
2. Build a workbench.
If you’re fortunate enough to have a basement that is large enough to double as tool storage and a large workspace, have at it. My husband and I built 2 large tiered workbenches a few years ago that consume 1/4 of our basement, but allow us a great place to store materials and work on what we love to do most, home improvement projects. They’re built custom to our home, but in such a way that we’ll be able to easily disassemble them into pieces should we ever move. Learn how we built these tables here and here.

3. Work the corners.
Not everyone’s going to have an extra 8-foot piece of scrap countertop laying around, but I did, so just this fall we installed it in one corner of the basement for additional workspace. A ledge was already built around the side of the basement shown here, and most of the weight of the countertop rests solely on that. Scrap 2×4′s were used to support the weight of the front and transform the countertop into more of a table. Let me be the first to say, it was the perfect space to wrap Christmas presents.

4. Build mammoth shelves.
For those of you who don’t have spare laminate countertop, check out one of our latest projects: BAM, that’s a big shelf.

These shelves span 10-feet and run floor to ceiling, adding more storage space than we know what to do with. It’ll be a much better place for our extra kitchen appliances and large plastic bins, but we could feasibly store all of our holiday decor and wrapping materials here too, making more room in other parts of the house. Start with a tutorial like this one from DIY Network, and customize it to fit your space.
What are your tried and true approaches to improving your basement?


Leave A Reply