• Home
  • about emily
  • before + after
  • HGTV + DIY Network
  • good press
  • contact
  • Let’s Organize These Posts:

    • Art Attack
    • Backyard
    • Barn
    • Basement
    • Bathroom
    • Beach
    • Bedrooms
    • Being Thrifty
    • Business-y
    • Buying and Renting and Selling
    • Casual Celebrations
    • Closets
    • Curb Appeal
    • Dainty Details
    • Deck
    • Decor
    • Dining Room
    • DIY
    • Dog-Related
    • Entryway
    • Flooring
    • For the Kids
    • Garage
    • Gardening
    • Helping The Economy
    • HGTV + DIY Network Projects
    • Holiday-Related Projects
    • Home Safety
    • Kitchen
    • Lighting
    • Living Room
    • Merry Travels
    • Office Space
    • Organized
    • Other Pads
    • Outdoor Living
    • Scooter Fun
    • Stairwell
    • Sunroom
    • Supporting Sponsors
    • The Art Room
    • Tools
    • Uncategorizable
    • Wedding
    • Windows
    • Work-pads
  • Search

  • Hi, I’m Emily

    Emily Fazio

    I'm a home improvement enthusiast, living a very merry DIY lifestyle.

    You can find me writing for HGTV and DIY Network, follow me on facebook and instagram, or drop me a note if you'd like. I love notes.

    Thanks for visiting!

  • BROWSE POSTS BY CATEGORY:

    • Art Attack (7)
    • Backyard (92)
    • Barn (8)
    • Basement (27)
    • Bathroom (43)
    • Beach (13)
    • Bedrooms (73)
    • Being Thrifty (53)
    • Business-y (12)
    • Buying and Renting and Selling (23)
    • Casual Celebrations (36)
    • Closets (17)
    • Curb Appeal (44)
    • Dainty Details (8)
    • Deck (23)
    • Decor (286)
    • Dining Room (37)
    • DIY (577)
    • Dog-Related (24)
    • Entryway (59)
    • Flooring (58)
    • For the Kids (32)
    • Garage (17)
    • Gardening (70)
    • Helping The Economy (30)
    • HGTV + DIY Network Projects (283)
    • Holiday-Related Projects (80)
    • Home Safety (12)
    • Kitchen (83)
    • Lighting (31)
    • Living Room (77)
    • Merry Travels (21)
    • Office Space (21)
    • Organized (41)
    • Other Pads (14)
    • Outdoor Living (12)
    • Scooter Fun (8)
    • Stairwell (20)
    • Sunroom (22)
    • Supporting Sponsors (43)
    • The Art Room (3)
    • Tools (43)
    • Uncategorizable (1)
    • Wedding (28)
    • Windows (14)
    • Work-pads (10)
  • Search

  • Pages

    • blog
    • Merrypad Features
    • Privacy Policy
    • about emily
    • before + after
      • before + after, our current home
      • before + after, our first house
    • contact me
    • choose a badge and share the merrypad.com love
  • Home
  • about emily
  • before + after
  • HGTV + DIY Network
  • good press
  • contact

A Sweet, Scandinavian-Inspired Tree Skirt

April 30, 2016

This post was originally published on DIY Network’s blog Made + Remade in December 2014.

DIY tree skirt using felting craft technique.

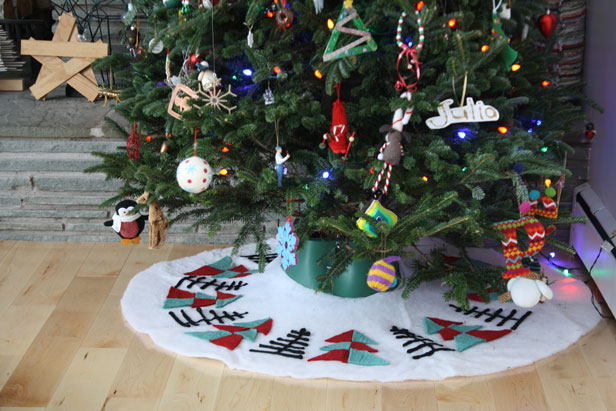
Combine my favorite holiday season + testing my hand at a new DIY skill + an effort in Scandinavian design, and what do you get? A perfect little tree skirt!

Needle felting is a craft I’ve admired a lot lately; people with experience than myself make beautiful woolen animals and objects, and decorate their wool sweaters, so when the idea arose to make a new tree skirt to coordinate with our blossoming collection of crafty Scandinavian holiday decor, I thought that needle-working it would be a great way to make something practical, while trying something new.

Materials:

  • Full-size quilt batting
  • Wool roving felted sheets (I used 2- 12″x12″ sheets, one red and one green)
  • Wool pencil roving
  • 2″ thick piece of high-density foam

Tools:

  • Sharp scissors
  • Felting needles (lots of options out there and I found one with a nice ergonomic handle, but here’s a good starter pack for felting that’s cheap)
  • Straight pins

Step 1

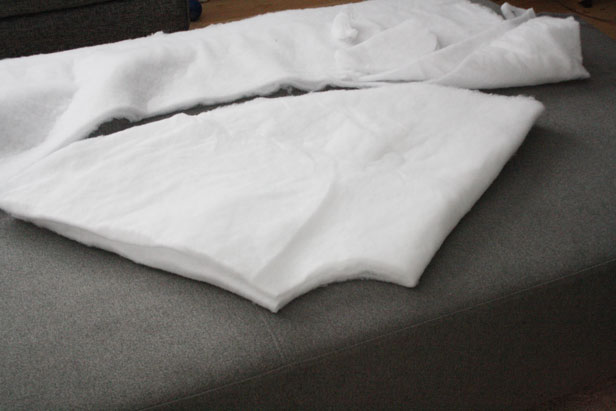
I used a package of full-size quilt batting for the base of my tree skirt. It’s fluffy, available inexpensively, and a wide size to fit well beneath a large tree.

Begin by cutting your full-size quilt batting sheet into a circle. If you fold your batting in half or into quarters, you’ll find it a little easier than trying to cut a perfect circle out of a flat sheet. 

DIY tree skirt using felting craft technique.

Step 2

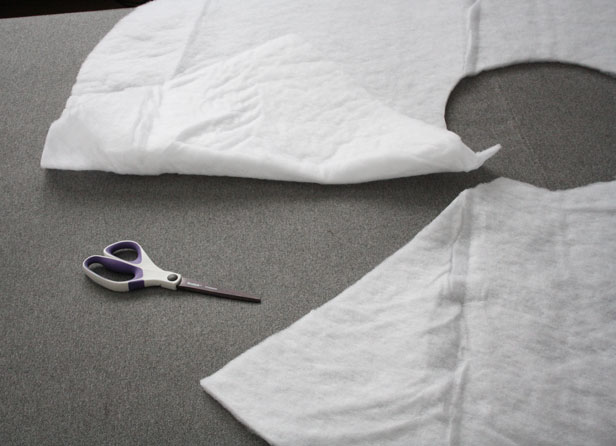
Still folded, you’ll want to cut another circle in the center of your batting that will wrap around the tree trunk and stand. 

DIY tree skirt using felting craft technique.

Step 3

Unfold your batting at this point, and trim a straight line from the outer edge to the inner circle. This will make it possible for you to slide the tree skirt around the tree. 

DIY tree skirt using felting craft technique.

Step 4

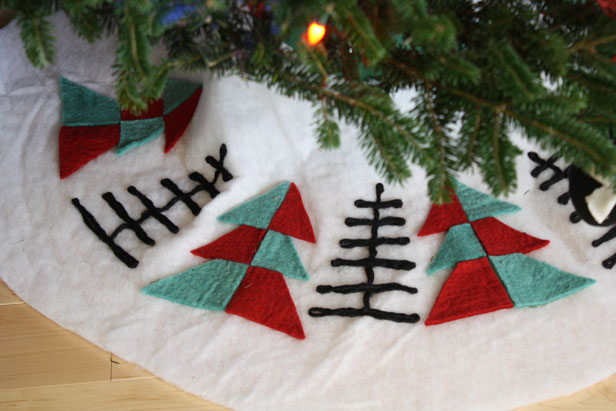
The beauty of a custom project like this is, you can take it in almost any direction to suit your holiday decor style. Choose colors to suit your own taste, and get creative with patterns. Our style is veering Scandinavian, so I gravitated towards reds and blacks, but supplemented with teal and green when I was choosing colors of wool roving and felted wool rolls at the store. In this design, I used one 12″x12″ sheet of teal, one 12″x12″ sheet of red, one black wool pencil roving (essentially, thick yarn), and a single felting needle.

DIY tree skirt using felting craft technique.

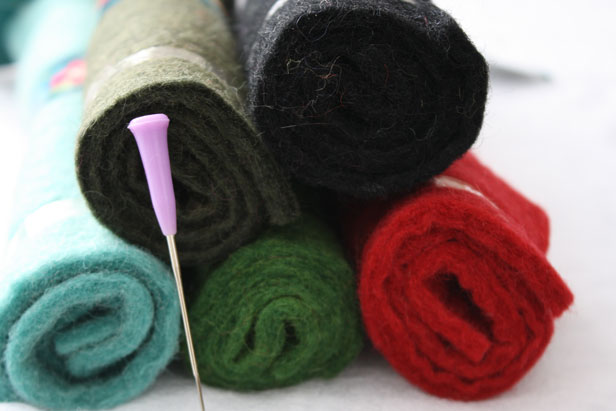
If you don’t already have one, you’ll need to buy needle felting tools. Felting needles which are different than straight pins because they have a little tooth on the end that grabs the wool fibers to force them through the layer you’re affixing them to, connecting and entangling them. I found a pack of two for $6 at my local craft store, and you’ll find that there are lots of varieties available at a range of costs. 

Step 5

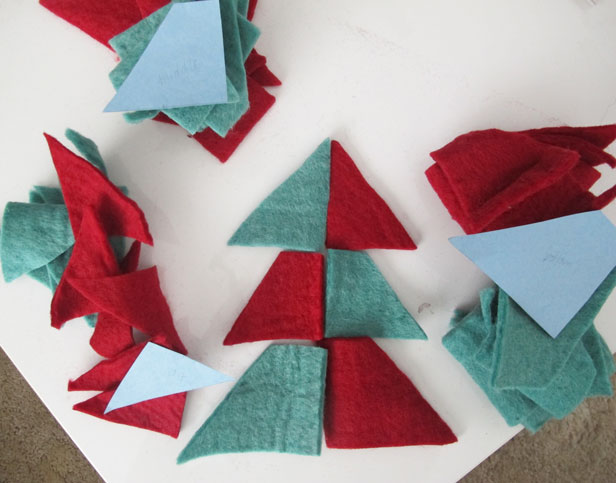
I chose to impress modern-looking trees upon my tree skirt design, and I made a template before I got cutting to help ensure that all of the pieces would be the same size, and the proportion that I wished to have. 

DIY tree skirt using felting craft technique.

Step 6

My tree was symmetrical, but with alternating red and teal colors. From the above design I trimmed the paper so that I had a template for the top, middle, and bottom sections of each tree.

From there, I trimmed carefully through each 12″x12″ sheet of felted wool, obtaining 8 tree tops, 8 tree middles, and 8 tree bottoms from each color. There was very, very little scrap remaining so be diligent to maximize each sheet, or else you’ll run short.

DIY tree skirt using felting craft technique.

Step 7

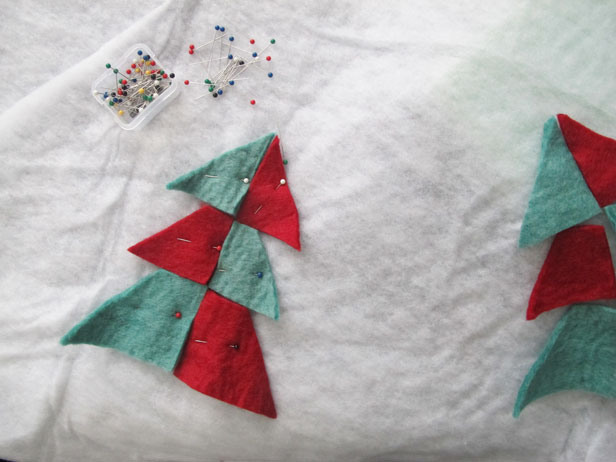
Organize your trees onto the spread out quilt batting, and attach them in place with straight pins.

DIY tree skirt using felting craft technique.

Step 8

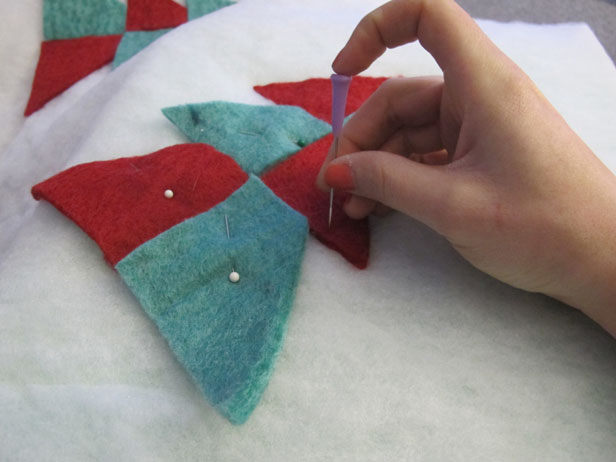
You’ll need to place your quilt batting on top of a soft surface before you begin felting with the needle. The needle and fibers will need to penetrate through something soft in order to work effectively. A small piece of styrofoam came with my felting needle, but I used a 2″ thick piece of high-density foam beneath my area so that the needle had plenty of room to plunge. It worked really well.

Use the felting needle to attach each section to the underlying batting by, essentially, using your hand like the needle on a sewing machine and POKE-POKE-POKE, STAB-STAB-STAB all around the edge and then in the middle of the area too. The needle with its toothy end will make a crunching sound as it forces through the layers, and though it took a long time to do all of the trees, I was able to see progress pretty quickly. After just a few pokes of the needle, the top lying tree design was beginning to be well-affixed to the batting. This is my new zen.

DIY tree skirt using felting craft technique.

Step 9

I had space between my colorful trees in which I planned to add in additional details; circles, snowflakes, I knew something would work well to add a little more personality to the tree skirt. I sketched a few different ideas on a sheet of paper, and ended up liking these simple black tree forms the best.

DIY tree skirt using felting craft technique.

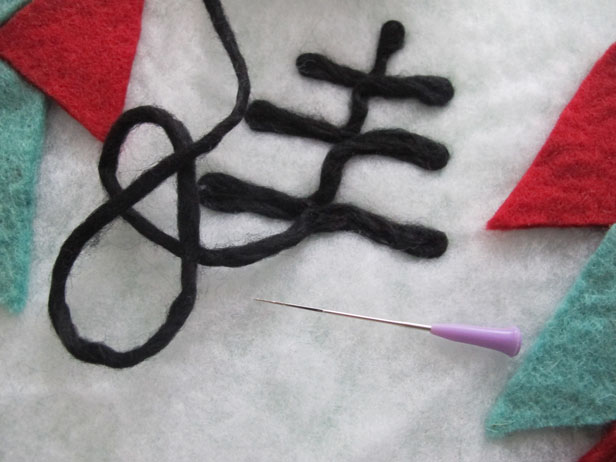
Using a length of wool pencil roving (which is wool roving pulled into a thick yarn-like length), I modeled each tree and used the felting pin to bore into the high-density foam and made the shape permanent.

Step 10

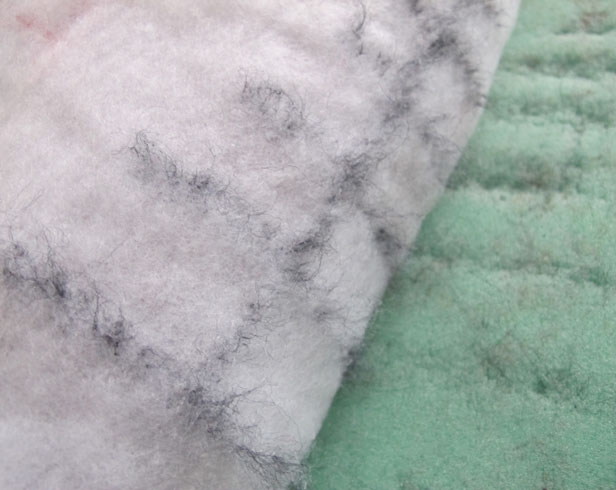
If you’re curious what it looks like from the underside of the skirt, here you can see the black threads tangling in the white batting.

DIY tree skirt using felting craft technique.

Step 11

Set up your finished piece beneath the tree, and voila! My first felted piece, and an easy tree skirt.

DIY tree skirt using felting craft technique.

Share

Decor  / DIY  / HGTV + DIY Network Projects  / Holiday-Related Projects

Emily
I'm a home improvement enthusiast, living a very merry DIY lifestyle. You can find me writing for HGTV and DIY Network, follow me on facebook and instagram, or drop me a note if you'd like. I love notes.

Leave A Reply


Leave a Reply Cancel reply

Your email address will not be published. Required fields are marked *

This site uses Akismet to reduce spam. Learn how your comment data is processed.

  • HI, I’m Emily

    Emily Fazio

    I'm a home improvement enthusiast, living a very merry DIY lifestyle. Follow me on facebook and instagram, or drop me a note if you'd like. I love notes.

    Thanks for visiting!

  • Instagram

    Can’t believe I ever bought dumpling wrappers. 🥟 Pulse a few cups of flour in the food processor drizzling in cold water until it forms dough. Roll smooth. Use a conveniently large cookie cutter, or just trim out squares. The end ❤️ #hny #dumplings
    Didn’t think I’d be making more masks, but her Didn’t think I’d be making more masks, but here we are (now feat. recycled t-shirt layer for added softness and bonus-layer protection). #diy #amateurseamstress #diymask
    Get out there ☀️ Get out there ☀️
    The gang finally showed up. 👻 The gang finally showed up. 👻
    A record 233 cloves + 10 shallots 🧛🏻‍♀️ 
#merrypadathome #garden2021 #garlic #gardennotes #whatisnormal
    ⭐️⭐️⭐️⭐️⭐️ ⭐️⭐️⭐️⭐️⭐️
    Immeasurably tall, lanky tomatillos. #garden2020 # Immeasurably tall, lanky tomatillos. #garden2020 #tomatillos #nofilter
    32 oz., reserved for the brave 🌶🌶 😍#homeg 32 oz., reserved for the brave 🌶🌶 😍#homegrown #tomatillos #harvest2020
    Nothing says “let’s stay home all fall, too” Nothing says “let’s stay home all fall, too” like a badass custom fireplace on our patio. 🔥 #chiminea #merrypadathome
    Load More... follow emily: @merrypad


  • Like Us On Facebook

    Facebook Pagelike Widget


  • Popular Posts

    • DIY sideboard rehab. Our Refinished Midcentury Buffet 38.1k views
    • How to fix an IKEA drawer. Cheap IKEA Drawers (And The Quick Fix) 38k views
    • How to design and make a barn quilt. How to Make Your Own Barn Quilt 32.6k views
    • DIY driveway removal. The Driveway Rocks 24.1k views
    • How to hang art on brick surfaces using specialty clips. The Easy Way to Hang Art on Brick or Stone 23.4k views
    • Goodbye, gold fireplace covering. Less Is More: How to Remove a Fireplace Surround 21.3k views
    • Our DIY flagstone patio. Building a Patio in One Day 16.7k views
    • Bedroom paint, freshened up with Snowbound paint. Painting Everything White: We Chose Snowbound, By Sherwin Williams 15.9k views
    • Tips for dying pasta different colors, and a Halloween Recipe for the kids. Tips for Dying Pasta Different Colors (+ A Special Halloween Recipe) 15k views
    • Finished stained kitchen cabinets. Javalicious, A Gel Staining Reveal (Update #3) 13.7k views


  • BROWSE POSTS BY CATEGORY:

    • Art Attack (7)
    • Backyard (92)
    • Barn (8)
    • Basement (27)
    • Bathroom (43)
    • Beach (13)
    • Bedrooms (73)
    • Being Thrifty (53)
    • Business-y (12)
    • Buying and Renting and Selling (23)
    • Casual Celebrations (36)
    • Closets (17)
    • Curb Appeal (44)
    • Dainty Details (8)
    • Deck (23)
    • Decor (286)
    • Dining Room (37)
    • DIY (577)
    • Dog-Related (24)
    • Entryway (59)
    • Flooring (58)
    • For the Kids (32)
    • Garage (17)
    • Gardening (70)
    • Helping The Economy (30)
    • HGTV + DIY Network Projects (283)
    • Holiday-Related Projects (80)
    • Home Safety (12)
    • Kitchen (83)
    • Lighting (31)
    • Living Room (77)
    • Merry Travels (21)
    • Office Space (21)
    • Organized (41)
    • Other Pads (14)
    • Outdoor Living (12)
    • Scooter Fun (8)
    • Stairwell (20)
    • Sunroom (22)
    • Supporting Sponsors (43)
    • The Art Room (3)
    • Tools (43)
    • Uncategorizable (1)
    • Wedding (28)
    • Windows (14)
    • Work-pads (10)


  • a little bit of everything, friends, DIY, and inspiration

    • Dadand.com < My husband and his BFF
    • DIY Network
    • HGTV
  • Get Posts Via Email

  • Some Legal

    Merrypad incorporates the occasional affiliate link to Amazon.com and Minted; we link to many other websites and products, but if it is in context of a paid sponsorship, it is always noted as such. Please review the privacy policy and contact me if you have any additional questions.

    Theme customized by Pete Fazio Creative, the guy from dadand.com.


© Copyright Merrypad