I’ve written a little bit every year to track the evolution of our backyard garden. If you want to go through those stories, feel free to do so here: 2013 (crushed by a tree), 2014, 2015, 2016, 2017, 2018, 2019, 2020, 2021, 2022.
My archives will prove that starting a garden isn’t something done in a single year. In fact, there’s no end in sight if you’re set on optimizing and finessing the space for new crops or challenges. Trying to find our way and build upon our vision is fun though. Every year brings new ideas, and building a permanent garden fence is a next-level #gardengoals.

The Backstory (Our Deerest Friends)
Any deer-trafficked yard requires a fenced-in garden. While every neighbor and expert I’ve encountered suggests no shorter than 8′ fencing, our trial years 2013-2016 only used a 4′ fence and we had no issues with deer jumping in. I mean, maybe they did jump in and I didn’t know, but we still haven’t witnessed trampled plants or tipped trellises.
I think, for us, the deer ignore the garden because we’re outdoors a lot more in the spring and summer. Our human scents and traces scare deer into keeping their distance. Plus, there’s a ton of foliage for them to eat, so no shortage of food for that four-legged crew.
When we leveled up our garden from a simple 4′-temporary-metal-fence style to a more permanent design, we raised its height using 6′ fencing. Six-foot fencing was more accessible at local stores than 8′ fence, too. We applied wisdom from our own learnings by burying one foot of fencing to discourage diggers and smaller wildlife from entering down low. So, in actuality, the finished fence is 12″ buried, and 5′ high above the ground.
Before and After
This is what we were starting with (that broken leaning tree in the background came down all by itself a few days after I snapped this, FYI):

And here’s where we are today:

The Size and Materials
The new garden is just a little bigger than the old one; it’s sized 16′ x 32′ (512 sq. ft.). It’s rectangular, not oval. We sunk 4x4x8′ posts down 2.5′ into the ground in cement, leaving 5.5′ atop so that we could attach fencing. There’s an actual gate too (as opposed to an opening that we snagged and squeezed through in the old fence).

One thing we really have working for us is the fact that our soil has a lot of sand in it. We hit the occasional root, but no rocks and no dense clay. I mean, look at this. Post holes are never easy, but we couldn’t have it easier.
If you’re curious, I did price this project in cedar. I figured I would pay a little more for cedar lumber, only to be told over the phone by the guy at the local lumberyard that it was, like, $90 per 4×4 in cedar. In a moment of complete shock exclaimed – mouth-agape, high-pitched voice – “That’s great, lemme think about how many I’ll need and I’ll stop by later.” Not. Cedar would have made this project 8x more expensive. All-in, we spent about $500 on lumber, cement, and fencing.
The posts we used are regular, untreated pine. We should have gotten pressure-treated, at the very least, but without having done a lot of research on how much the treatment would leach into the soil, I instinctively went the safe route. (Would come to learn that PT isn’t terribly bad for soil these days. It allegedly would kill the plants before harming the edible fruit, so we’ll just have to deal with rotting posts sooner as a result of not using them.) We did use PT for the horizontal pieces along the front and top of the fence, as neither come in contact with the ground. Editors’ Update 2023: Splurge on the PT posts.
Staining the Wood
Prior to installing the posts, I stained them using what is still my *absolute favorite* stain, a natural solution of dissolved steel wool in apple cider vinegar. The stain I used had been sitting in the basement for a few years untouched, and man-oh-man was it concentrated. Normally it takes a few months to achieve a dark stain using this finish, but within a day, these posts looked fantastic.

Leveling the Posts
Our ground isn’t level, so there was some level of complexity with respect to getting a fence that looks level. After we got all 13 posts secured in cement, we wanted to make sure the top of the fence looked level. What worked really well for us was to decide on the height of the fence, mark it at one post, and then run a horizontal board along to all of the other posts. Working one at a time and using a level to transfer the marking all of the way around, we achieved our goal.
The height of the finished fence is between 50″-60″, varying slightly because of the unevenness of the underlying ground but looking visually straight along the top.
Attaching the Fencing
Originally, I thought we would just wrap the entire length of steel fence around the new posts in one long sheet. We eventually surrendered to that idea when we realized we were inviting ourselves to a damn wrestling match. Instead, we trimmed 8′ lengths of fencing so that they could be attached individually, post-to-post-to-post.
I singlehandedly cut and installed 12 steel fence panels in half of a day, using metal snips to cut, and a pneumatic stapler to attach the fencing at the height we previously marked. Most aspects of this project were easily done solo, but would go a lot faster with a partner or crew, which is probably nice for you to keep in mind.

Trimming the fence into 8-foot lengths made it a lot easier to sink the fencing about 6″-12″ into the ground to ward off animals that–in our experience–try to burrow beneath the fence, or dig their way through. 6″-12″ certainly might not be enough deterrent for the strong-willed, I mean, what’s to say that anything isn’t going to dig deeper to get where he wants to go? We’re testing it out to see how it rolls, and we can adapt if necessary.
To make things even more complicated for the burrowing guys, I curled the end of the fencing underground when there was any excess. Get it in the hole!

I also purchased a length of plastic fence/netting to defend the lower 18″ of the garden fence from smaller intruders. Six inches of that 18″ width is also buried underground. The metal fence has 4″x6″ openings which is still wide enough for a lot of animals to squeeze through. The added layer of defense supplies smaller 1″x1″ square openings. Just a bit tougher for common yard folk to squeeze through.
I backfilled the buried fencing with soil and tamped it to be level with the grass in the yard. Then, we turned our attention to planting and finishing a custom garden gate.
Quickly, the list of what we’re growing this year includes:
- Basil
- Cilantro
- Sugar snap peas
- String beans
- Spinach
- Garlic (planted last fall, worked our construction around them)
- Tomatoes (6 varieties, grown from seed by my parents)
- Cucumbers
- Eggplants
- Sunflowers (the only florals)
- Leeks
- Strawberries
- Blueberries (though at last check, the birds ate the few berries on the plant)
- and Potatoes in two containers located on our back patio (The deer have *not* eaten them!)

Building the Garden Gate
Pete’s the brains behind the garden gate and kept the construction simple and strong.
A little bit of research told us how to brace the rectangular frame so that it resisted sagging (note: it’s the opposite of what we thought). We pimped it out with self-closing hinges and a latch that’s easy for the kids to maneuver. We avoided hinging the door on the corner post, thinking it might be more susceptible to weakening over time. And lastly, we built a ramp using some spare pavers so that the door closes to sit almost right atop them. It’s a good fit. (Editor’s Update 2023: Still love this door.)

To stain the door, I made a second batch of vinegar/steel wool stain. The vinegar dissolved the steel wool in 3 weeks. We used it both for the door, cross-pieces, and the trim. The newer batch of steel wool wasn’t as concentrated as the solution I had in the basement from two years ago, but it continues to age and darken wood for months after application. I’m confident that by next year, all of the boards will be more similar in color. (Editors’ Update 2023: Still holding strong :) )
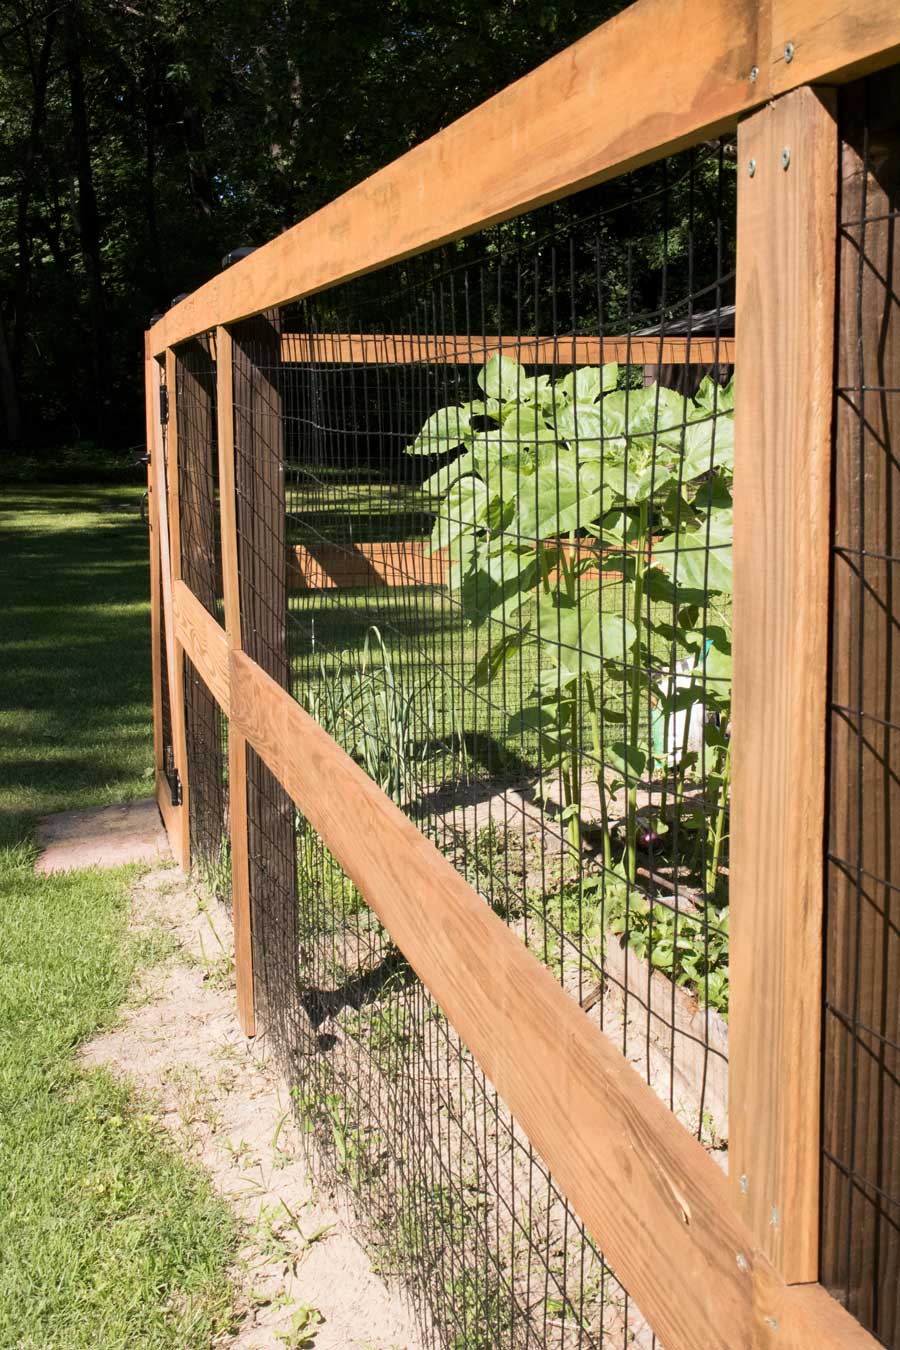
Fence Details
We added two horizontal fence pieces between each post – 1×4 at the top, and 1×6 across the middle – and then pieced in 1×4 trim pieces vertically along the fronts of the 4×4 posts. It looks nicely finished and offers a lot of sunlight.
We used screws for everything so that any component of this fence can be easily adjusted if/as necessary. Natural lighting in our garden has been steadily improving. When we cut down one of the big trees in the middle of the yard this spring, we opened the garden up to bonus afternoon sunlight.
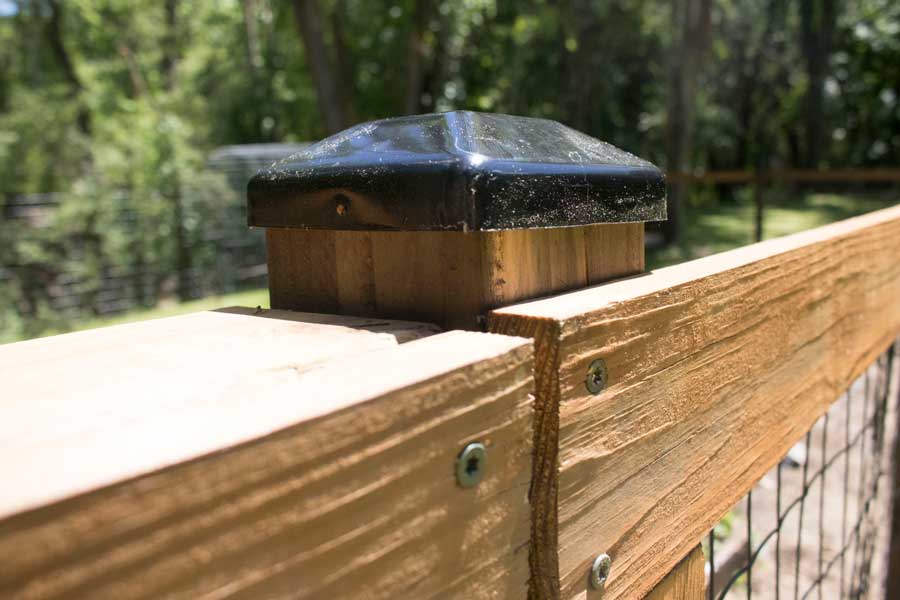
We added plastic caps to the top of the posts to help prevent rain from soaking in. These are the plastic post caps we got from Amazon (aff link) and we totally thought they’d squeeze onto the post snugly like a swimming cap, but they measure a little too big and overhang the 3.5″x3.5″ post in every direction… so buy a different kind. It’s a super frustrating finishing touch to this project. We added pin nails around the edge to keep them in place. In all fairness, that’s how the manufacturer intended, but it wasn’t how we thought it would work. Our alt plan? Custom copper caps that would patina like champs. Maybe in the future!
Here’s one more before + after for comparison; so nice to finally have this special garden in our own yard!
Before: Simple 4′ metal fence.

After: Customized wooden fence with gate. Note that the tree in the upper right was taken down! It looks far away but actually used to cast a big afternoon shadow on the garden in previous years. It was a male mulberry tree and we loved it, right up until the day it presented a large and threatening crack.
UPDATE 2023: Our backyard garden is still one of our favorite things about this home. I would recommend pressure-treated posts. Two of ours are wobbly (but have not been replaced yet). We’ve had a few instances where animals have tried to bury under (chipmunks) but no deer have leaped into the garden, despite the fence being shorter than 8′.
The only thing we wish is that we had made this garden BIGGER! We didn’t anticipate how quickly 500 sq. ft. could fill up with plants come late summer, but my-my, it does. If you have plans to experiment with lots of fruits and veggies, don’t hesitate to build larger than you think you’ll need.


23 Comments
Your garden looks great!
Also, I think you’ve convinced me to try the steel wool in apple cider vinegar stain on some shelves we may be making for a local retail store. PS – Totally forgot you brewed your stain in a vase. That seems something I would do. :)
Without a doubt, try it. Just keep in mind that it will continue to darken over time – in most applications, the end result after several months is a rich mocha brown (so approp.)
Definitely make it in giant container. The biggest one you have. It keeps well :)
I love the final look! It looks very neat and well-done. Thank you for sharing the details, now I’m dying to make one myself lol
That garden fence is on point! I will definitely be building one similar, I like the look, but I think I need to go taller for sure. I have deer that could easily hop that fence.
Great garden ideas! What did you do to achieve a good looking edge around the outside and inside edge of your fence to eliminate weeds?
I weed around the edges often!
Thank you so much for posting this! We have a raised bed garden, and this will be the perfect fencing enclosure to match the aesthetic of our backyard, barn, and chicken coop! I especially can’t wait to try the ACV and steel wool stain!
Good luck on your project! The stain is awesome.
Hello, great gaden… quick question, is there a reason why you didn’t put wood all around the base of the frame? I was looking to do a similar gaden, and was thinking of adding that component.
Great Job!
Quick question is there a reason why you didnt put a board on the (bottom) base of the frame… surround it on all sides?
Two reasons, actually! 1) Inevitable exposure to moisture/premature rotting if the bottom board was resting along the ground. 2) It would draw attention to the fact that the ground is not 100% level from left to right. There’s a difference of about 6″ across the 28′ span.
Hello! How far apart did you space the posts?
Thanks!
Eight feet!
I just found your site today and I think your project is just great and inspiring. Thanks also for the detailed presentation. Please keep it up.
Best regards
Karl Heinz
Hello! I love your garden fence and am currently following your process! Random question…did you drill a hole for both of the posts used to make your door? Or did you only dig post holes for the 8′ spacing? It looks like the post that your door hinges attach to doesn’t go into the ground like the others
Hey Alex! Both posts are definitely sunk in concrete for stability. Without going to double-check the exact measurements, the door may be 2′ wide while the fence panel beside it is 6′ wide, totaling 8′. All other sections of the fence are 8′.
HI Emily — we are looking to do something similar in our yard. Where did you get the fence wire?
I’m not exactly sure where I bought it, but it’s the type of fencing that’s readily available at any hardware store!
The before-and-after photos truly showcase the transformative power of your garden fence. The improved aesthetics and the practical benefits are striking. Your passion for DIY projects and the care you put into sharing your knowledge shine through in every aspect of this post.
Looks great! Can you say more about the wire fencing you used? Was is a 4′ high and you used 2 sections for each 8′ section of fence? Or is it a 6′ high roll that you put on length-wise and buried whatever was left over in the ground? Hope that makes sense. Thanks.
It was a 6’ high piece of fence with about 1’ buried underground! Think: a roll sold that measures 6’x100’.
Great looking fence! Is the gate built with 4x4s or 2x4s?
2x4s!