• Home
  • about emily
  • before + after
  • HGTV + DIY Network
  • good press
  • contact
  • Let’s Organize These Posts:

    • Art Attack
    • Backyard
    • Barn
    • Basement
    • Bathroom
    • Beach
    • Bedrooms
    • Being Thrifty
    • Business-y
    • Buying and Renting and Selling
    • Casual Celebrations
    • Closets
    • Curb Appeal
    • Dainty Details
    • Deck
    • Decor
    • Dining Room
    • DIY
    • Dog-Related
    • Entryway
    • Flooring
    • For the Kids
    • Garage
    • Gardening
    • Helping The Economy
    • HGTV + DIY Network Projects
    • Holiday-Related Projects
    • Home Safety
    • Kitchen
    • Lighting
    • Living Room
    • Merry Travels
    • Office Space
    • Organized
    • Other Pads
    • Outdoor Living
    • Scooter Fun
    • Stairwell
    • Sunroom
    • Supporting Sponsors
    • The Art Room
    • Tools
    • Uncategorizable
    • Wedding
    • Windows
    • Work-pads
  • Search

  • Hi, I’m Emily

    Emily Fazio

    I'm a home improvement enthusiast, living a very merry DIY lifestyle.

    You can find me writing for HGTV and DIY Network, follow me on facebook and instagram, or drop me a note if you'd like. I love notes.

    Thanks for visiting!

  • BROWSE POSTS BY CATEGORY:

    • Art Attack (7)
    • Backyard (92)
    • Barn (8)
    • Basement (27)
    • Bathroom (43)
    • Beach (13)
    • Bedrooms (73)
    • Being Thrifty (53)
    • Business-y (12)
    • Buying and Renting and Selling (23)
    • Casual Celebrations (36)
    • Closets (17)
    • Curb Appeal (44)
    • Dainty Details (8)
    • Deck (23)
    • Decor (286)
    • Dining Room (37)
    • DIY (577)
    • Dog-Related (24)
    • Entryway (59)
    • Flooring (58)
    • For the Kids (32)
    • Garage (17)
    • Gardening (70)
    • Helping The Economy (30)
    • HGTV + DIY Network Projects (283)
    • Holiday-Related Projects (80)
    • Home Safety (12)
    • Kitchen (84)
    • Lighting (31)
    • Living Room (77)
    • Merry Travels (21)
    • Office Space (21)
    • Organized (41)
    • Other Pads (14)
    • Outdoor Living (12)
    • Scooter Fun (8)
    • Stairwell (20)
    • Sunroom (22)
    • Supporting Sponsors (43)
    • The Art Room (3)
    • Tools (43)
    • Uncategorizable (1)
    • Wedding (28)
    • Windows (14)
    • Work-pads (10)
  • Search

  • Pages

    • blog
    • Good Press: Special Features, Freelance Projects, and Long-Term Clients
    • Privacy Policy
    • about emily
    • before + after
      • before + after – transforming my first home
      • before + after, our current home
    • contact me
    • choose a badge and share the merrypad.com love
  • Home
  • about emily
  • before + after
  • HGTV + DIY Network
  • good press
  • contact

The Famous Rainbow Barn Quilt

October 6, 2017

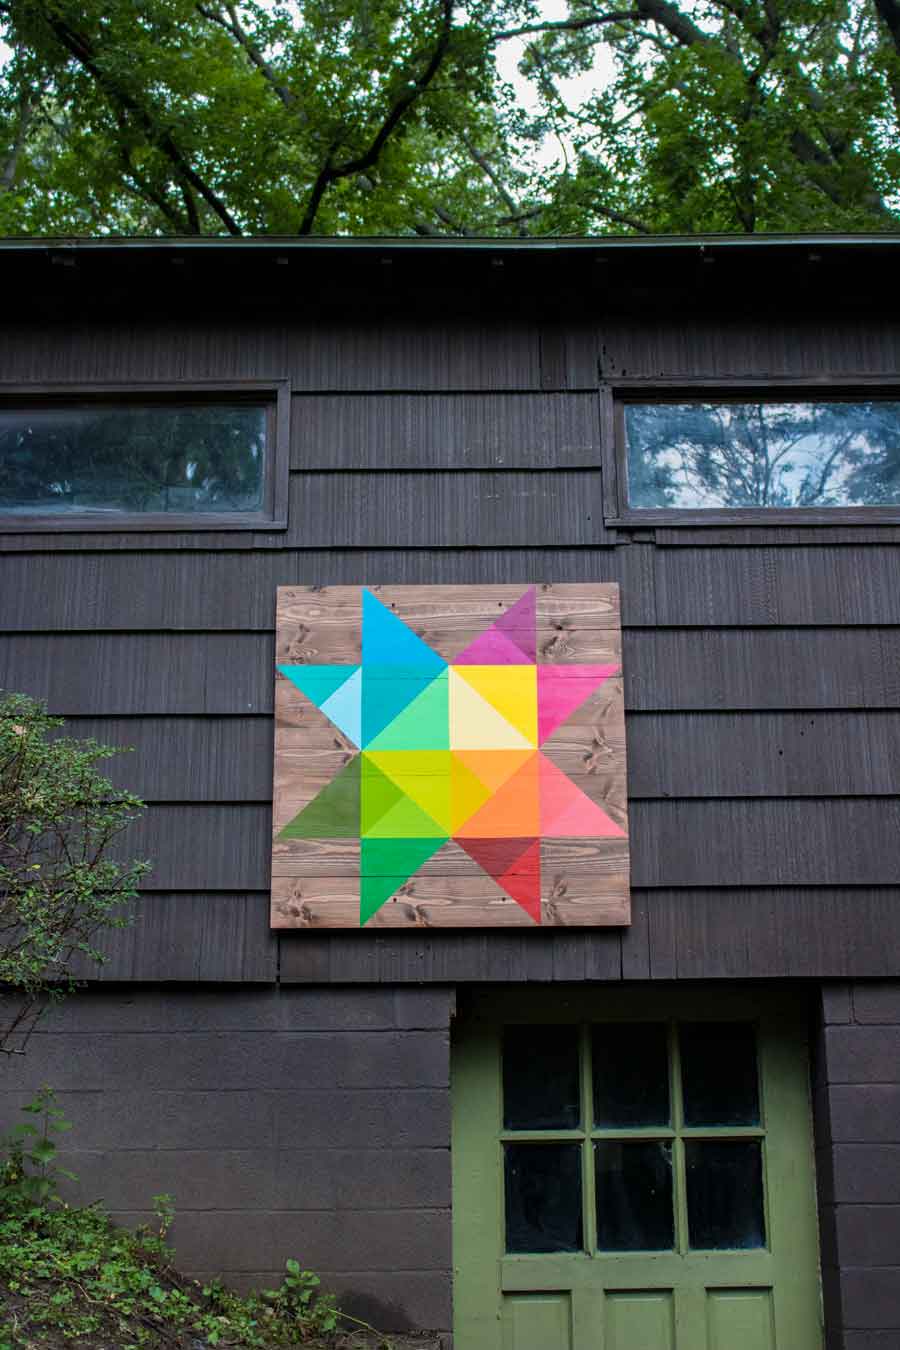
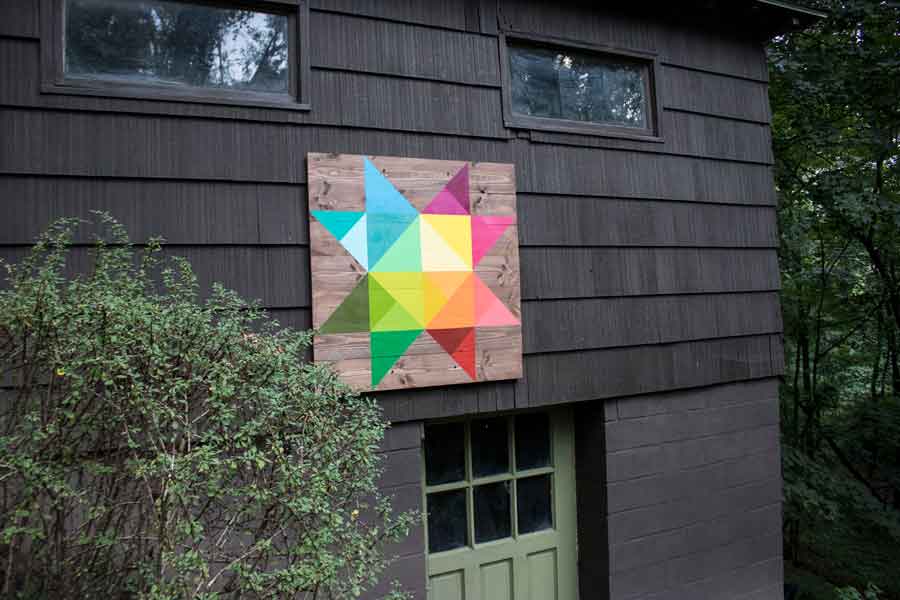
The barn quilt originally created for me in a partnership with DIY Network is a special project–one that catches my eye daily.

A handmade, hand-painted barn quilt made featuring modern, vivid colors / diy network

The Designer

I’ve followed Buffalo-native Whitney Crispell for quite some time on Instagram, and when she announced that she was launching her own heirloom quilting business @localcolorquilts, I crossed my fingers and hoped she’d be willing to collaborate with me on a unique design. Her use of color! Her appreciation for modern design and pattern! So refreshing. Her projects always caught my eye and earned a double tap. She bit the bait, agreed to an interview for HGTV.com, and the rest is history.

Lucky day! 🌈 We had the pleasure of visiting with @whitneyarlene of @localcolorquilts and her lovely family. Whitney’s design was used for the barn quilt I created for @diynetwork, and it was fun to let her see it in person. We’re in total agreement that you should make one too. Barn quilt all the things! Thanks again, Whitney! #linkinbio. . . . #diynetwork #localcolorquilts #diy #barnquilt #heirloomquilt #painttherainbow #lovehome #makesomethingeveryday #merrypadathome

A post shared by Emily Fazio at Merrypad (@merrypad) on Sep 24, 2017 at 1:22pm PDT

For decades, I’ve admired the colorful, painted quilts adorning rural barns in my travels. The hand-painted wooden decor is a nod towards heirloom quilting, and quite literally can be described as an ornate quilt design that is applied to a barn as an outdoor decoration. Barn quilting became “a thing” with the help of Donna Sue Groves, as she sought a way to commemorate her mother. The popularity of barn quilting continued to grow as a means for community togetherness (so hygge!) and spurs agri-tourism around the United States and Canada. More than 7,000 barn quilts are mapped on quilt trails through both private and public property, and sought after by niche travelers.

A barn quilt can be anything you want it to be–simple or ornate–but its elements of color, contrast and symmetry are always prevalent, and visually tie it back to the art of heirloom quilting.

After I painted the barn, I knew I wanted to install a quilt of my own. Whitney had the vision and attention to detail that I was lacking and contributed the pattern and color palette. (She actually gave me a lot of designs – her reinvention of some classic quilting patterns is worth some gold. If you want a cool, original pattern for yourself, you might want to get in touch with Whitney).

Painting a modern barn quilt.

Step 1: Select Your Design and Buy Paint

Whitney at Local Color Quilts in Buffalo, NY was the brains behind the design I used for this barn quilt. An accomplished quilter with a unique perspective on color, she modernized a traditional star design with a refreshingly bright color palette that would work perfectly on my dark brown-stained barn. Matching paint colors to the palette that she selected for the design was easy; many paint manufacturers have apps that help you match colors in your photos to paint chips in their respective line of colors, so I was able to go to the paint store armed with the paint codes for the 18 shades that I needed for the design. I only needed to purchase the $3 sample containers for the project – so keep in mind to choose the smallest samples sold in-store.

Step 2: Select and Cut Lumber For Your Barn Quilt

Bear in mind the size of the barn quilt you want to make when selecting your lumber. Many traditional barn quilts are 8-foot squares, but the space available on my barn wasn’t quite so big. I scaled down so that my quilt was built upon a 4’x4’ piece of 1/4” plywood base, and planed 1×8 pine boards. Before making any cuts, I dry-fit 7 of the pine boards together, and measured to find that the quilt could, at max, be a 50” square. I cut all boards to that length.

I was able to source the wood from trees cut down on my parents’ property, which my Dad had planed into gorgeous, red spruce boards. He had been saving them for a long time, and I managed to convince him this was the project that would do them right.

Step 3: Stain and Assemble Wood For a Barn Quilt

Staining is optional, really – It’s perfectly awesome to leave the boards natural since they will weather with time, and no judgment if you decide to paint the base either. I stained the pine boards in my project using the same color stain used for the siding on the barn itself but diluted with a little water to allow some transparency and allow the grain of the wood to show through.

If you’re applying stain, forget to coat the edges of the boards, as well as any areas of the 4×4 base plywood that might be visible.

Once the stain has dried, flip the boards over, line them up into a perfect square, and lay the plywood atop it. Drill 1-1/4” screws through the plywood and into each board, all the while making sure that the boards aren’t shifting. I put 6 screws into each board.

Step 4: Measure and Tape Before Painting

Following the modern star design from Whitney, I blocked off the base of the barn quilt into 16 even squares. For demonstration purposes here, I used blue tape in the first photo, but you’ll just need to make accurate marks using a pencil, ruler, and long straight edge (a 4’ level is usually my go-to for long straight lines).

Step 5: Paint Your Barn Quilt

Painter’s tape will be your BFF. The painting process will probably take you a couple of days, but it could be done in one day with some patience. It’s really easy to make quick progress at the beginning of the project because you can mask painter’s tape along your pencil lines in different areas of your design, and apply several colors at the same time. Towards the end of the project is where I started to slow down – my final spaces were in close proximity, so I needed to wait for one color to try before taping off the next section. Each space will require 2-3 coats of paint, but working outdoors with nice air flow helps the paint dry fast.

Step 6: Hanging a Barn Quilt

Certainly one of the most attractive pieces of art I’ve ever painted! Also one of the heaviest. As a 50” square, the barn quilt weighed easily 50 pounds, and I knew it would be a challenge to install it on the side of our barn.

I used no fancy joinery with this project. I briefly considered biscuits but didn’t think they’d be strong enough alone. There is no fancy hanging apparatus, either. I mounted the red spruce to a piece of plywood, and then straight to the wall of the barn with some 5″ bolts, and that’s where it will probably remain until the structure completely decays.

You’re definitely going to want to get the barn quilt of this size into some studs. You can probably trust some toggle bolts, but go for the studs if it’s an option.

I pre-determined where to anchor it by drilling out from the inside of the barn beside my target studs, and then installed a 2×6 board as a ledger for the barn quilt to sit upon while we attached it into those studs using 5” bolts. Once the art is installed–I used two bolts on the top and two on the bottom–you can remove the ledger and step back to admire your beautiful, modern barn quilt.

Wooden boards sourced locally from Buffalo, NY to be used in a handmade barn quilt.

I can finally share this! 🌈 Last week I added some magical outdoor art to the wall of our barn. 22 colors from the rainbow as designed by the super talented Whitney Crispell of @localcolorquilts, and featured on @diynetwork. Votes are in: Barn quilts on all of the things! (There’s also an awesome interview with Whitney on @hgtv; search for it.) Shortly after we installed it, I found @dadandblog and his baby labor adding a nice paver edging to help guide rain water that drips from the barn roof (no gutters). 💦 . . . #thingswedo #merrypadathome #diynetwork #diy #makesomethingeveryday #barnquilt #handmade #crafty #teachthemyoung #barnmakeover

A post shared by Emily Fazio at Merrypad (@merrypad) on Aug 31, 2017 at 6:46pm PDT

Modern, rainbow-colored barn quilt on our mid-century home's outbuilding.

How to build and paint a modern barn quilt as a nod to traditional outdoor decor.

Share

Barn  / DIY  / HGTV + DIY Network Projects

Emily
I'm a home improvement enthusiast, living a very merry DIY lifestyle. I've been a freelancer writer for 10+ years and you can find my work on popular home and garden sites, like HGTV.com. Follow me on facebook and instagram, or drop me a note.

9 Comments


Diego Lopes
October 11, 2017 at 2:46 pm
Reply

It looks really beautiful, you did an amazing job there!


Laurie
June 10, 2018 at 11:03 am
Reply

I’m curious about the app you’re using to plan the color layout. Can you tell me which app it is?


    Emily
    June 11, 2018 at 3:21 pm

    Hi Laurie, I have no affiliation to Behr, but its “Color Smart” app was what I used. It reads colors off a photo on your device, and attempts to match it to a color in the Behr palette. For colors that didn’t have a close match, I just used paint swatches in-store from brands other than Behr. Hope this helps!

LINDA DORN
September 17, 2019 at 9:54 am
Reply

Can you tell me what were the 18 color codes and the quilt pattern used for the project .
I just love the color palette and design. This is my first attempt at trying this project and need all the help I can get .
Thanks.


    Emily
    October 1, 2019 at 9:14 am

    Definitely cannot share the secret sauce with you, Linda! Choose what you like and it will be wonderful. Send a picture of the finished piece when you have a chance!

LINDA
September 17, 2019 at 12:31 pm
Reply

Hi Laurie,
I absolutely love this color palette and design.
Can you please tell me what the color codes were for the paints used and the name of quilt design.
I am thinking of using 4’x4′ piece of MDO sign board. Is that the size you used?
This is my first attempt at making a barn quilt. I need all the help I can get.
Thanks so much !!


Nippon
December 24, 2019 at 5:08 am
Reply

I think it’s just great!! Incredible work!!


Sarah
April 13, 2022 at 12:20 pm
Reply

Hello! The link to tutorial does not work anymore! Can you provide a new link? Thanks!!!


    Emily
    April 13, 2022 at 12:25 pm

    Here you go, Sarah! Thanks for letting me know. https://photos.hgtv.com/content/diy-com/en/how-to/make-and-decorate/decorating/how-tos/2017/h/diy-modern-barn-quilt.html

Leave a Reply Cancel reply

Your email address will not be published. Required fields are marked *

This site uses Akismet to reduce spam. Learn how your comment data is processed.

  • HI, I’m Emily

    Emily Fazio

    I'm a home improvement enthusiast, living a very merry DIY lifestyle. Follow me on facebook and instagram, or drop me a note if you'd like. I love notes.

    Thanks for visiting!

  • Instagram

    merrypad

    Merrypad // Emily Fazio
    pumpkin patch is doing great✌️#year1 #squashbl pumpkin patch is doing great✌️#year1 #squashblossoms #pumpkinpatch
    I’ve overdone it. #2023gardennotes I’ve overdone it. #2023gardennotes
    I’m not great at weeding my mulched beds, but I I’m not great at weeding my mulched beds, but I am very good at transplanting thousands of pachysandra like little bouquets so within 3 years they’ll consume the entire area ✌️ #earnyourallowance #pachysandra #gardening #merrypadathome
    One magic blossom from the peony roots transplante One magic blossom from the peony roots transplanted in April ❤️
    IT’S SCAPE SZN! IT’S SCAPE SZN!
    The biggest learning from my first year of pumpkin The biggest learning from my first year of pumpkin farming: no need to start seeds weeks in advance. These sprouted in 3 days indoors, and I was able to easily move them to the farm with minimal disturbance before they outgrew their tiny little upcycled egg carton pods. The seedlings I started in April in larger containers were very lanky at transplant and do not seem as hearty. They THRIVE when transplanted at this size! 📓 #gardennotes #garden2023 #pumpkinfarming #gourdfarming
    #2023garden pathways sponsored by pine tree bark 👩‍🌾👍 

#repurposedwood #merrypadathome
    Load More... follow emily: @merrypad


  • Like Us On Facebook

    Facebook Pagelike Widget


  • Popular Posts

    • How to fix an IKEA drawer. The Easy Fix For Broken IKEA Drawers 74.2k views
    • DIY sideboard rehab. 7 Steps for Restoring an Old Midcentury Sideboard Buffet 62.7k views
    • How to design and make a barn quilt. How to Make Your Own Barn Quilt 55.2k views
    • How to hang art on brick surfaces using specialty clips. The Easy Way to Hang Art on Brick or Stone 44.6k views
    • Our DIY flagstone patio. Building a Flagstone Patio in One Day 40.4k views
    • DIY driveway removal. How to Remove an Old Asphalt Driveway 36.9k views
    • Fix an ikea dresser drawer. Life Support For An IKEA Dresser 35.7k views
    • Tips for dying pasta different colors, and a Halloween Recipe for the kids. How to Dye Pasta Different Colors (Halloween Recipe) 35.2k views
    • Goodbye, gold fireplace covering. Less Is More: How to Remove a Fireplace Surround 31.6k views
    • After: Custom wooden garden fence. Designing a Durable Wooden Fence For Our Beautiful Backyard Garden 29.6k views


  • BROWSE POSTS BY CATEGORY:

    • Art Attack (7)
    • Backyard (92)
    • Barn (8)
    • Basement (27)
    • Bathroom (43)
    • Beach (13)
    • Bedrooms (73)
    • Being Thrifty (53)
    • Business-y (12)
    • Buying and Renting and Selling (23)
    • Casual Celebrations (36)
    • Closets (17)
    • Curb Appeal (44)
    • Dainty Details (8)
    • Deck (23)
    • Decor (286)
    • Dining Room (37)
    • DIY (577)
    • Dog-Related (24)
    • Entryway (59)
    • Flooring (58)
    • For the Kids (32)
    • Garage (17)
    • Gardening (70)
    • Helping The Economy (30)
    • HGTV + DIY Network Projects (283)
    • Holiday-Related Projects (80)
    • Home Safety (12)
    • Kitchen (84)
    • Lighting (31)
    • Living Room (77)
    • Merry Travels (21)
    • Office Space (21)
    • Organized (41)
    • Other Pads (14)
    • Outdoor Living (12)
    • Scooter Fun (8)
    • Stairwell (20)
    • Sunroom (22)
    • Supporting Sponsors (43)
    • The Art Room (3)
    • Tools (43)
    • Uncategorizable (1)
    • Wedding (28)
    • Windows (14)
    • Work-pads (10)


  • a little bit of everything, friends, DIY, and inspiration

    • Dadand.com < My husband and his BFF
    • HGTV
  • Some Legal

    Merrypad incorporates the occasional affiliate link to Amazon.com and Minted; we link to many other websites and products, but if it is in context of a paid sponsorship, it is always noted as such. Please review the privacy policy and contact me if you have any additional questions.

    Theme customized by Pete Fazio Creative, the guy from dadand.com.


© Copyright Merrypad