I crunched some numbers and realized that it took me 237 weeks since moving in to get art hung on the walls of our master bedroom. Mild case of “hole-in-the-wall-phobia.”
Now, I know that’s totally crazy. I know how to patch and paint and I’ve done it plenty, but in the interest of hanging the art in the right damn space on the first try, it took this long (yup, 4.5 years) to actually make things happen without rushing the process just to check it off the list.
It’s especially nice to finally live in a bedroom that doesn’t feel like my first apartment where I was forbidden from damaging the drywall. And you how daylight reflects off frame glass? It sure makes a room feel more homey (also, impossibly hard to photograph).

Backtrack for a sec before this becomes all about me being weird for not wanting to put nails into my drywall. Part of the reason this took so long was also due to the fact that we really needed new bedroom dressers. The set of IKEA MALM dressers I bought 10+ years ago has now been fully recalled–now to the point where IKEA is begging to come pick them up to spare you the inconvenience of having to rent a truck in order to transport them back to a store–but when you’re outfitting your “forever home” you want to buy “forever dressers” and it’s really hard to commit to “forever dressers” without making some sort of concession for budget/quality/size/finishing details when you’re simultaneously under the pressure of recalled dressers that may or may not tip on your children because you haven’t anchored them to the wall (back to being obsessed about perfect, hole-free drywall). In short, we’ve been waiting it out until the right dresser at the right price point came into line of sight. Fortunately, that opportunity knocked sometime last fall when a decent set of Benson 6-drawer dressers at West Elm caught my eye. They’re no longer available in the light oak color we bought, but the darker walnut option is available here. Originally priced around $1,200/each, they were marked down to $699 + some bonus discounts + 20% west elm card bonus cash back (+ an exorbitant amount for shipping and setup) and the set of 2 new dressers cost about $1,700 from store-to-door. Pricing-wise, they were a good bargain considering that the units I had really been coveting were about 4x more expensive–completely unjustifiable to my spending senses (but I still love you, DWR). The West Elm dressers were also the perfect size and scale for the wall I had been scheming for in our room, and the lighter veneer wood finish was ideal, too. It’s hard to find light wood pieces that are modern but not just white.
I took a few “before” photos for a good laugh, knowing that it would be crazy to look back on this wall someday and recalling that we lived with it looking like this for 4+ years.
I openly admit that I have a love/hate relationship with West Elm furniture. I had some reluctance about buying dressers there because we’re less than thrilled with our Tillary Sectional, but it doesn’t end there. Our mod upholstered bed frame is literally about to collapse on the floor because a leg is 2-seconds from breaking off (they sent a backup part but angled legs on any furniture get a thumbs-down from me now), and I always thought the drawers in store felt like they had cheap sliders… but all that said, I took a risk and these ones aren’t too bad. They close nicely and slide smoothly, and the leather handles do feel nice and higher end than other products at the same price point.

The real perk of getting new dressers was finally being able to finish that end of the bedroom with some artwork. Our collection is a nice mix of prints that we’ve been gifted (or gifted each other), small originals that we’ve purchased, and a whole bunch of random treasures we’ve collected or inherited. It still took me months to decide which pieces would be hung above the dressers on the wall to make the space feel more finished, but I considered:
- Scale and color: Wanted the collection to feel bonded by color palette, and it just so happened that most of our frames are black, so that helped too.
- Importance: A little bit of this, a little bit of that. The final selects for our wall all have a little sentimental value, yet still flow well together.
- Orientation: To gallery wall, or not to gallery wall? I wanted some organization more than a puzzled assortment on the wall, and bottom-aligning the frames seemed like a good direction. It’s still a gallery wall, but just a little bit more refined and minimalized.
I sat around and brewed about the options for months, planning that I would have them selected and hung on New Years Day if all my ducks aligned.
Didn’t quite make my deadline–I’ll almost always choose a lazy day with friends over a self-imposed deadline–but I got it done in the goal week and boy, did that ever deserve a high-five.
Hanging artwork to be bottom-aligned is so much like installing any type of gallery wall that it hardly feels like it needs much explanation, but what I did was:
- Lined up the artwork left to right on top of the dresser so that I could determine which order I wanted the art to present. Originally I thought I wanted the tall pieces in the middle so that they tapered down to shorter pieces at the left and right, but the scale of my pieces didn’t seem right for that, so I scattered them a little bit and found that I liked the balance much more.
- Found my center on the wall (not the center above the dressers – I knew I could inch the furniture left and right by a few inches if I needed to make it more centered).
- Measured the width of the framed artwork itself, and included 1.5″ spaces between each frame to obtain the measurement for my total gallery wall length.
- Determined where the center of my total gallery wall length hit relative to the center of the actual wall – note that I didn’t hang a frame smack in the center of the wall. Since the frames are all different widths (and there’s an even number) no single frame is actually hitting the center point. Aim to have the same amount of empty space on either side of the gallery wall, and line things up from there.
- Selected a consistent spacer for the bottom, so that I could easily plan where the bottom edge of each frame would sit. I used a stack of hardcover books – works great.
- I hung the middle two frames first. Much like with any gallery wall (helpful tips on this post) once you know the center point for the frame, measure the distance from the wire/hook to the top of the picture frame. Then on the wall, measure down from where the top of the frame hits (while sitting atop the stack-o-books spacer) and put your hook in the wall right there. When you hang the frame, it should rest on the hook but exactly at the same height that it was at while the spacer books rested beneath it.
- Note: Not that my phobia is accepting of “oh shit, that’s not right” holes in the wall, but if your nailed hook is a few millimeters too high/too low/left/right, it’s easy enough to recalibrate the measurements and place the hook again… any first (incorrect) hole will be covered by the frame itself. Shh.
- Continue to install the rest of the frames, always hanging as you go so you can be certain that the frames are consistently aligned along the bottom edge.
Slick.
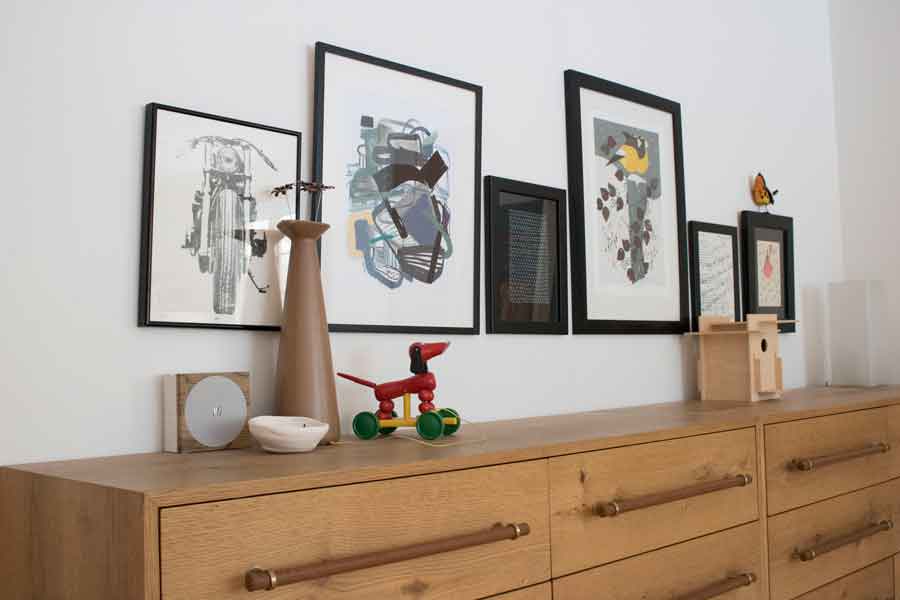
As for our 6 frames? Left to right:
- That’s the Kaye Rachelle tea towel I posted about in 2012. Our dog, Cody, chewed the towel while it was still practically brand new, but I found new life by framing it because I really loved the screen print of the motorcycle. Now it’s a subtle memory of our buddy boy, as well a cool print.
- Pete gifted me our first original Jaime Derringer print for my 30th birthday. Jaime’s someone you might know as the CEO of popular Design Milk and related companies, but she’s also an amazing artist and we’ve both gravitated to her techniques and style for years. This mixed-media piece lived in the dining room for awhile, but I swapped it to a portrait orientation and found that it worked really well here.
- Another nod to JD–before the holidays, Jaime posted on Instagram that she was cleaning out some old original pieces, so I bought this white line drawing on black paper as a gift for Pete as we celebrated our 5th wedding anniversary. Framed it in black, too. Design-wise, it’s similar to her much-covetable Crocodile 1 print for sale on sites like Minted.
- My parents gifted us a Grosbeak limited edition lithograph from the Charley Harper collection for our 1st wedding anniversary, and while it was matted and framed right away, it’s never had a good home until now.
- Pete and I took a memorable road trip to Kinston, NC a couple of years ago to eat at the famous Chef and the Farmer restaurant (as seen on PBS Create’s show ‘A Chef’s Life’). If you’re familiar, it was every bit as insanely wonderful as you might expect, and if you’re also a fan of Vivian Howard, we should be BFF. Randomly, we were at the restaurant the same day as Andrew Zimmern while he filmed Bizarre Foods for Travel Channel, and in a super weird right-place-right-time moment got photos of Pete/Andrew and me/Vivian and then left her with our menu from dinner, which arrived at our home signed with a personal message a few weeks later. Frame it? Hell yes.
- It feels good that our kids know a Charley Harper piece when they see one (my hands-down favorite artist). Julia reinterpreted and illustrated one of his cardinals for me as a Christmas gift a few years ago. Perfect in many ways.


7 Comments
Apparently I keep forgetting to check you blog for new posts :(
I love those dressers, they look great in your room! And I completely understand the price point vs quality struggle. I am forever wrestling with cost vs quality vs “do I really NEED this?” Currently having this struggle about flatware, as ours is approaching the 10 year mark and really starting to show it. Also, last hurricane season destroyed my rain boots.
Having said all that, I think I’m beginning to have a love/hate with WE, too. I love the design of most of their stuff, but I’m not a huge fan of some of the quality. I have many feels about our couch, coffee table, dining table and whatever else we have that I’m forgetting about, but they’re all still usable and I can’t really justify replacing any of it.
Is it the mounting bracket on angled legs you’re not a fan of, or are they not very sturdy in general? We’re in the planning stages of a bed frame build, and I keep coming back to the look of angled legs, but maybe they are a bad idea for something that gets as much use as a bed frame. (Honestly in our small room you can’t see the legs/headboard anyway, so maybe I’m over-thinking the bed frame design.)
Oops, I totally left you a novel of a comment and did not even get around to the actual point of your post.
I have similar anxieties over hanging things these days. I guess I’ve come to realize that while I’m 100% capable of patching “oops that’s in the wrong spot” or “ok, time for something new” holes, I’m unlikely to actually do it. There are probably a bunch of holes behind most of my artwork for that reason. I guess I could combat this by just using picture ledges everywhere, but that look doesn’t seem right for every room.
Thankfully, after we finally got around to moving into our master bedroom last fall, Robert got tired of looking at the painting across from our bed leaning against the wall, so he hung it for me. Now I suppose it will just take me an eon to address the fact that the canvas stretchers are more of a rhombus shape than a rectangle, and really need to be straightened?
Hey Cait! I like to keep you on your toes – posts coming in sporadic bursts these days (and more to come!).
I think the structural integrity of the angled legs is my main complaint on the bed; it’s just an undue stress on the hardware, and in our case actually cracked the wood of the footboard. We were able to get a replacement from the company–a new footboard and side boards–but for a year or so now have just been tightening down the hardware periodically. Once the wood cracks all the way (and it certainly will with time) at least we’ll be able to swap it out instead of replacing the whole bed frame.
The dressers are still nice; we’ve had them since October or so. It really is hard to find nice, solid wood construction these days that’s affordable. The age of DIY/repair/refinishing has not passed. I wish I could have found a great vintage set to refinish for our bedroom, but no luck!
Robert recently (is almost 3 months still “recently”? I’m going to go with yes) started working in a custom wood shop building furniture, so I think we have/will become a whole new level of annoyingly-critical about furniture construction. Not sure if I should be ashamed of that or not. Seems like it’s going to make it challenging any time I try to replace something in the future. Even though I completely understand the level of craftsmanship that goes into truly good quality piece, most of it is still way out of my price range.
Thanks for the response about the bed fame! That definitely makes sense. I guess angled legs have more of a place on something like a console table, or anything that gets lighter use than a bed, couch or chair? Maybe I need to crawl under my dining table and see how those are attached. That obviously doesn’t receive the same stress as furniture you sit/sleep on, but it has to withstand extending to have the leaf added.
We definitely lucked into our MCM bedroom dresser/nightstands, because my parents’ neighbor was literally throwing one of the nightstands away. My mom rushed over and stopped him, telling him what good quality it was, and now we have both nightstands and the 9 drawer dresser.
I have another MCM dresser in the living room that was a pair but we only bought one to start with and when we went back shortly after its mate was gone. Apparently I have a thing for dressers. And chairs.
Robert can build you anything now! That sounds like a fun job. Hope he’s enjoying it!
We don’t have problems with other angled legs, though I will say on our dining table that’s from the 1960s (and slightly angled) there are 3x the bolts holding each leg in position. On our coffee table, there’s a shelf a few inches off the floor that bolts between each of the 4 legs and that holds them in position better than if there were no shelf and the legs were only attached to the tabletop.
He’s definitely enjoying it! And learning a lot. It’s actually part of a local architectural salvage company, a place I think we talked about visiting but it was too far/we were short on time when you were here.
I think our dining table has some cross bracing and triangulation that probably helps the legs. Definitely just had to remind myself what your table looks like, although I remembered talking about that library score! And that’s a good point about the shelf on your coffee table.
Looks great. Thanks for sharing.