

I pinned this little sweet image to one of my pinterest boards a few weeks ago; it’s a light strand inside a jar, which is definitely something I’d seen created before. Each time I’ve seen it, it resonated with me – and seemed very DIYable. (The photo below originates from this flickr photostream, by the way). I like when a simple strand of christmas lights can be put to use during the rest of the year; my mom has a strand stuffed into a glass bird feeder turned tree hanging in her backyard too. And while it’s pretty, it’s functional too, lighting up the brick pathway in the backyard every evening.
 It also sort of reminds me of fireflies caught in a jar, hence the headline that drew you in. Seems to me like it would be a nice light to have on the picnic table in the backyard on warm nights. (Fun fact: There is one single outlet in my master bedroom, but 6 accessible outlets in the backyard that I could easily extension cord outdoor decor to.)
I found a great glass container a few weeks ago at a garage sale (for $2). It would have made a pretty vase, if only the mouth was wider; right now it’s only big enough to hold a few long stemmed flowers or branches. So, even though I’ve seen a lot of people making glass jug lamps lately using those $10 lamp kits from Home Depot (which yes, I’ve looked into recently and considered), I decided to make mine into the freestanding firefly decor piece similar to the pinterest/flickr image.

So, I did some research. I knew I had to get that wire into the container somehow, in a way where the two-prong plug could continue on to an outlet. I simply planned on drilling a small hole in the back of the jug, feeding the lights in, and twa-la.
A common google search told me that I should have a diamond- or carbide-tipped drill bit to cut through glass; use of any other type and you risk shattering the glass before the job is done. I also looked up Dremel-specific bits hoping that maybe I’d find that we already have one on hand (Pete has a lot of Dremel accessories) but no avail. The jug itself was cheap, but I figured I’d do it right and not set myself up for failure. I had a Groupon for a local Ace Hardware on hand, so I splurged on baby’s first carbide bit to use with the electric drill. The 1/2″ bit was $13.99 – yowza, I’m pretty sure they’re less expensive elsewhere.
Also, as recommended by other craftsters, I taped the area I was going to be drilling into to help reinforce it (and also give the bit a little somethin’ somethin’ to grab on to as I started to drill). The jug being round, the best and most stable position seemed to be kneeling on the deck with the jar nestled between my knees. Snug.
 Just like many of the reviews I read warned, it was going to take several minutes to drill-sand my way through the glass, and it was going to throw up lots of glass dust (so I was prepared with a mask and a strong breeze away from me, sorry neighbors). Lo-and-behold, it worked! After a few minutes, I started to see that I was popping through to the other side; I had been maintaining steady pressure and drilling at a reasonably quick clip (not too slow, not wildly out of control so I could stay in the groove that I was slowly carving for myself).
 Now, if I had been making a simple jug lamp, this hole would have been just enough to pull an electrical wire through, but in order to thread in a 20′ strand of christmas lights, I was going to need it a little wider. That’s why I splurged on the larger bit (although I did find two 3/16″ bits at a recent garage sale for $1, just to have on hand for future projects). Anyways, I kept on drilling for about 5 seconds after I snapped that photo only to have this happen:
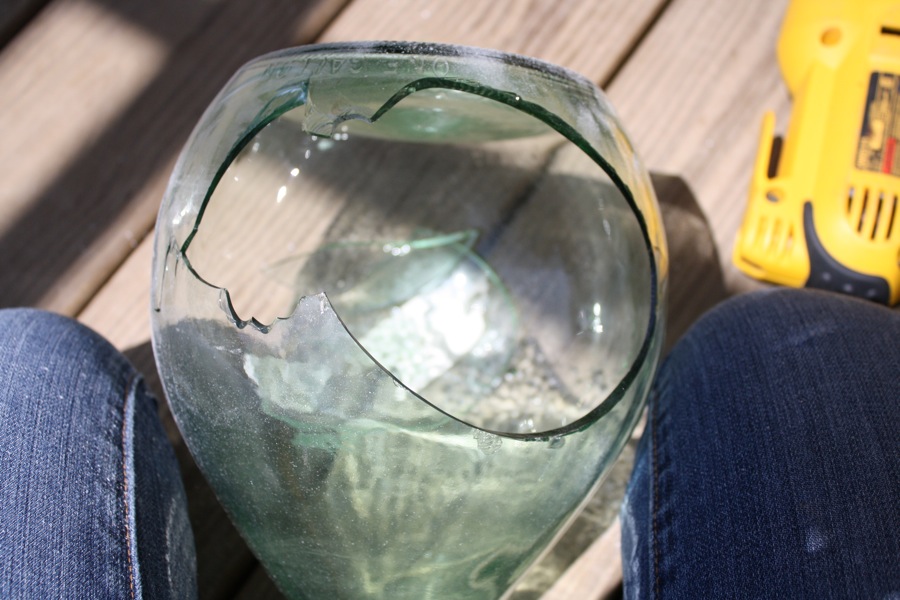 Womp-womp.
I don’t know; maybe I was drilling too fast, maybe I was pushing harder than I needed to now that the hole had been drilled and I was just widening it out, but whatever I was doing, it didn’t work out.
Well, it sort of worked out. There’s a huge sharp shard-y hole in the back, and some spider-veiny cracks circling around the front…
 … but somehow it remained in tact. And I use “in tact” extremely loosely. It’s fragile, it’s fricken sharp (I did not cut myself though), and it’s not perfect anymore. But now I had a bigger hole that I could shove the christmas lights into really, really easily. Which worked out in my favor, I suppose.
 And, well, it worked out in the sense that once the lights went in (and the big hole is facing the wall) you can’t really tell that the jar is damaged at all. Of course it’s not something that I’d want handy girl getting her hands on or carrying around, because it’s bound to collapse into 14,000,000 pieces if knocked the wrong way, but just sitting lit on the shelf at night it looks pretty good.
Sigh. (At least it was only $2.)


15 Comments
Whomp whomp :(
At least it’s still pretty with its jagged side to the wall! Maybe you’ll score an even better jug at another garage sale to try again?
I considered trying again with some other jars I have. Pickle jars, wine bottles, vases, sort of like what Erin and Kate mentioned in their comments. Seems like any of that could work well; and a green wine bottle (that I happen to be eyeing on my shelf right now) might be really nice lit up.
PS- Also, my coworker actually has a glass head from Pier1 on her desk with pink lights in it. I think those are battery opperated, but she needs another strand or something because the lights are all in the neck… it’s kind of weird. Really weird. I think I prefer the other coworker who turned an Absolut bottle into a lava lamp.
HA, I love DIY office lighting. And I wish I had done something like that; probably would have made the cubicle more tolerable. I need a pic of the DIY lava lamp sometime; sounds cool.
Oh yes, I think it would be great with the green wine bottle!
I used a Patron bottle to do this. But I didn’t drill a hole it it. I just fed the lights through the neck of the bottle.
I did something like this around Christmas. I used a vase with a normal opening- so I didn’t have to drill a hole- I just let the cord hang down the back and you couldn’t really see it. I also put glittery ornaments in with the Christmas lights. I liked it so much I got pink lights and put those in the vase with those red sparkly hearts. Hope you enjoy your cozy twinkly lights when all is done!
Dan’s brother made a series of these for Christmas presents out of wine bottles. Really pretty!
That’s awesome!
LOL! Love it! It’s really pretty when lit!
Oh no! What a bummer that it broke! It does look pretty with the cracked part turned to the back… which isn’t too bad for $2!
I know, right? At least I didn’t pay full retail for it. Well, if I did I might not have even dared with this project. I guarantee it’ll still get used until it’s too broken to deal… and I’m even considering patching it up with some glaze to try and bind some looser pieces together a little.
Hi Emily,
Looks fab, and I would love to give it a try. Have seen something similar done with a rattan open weave ball about 12 inches across. But as we had a major fire last year, I wonder about safety, and if if the heat from the lights would melt the wire inside? Thoughts?
Jill
Yikes! I hadn’t thought of a fire concern (although now mine has plenty of ventilation). I suppose I’m not too worried because I’m using a standard strand of Christmas lights, and I know they don’t seem to overheat when I have them on a dry wreath (which would be kind of like the rattan idea you’re thinking of) or Christmas pine tree. I wouldn’t leave it plugged in while I was away from the house or overnight because a fire is my worst nightmare (I’m sorry about yours) but so far when I’ve had it turned on, the glass doesn’t seem to be getting too warm. I hope that’s helpful! Thanks for the nice comment!
I’m no expert, but I trust Adam and Jamie, and on Mythbusters they did everything possible to get a fire going with lights and strung an extremely dry Christmas tree in 2,500 lights and still couldn’t ignite it . So I doubt there’s much chance of all or a fire.