• Home
  • about emily
  • before + after
  • HGTV + DIY Network
  • good press
  • contact
  • Let’s Organize These Posts:

    • Art Attack
    • Backyard
    • Barn
    • Basement
    • Bathroom
    • Beach
    • Bedrooms
    • Being Thrifty
    • Business-y
    • Buying and Renting and Selling
    • Casual Celebrations
    • Closets
    • Curb Appeal
    • Dainty Details
    • Deck
    • Decor
    • Dining Room
    • DIY
    • Dog-Related
    • Entryway
    • Flooring
    • For the Kids
    • Garage
    • Gardening
    • Helping The Economy
    • HGTV + DIY Network Projects
    • Holiday-Related Projects
    • Home Safety
    • Kitchen
    • Lighting
    • Living Room
    • Merry Travels
    • Office Space
    • Organized
    • Other Pads
    • Outdoor Living
    • Scooter Fun
    • Stairwell
    • Sunroom
    • Supporting Sponsors
    • The Art Room
    • Tools
    • Uncategorizable
    • Wedding
    • Windows
    • Work-pads
  • Search

  • Hi, I’m Emily

    Emily Fazio

    I'm a home improvement enthusiast, living a very merry DIY lifestyle.

    You can find me writing for HGTV and DIY Network, follow me on facebook and instagram, or drop me a note if you'd like. I love notes.

    Thanks for visiting!

  • BROWSE POSTS BY CATEGORY:

    • Art Attack (7)
    • Backyard (92)
    • Barn (8)
    • Basement (27)
    • Bathroom (43)
    • Beach (13)
    • Bedrooms (73)
    • Being Thrifty (53)
    • Business-y (12)
    • Buying and Renting and Selling (23)
    • Casual Celebrations (36)
    • Closets (17)
    • Curb Appeal (44)
    • Dainty Details (8)
    • Deck (23)
    • Decor (286)
    • Dining Room (37)
    • DIY (577)
    • Dog-Related (24)
    • Entryway (59)
    • Flooring (58)
    • For the Kids (32)
    • Garage (17)
    • Gardening (70)
    • Helping The Economy (30)
    • HGTV + DIY Network Projects (283)
    • Holiday-Related Projects (80)
    • Home Safety (12)
    • Kitchen (84)
    • Lighting (31)
    • Living Room (77)
    • Merry Travels (21)
    • Office Space (21)
    • Organized (41)
    • Other Pads (14)
    • Outdoor Living (12)
    • Scooter Fun (8)
    • Stairwell (20)
    • Sunroom (22)
    • Supporting Sponsors (43)
    • The Art Room (3)
    • Tools (43)
    • Uncategorizable (1)
    • Wedding (28)
    • Windows (14)
    • Work-pads (10)
  • Search

  • Pages

    • blog
    • Good Press: Special Features, Freelance Projects, and Long-Term Clients
    • Privacy Policy
    • about emily
    • before + after
      • before + after – transforming my first home
      • before + after, our current home
    • contact me
    • choose a badge and share the merrypad.com love
  • Home
  • about emily
  • before + after
  • HGTV + DIY Network
  • good press
  • contact

How to Build New Front Stairs and Railings

August 27, 2013

Replacing the driveway at our old house/rental house was a weight off my shoulders. When we were allowed to drive on it, we did the honors in a vehicle filled to the brim with pressure-treated wood.

As it would seem, the work never ends. We were left with the pleasure of replacing the stairs that led to the front door.

It should have been really easy to replace the stairs. Right? Just get some new joist hangers and nail them into place. But since many layers of old cement and asphalt were removed with the excavation, the driveway lowered 6-8″. The best plan was to rebuild the stairs from scratch. It was a little blessing in disguise, actually, as we were able to upgrade the handrails.

It’s not that the DIY railings and front stairs built a few years ago were of terrible quality. (They did pass inspection.) But, they had loosened up a lot over the last year. Tenants are rough. We knew we could make them sturdier with a few simple design upgrades.

This post isn’t intended so much to be a tutorial. We used online resources to adapt what we already knew. We cut the stringers ourselves and used simple store-bought balusters. Thank you, Internet.

We didn’t need to alter the number of risers–three would still do–but we did have to calculate a new rise and run.

Two 2×12 boards formed our custom stringers, which cost approximately $32 as opposed to the precut variety sold at our local big box for $8.50/each for a 3-step unit ($25). Customization was necessary in this case. Plus, cutting stringers just seems like one of those things that we should know how to do. Read this tutorial to learn how. Be sure to clamp the square to a scrap board for consistency from step to step.

Make custom stringers for your staircase.

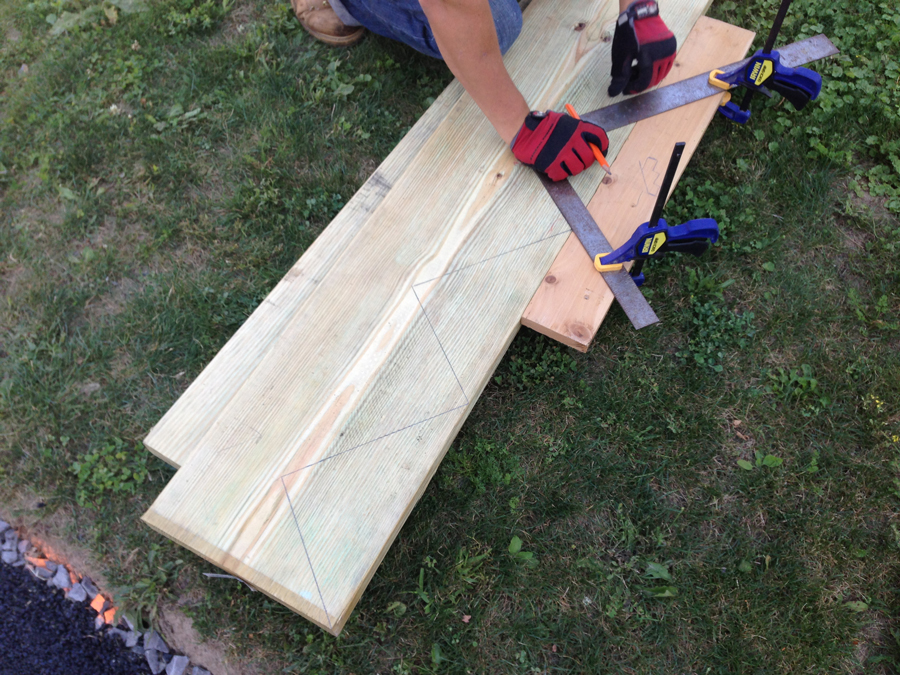
It was the first time I used power tools since learning I was pregnant. We missed each other, clearly. And as they say, the baby’s hearing stuff in there and already getting accustomed to noises in the outside world, so getting it used to power tools should work in our favor.

Cutting boards for the new stairs using the chop saw.

Getting back into the woodworking projects felt really good. There was much that I could do to help keep the project moving while Pete still performed the heavy-duty lifting that came with the project. I measured boards, helped with drilling using the lighter, cordless machinery, prepped tools, and cleared scraps.

We did a few things differently this time around. Since we used 2×12″ boards, we used extra 2×12″ lumber as a ledger on which to attach the stairs to the structure.

New header for the stairs to attach to.

We used 5/4 deck boards doubled up to make 11″ steps. They’re deeper than what we had used on the previous design. Bonus: they match the top landing.

stairs_new_runners_1

We also reinforced the 4×4 posts. Instead of using galvanized cups, we wrapped each post over the joist by notching it with the chop saw and a wood chisel. Bolted securely, they will not move. Big difference.

Notching the porch railing for reinforcement.

We strayed from the previously horizontal baluster design and opted for traditional 2×2 balusters. I was always opposed to this design, but it does actually look great, and less like we’re forcing modernism on a traditional home.

New stairs, finished!

The completed unit fits the bill. We’re letting the pressure-treated wood dry out before we weatherproof it this fall. Eventually–hopefully sooner than later–the stairs and rails should weather nicely to match the darker brown landing.

Share

Buying and Renting and Selling  / Curb Appeal  / DIY

Emily
I'm a home improvement enthusiast, living a very merry DIY lifestyle. I've been a freelancer writer for 10+ years and you can find my work on popular home and garden sites, like HGTV.com. Follow me on facebook and instagram, or drop me a note.

9 Comments


Mark Winters
August 27, 2013 at 10:38 am
Reply

Looks good!


Sharon Dela-Hamaide
August 28, 2013 at 8:15 am
Reply

Nice job! This is perfect timing, because we just got a new door to an area that USED to have a deck in a location that was far too sunny. Now we will just have a small patio and stairs like this will be perfect. Thanks for all that you share with us. We really enjoy it.


    Emily
    August 28, 2013 at 8:55 am

    Glad that you enjoyed it – hopefully the references in the post will help you in building your own!

jb @BuildingMoxie
September 5, 2013 at 3:21 pm
Reply

Been so long since I checked in, and have really been behind on my reading — just now getting to this one. well done. great starting point for a simple set of exterior stairs. Thanks and hope you guys are doing great.


    Emily
    September 5, 2013 at 4:27 pm

    Thanks jb! We’re great, hope you are as well!

John
July 28, 2015 at 2:32 pm
Reply

Hi.

For connecting your balusters, I was wondering what your top and bottom rails’ material dimensions are? Did you split a larger piece of lumber to create the rails? Thx.


Donna Smythe
September 18, 2018 at 10:25 pm
Reply

My post are loose on my front steps at the bottom. Built about 8 yrs. ago. Not attached like yours which is lovely, tho my neighbor who had hers done this summer, hers is done like yours. Mine are attached without the cutout in the step and attached to the bottom step. Need to know how to stop the post from wobbling when walking down the stairs.Any help will be appreciated. P.S. My post are 3-4 inches wide, very thick.


    Emily
    September 19, 2018 at 7:56 am

    How are they attached to the step, Donna? Can you reach beneath or add extra hardware to the side, into the structural part of the staircase? Or does the entire post have to be replaced?

Orlando handrails
June 16, 2023 at 7:38 am
Reply

Thank you for sharing your journey and providing inspiration for others looking to improve their rental homes on a budget. Your creativity and determination serve as a reminder that even small changes can have a big impact. Well done!


Leave a Reply Cancel reply

Your email address will not be published. Required fields are marked *

This site uses Akismet to reduce spam. Learn how your comment data is processed.

  • HI, I’m Emily

    Emily Fazio

    I'm a home improvement enthusiast, living a very merry DIY lifestyle. Follow me on facebook and instagram, or drop me a note if you'd like. I love notes.

    Thanks for visiting!

  • Instagram

    merrypad

    Merrypad // Emily Fazio
    pumpkin patch is doing great✌️#year1 #squashbl pumpkin patch is doing great✌️#year1 #squashblossoms #pumpkinpatch
    I’ve overdone it. #2023gardennotes I’ve overdone it. #2023gardennotes
    I’m not great at weeding my mulched beds, but I I’m not great at weeding my mulched beds, but I am very good at transplanting thousands of pachysandra like little bouquets so within 3 years they’ll consume the entire area ✌️ #earnyourallowance #pachysandra #gardening #merrypadathome
    One magic blossom from the peony roots transplante One magic blossom from the peony roots transplanted in April ❤️
    IT’S SCAPE SZN! IT’S SCAPE SZN!
    The biggest learning from my first year of pumpkin The biggest learning from my first year of pumpkin farming: no need to start seeds weeks in advance. These sprouted in 3 days indoors, and I was able to easily move them to the farm with minimal disturbance before they outgrew their tiny little upcycled egg carton pods. The seedlings I started in April in larger containers were very lanky at transplant and do not seem as hearty. They THRIVE when transplanted at this size! 📓 #gardennotes #garden2023 #pumpkinfarming #gourdfarming
    #2023garden pathways sponsored by pine tree bark 👩‍🌾👍 

#repurposedwood #merrypadathome
    Load More... follow emily: @merrypad


  • Like Us On Facebook

    Facebook Pagelike Widget


  • Popular Posts

    • How to fix an IKEA drawer. The Easy Fix For Broken IKEA Drawers 74.2k views
    • DIY sideboard rehab. 7 Steps for Restoring an Old Midcentury Sideboard Buffet 62.7k views
    • How to design and make a barn quilt. How to Make Your Own Barn Quilt 55.2k views
    • How to hang art on brick surfaces using specialty clips. The Easy Way to Hang Art on Brick or Stone 44.6k views
    • Our DIY flagstone patio. Building a Flagstone Patio in One Day 40.4k views
    • DIY driveway removal. How to Remove an Old Asphalt Driveway 36.9k views
    • Fix an ikea dresser drawer. Life Support For An IKEA Dresser 35.7k views
    • Tips for dying pasta different colors, and a Halloween Recipe for the kids. How to Dye Pasta Different Colors (Halloween Recipe) 35.2k views
    • Goodbye, gold fireplace covering. Less Is More: How to Remove a Fireplace Surround 31.6k views
    • After: Custom wooden garden fence. Designing a Durable Wooden Fence For Our Beautiful Backyard Garden 29.6k views


  • BROWSE POSTS BY CATEGORY:

    • Art Attack (7)
    • Backyard (92)
    • Barn (8)
    • Basement (27)
    • Bathroom (43)
    • Beach (13)
    • Bedrooms (73)
    • Being Thrifty (53)
    • Business-y (12)
    • Buying and Renting and Selling (23)
    • Casual Celebrations (36)
    • Closets (17)
    • Curb Appeal (44)
    • Dainty Details (8)
    • Deck (23)
    • Decor (286)
    • Dining Room (37)
    • DIY (577)
    • Dog-Related (24)
    • Entryway (59)
    • Flooring (58)
    • For the Kids (32)
    • Garage (17)
    • Gardening (70)
    • Helping The Economy (30)
    • HGTV + DIY Network Projects (283)
    • Holiday-Related Projects (80)
    • Home Safety (12)
    • Kitchen (84)
    • Lighting (31)
    • Living Room (77)
    • Merry Travels (21)
    • Office Space (21)
    • Organized (41)
    • Other Pads (14)
    • Outdoor Living (12)
    • Scooter Fun (8)
    • Stairwell (20)
    • Sunroom (22)
    • Supporting Sponsors (43)
    • The Art Room (3)
    • Tools (43)
    • Uncategorizable (1)
    • Wedding (28)
    • Windows (14)
    • Work-pads (10)


  • a little bit of everything, friends, DIY, and inspiration

    • Dadand.com < My husband and his BFF
    • HGTV
  • Some Legal

    Merrypad incorporates the occasional affiliate link to Amazon.com and Minted; we link to many other websites and products, but if it is in context of a paid sponsorship, it is always noted as such. Please review the privacy policy and contact me if you have any additional questions.

    Theme customized by Pete Fazio Creative, the guy from dadand.com.


© Copyright Merrypad