The shiplap whipped me into ship-shape and shipped the bedroom off to have a whole new look and feel.
Shippy! Not really in a boat-y or cruise ship sense… my bedroom was transformed to be more cabin-y than anything else. And it’s still a work-in-progress, but I’ve definitely made serious headway in the last week.

The shiplap paneling that I bought (and showed you a bit of last week while it was still loaded in the car) was awfully (or pleasantly) knotty (depending how much you like pine and lots o’ knots). Its appearance wasn’t about to deter me; the indivdual boards of paneling were unimaginably straight compared to any other lumber I’ve ever sourced and dug through at Lowe’s, and in my book, straight, non-bowed, non-warped, un-damaged boards are a win-win-win-(win?). Plus, the plan all along was to paint the finished wall to match the other three walls, only standing out as a paneled accent but still blending in to the overall cozy feel of the room, so knottiness wasn’t necessarily an issue as long as the cuts were smooth.
The project was easier than I expected, and that says a lot since I thought that installing a paneled wall would be cake compared to building a deck, or porch railings, or pergolas.
Because the boards were going to span the length of one wall (the “headboard” wall of my master bedroom), I wanted it to look finished, and part of that was making sure that the left and right edges of the wall looked completed. The walls themselves are lath and plaster, and it’s uneven in places just due to the original construction and whatever natural sinking of the house has taken place, so trimming a 1″x2″ furring strip to wall-height and affixing it to either side of the wall and nail gunning it into place acted a bit like the picture frame edges that we needed to give it a finished-off look.
Of course, there were some unexpected-but-sort-of-expected snafus along the way. The first of which being that the upper crown moulding needed to come down from the wall-in-progress. Not that it was especially difficult with the help of a utility knife to score the layers (and layers, and layers of paint), but it wasn’t something I thought would need to happen upfront. I was successful at preserving that original trim, and was cautious to take my time and not break the board by getting all rushy.

I left the baseboard and window trim in place as-is because all of it was considerably thicker than the shiplap was, meaning the new boards could rest on it and not make it look too funny or out of place. At least I think so. It’s as subject-to-construction-debate as anything else I’ve taken on.
The second snafu is that someday we’re going to have to replace the ceiling. The stippled ceiling had seen it’s day, and the cloth that held the material to the ceiling is beginning to bow downward, detatching from whatever is up there. Talk about a nightmare. As long as we get to it before it gets to us (meaning: falls on us during the night), it’ll be good.

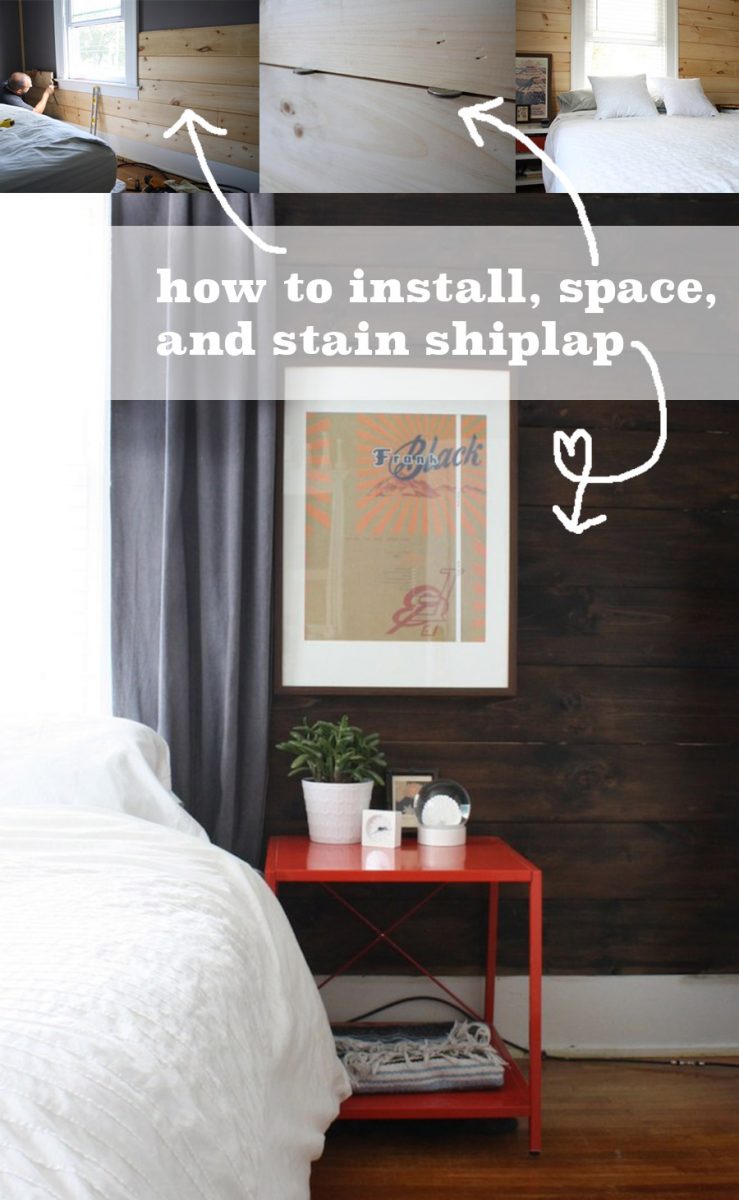
Following basic instructions for installing shiplap paneling, I started from the bottom, working my way up gradually. I lucked out in a lot of ways, namely in how 2 boards fit exactly between the baseboard and the bottom of the window with only the need to trim out the 1/2″ rabbet (shown by the arrows). The end result actually makes it look more like the window was installed after the shiplap.

I was also especially happy to find that we could use one single board, cut in two, to fit around the window. My original measurements told me that that we would need 8′-1″ of lumber to make that happen, and since Lowe’s didn’t have boards longer than 8′ even, we figured we were screwed into using extra boards (hence why I bought 22 8′ pieces of lumber). I should note: there was a different kind of shiplap available in longer lengths at Lowe’s, but it assembles more like a tongue and groove product, not like clapboard.
There are two possible explanations for this surprise:
1. The boards are an inch longer than marked for expected uneveness during millwork? I’ve encountered this before on other lumber I’ve purchased; sometimes my 12′ boards really measure 12’2″ or 1 board out of 5 measures longer than the others, randomly.
2. Or maybe I mis-measured. Virtually impossible, I know. And yes, I had already taken the furring strip width into account.

The trick for installing shiplap is to nail through the bottom part of the board, but not through the lower rabbet.
This really allows for access to the nails for easier board removal if ever it’s rotting or damaged in an outside application. Not likely in the bedroom, but we still wanted to install the boards correctly. We attached each board with 1-5/8″ nails using Pete’s Bostitch nail gun and pancake compressor, with each nail going in about 1-2″ up from the bottom of the board where the gun is positioned in the next photo. The overlapping board that sits on top of the the one below it locks the loosened top part of the board into place.

The best tip I received prior to starting this project was from Robbie (owner of that fabulous beach house I exposed last week, and creator of its dreamy shiplap bathroom).
She revealed that to make the consistent gaps between her bathroom panels, they used nickels as spacers between each board. If not for the spacers, the boards would rest flush together eliminating most (if not all) of the line break in the panels.
Instead of using nickels, I decided to go just a smidgen wider and use quarters. Sets of two quarters hot glued together, to be exact, which held up well for getting the job done but came apart without trouble (since, as you can imagine, I wasn’t about to spend an extra $1.50 on this project after dropping $150.00 into lumber). I think a wider gap will allow for more shadow in the paneling detail, accentuating the wall when it’s painted a dark color.

It worked really well, helping to create the consistent spacing from top to bottom.
 Once the boards were installed, I was unexpectedly pleased with the natural wood appearance. And super excited because I was able to return 8 of the original 22 boards to Lowe’s for a savings of $60. That means the whole job was under <$100, not including tools and nails that we already owned.
Totally transformational.


We’re so pleased with the wooden accents, in fact, that we’ve been considering staining the wall instead of painting it after all.
I learned a lot about staining shiplap during this project (read it here). Best advice? Stain it BEFORE you install (the nail holes will be hardly visible).
And jump ahead to see the finished bedroom here.


26 Comments
Oooo! Love it. I like the natural wood look, though painted would be great too–tough choice. I’m sure it’ll look fantastic either way. Congrats!
Thanks Kirsti! Ugh, decisions decisions.
That looks great! I think personally I would still paint it, but take that with a grain of salt- sometimes I want to paint our dark paneled living room ceiling white or a very light blue (Robert HATES that idea, he loves the dark, wood ceiling).
I love a dark room too. Plus, once you go paint you can’t go back :-/ I need to get you a picture of that fully dark-wood paneled media room at the beach house I showed you last week; that’ll make you want to make your entire house dark paneling.
Oh goodness. I may need to see that! (But I might also have to withhold the pictures from Robert- he will definitely want to panel the whole 20×20 room man-cave style, to go with his beloved leather couch.)
The problem with our living room is the giant cracks between some of the panels (same issue we had with the front porch, but that’s another story). I don’t know if it’s insulation that sometimes falls through (usually onto my head while watching Criminal Minds) or gravel from the flat tar & gravel roof on that part of the addition. Either way, some serious caulking needs to go on. I guess with something clear, because otherwise I’d have one very sulky husband.
I’ll try and get you a pic. You’re going to love that leather couch when you can cozy up on it in a dark, dark cave. The best part of Robbie’s is that it’s in the center of her house with no windows, so you really do feel like you’re in a theater/dark library. Yikes about the cracky situation. Does rain come in too?
Fortunately the rain does not come in! I think we need to get busy with the caulk soon, though. That room tends to get way hotter than the rest of the house, which we always attributed to the flat room, likely lack of sufficient insulation, and older windows. Things got better when we caulked the windows last fall/winter, and I would be they’ll get a little better when we caulk the ceiling gaps.
I like our leather couch for how comfortable it is, but recently I’ve been wanting a sectional with a chaise. I think I might have to compromise and just make a big, cushy, brightly colored ottoman.
Our living room is in the back of the house, with small windows (sort of like a basement, maybe), so when we close the curtains it becomes very media-room-ish. I’m trying to strike a balance between manly-media room and bright&cheery. I also need to update our house tour with better pictures, but it’s a tricky room to photograph.
Love the idea of a bright piece of furniture in a room like that. I hope you win that war. Dark brown walls with a great yellow couch? How cool would that be.
Ooh that would be fun!
This is the best picture that shows the ceiling, I think. Right now the walls (with the exception of the birch trees wall) are light yellow, with tan curtains (similar in tone to the birch trees background), a brown leather couch, burgandy chair, dark wood coffee table, teak tv console, dark wood ceiling, and jute rug. I think we might need a bright yellow ottoman, made with leftover fabric from the art room curtains.
Woah, I love this! I really like the wood in its natural color – what kind of stain are you thinking?
Thinking a dark color versus light… I have a bunch of dark frames from IKEA that would fit right in (not to mention, most of my barnwood frames are dark too and could work with it).
Nice! With lots of natural light I love a dark room as well. Sadly our house doesn’t get a ton of that (but on the plus side we have plenty of lovely trees surrounding us), so I’ve turned everything in the house white or light. Either way, it’s an awesome project and I still call dibs on your place if you ever decide to move :)
I definitely love the light during the day, and if it’s possible, the white blinds throughout brighten the room even more. Someday I’ll do all white or lights like you’re doing. And I’ll give you plenty of notice before I sell.
I love it!!! Fabulous work, as usual. I just used pickling white stain on a project and LOVE how it turned out, bright but still rustic. It would look great on that shiplap… if you’re a white lover like myself. Can’t wait to see the finished project!
Thanks Laurel! I do like the rustic-looking whitewashed look. Thinking about keeping the room dark and cozy with plans to stain in a dark color.
It looks great!
That nickel/quarter spacing business just blew my mind. *Slapping forehead*
Right? Never would have thought it. Side note: I was just browsing an inherited Martha Stewart Living from October 2010 and there’s a home profiled whose interior is almost entirely shiplap with perfect little gaps. Talk about mind blowing. It was fab. Thanks Beckie!
I have finally talked the BF into letting me do this project in the new house… thanks for all of your great tips. 2 questions, since you have done this two times, would you recommend staining the wood first? And two, what exactly did you put into the corners of the wall? I am a DIY newbie, aka I have done nothing, as I am just gathering ideas for projects when we move. Thanks again :-)
Glad you like it! Yes, staining the wood first was much easier. And along the edges, I installed pieces of 1×2 board to extend floor to ceiling (stained the same color); butting the shiplap against that made it look a little more finished than if I had butted the shiplap directly against the corner drywall. Good luck!
Thank you for this great tutorial! I have a question about the spacing between the shiplap boards. Do you find that it looks better with it? DH and I are having a little debate of over this.
Glad you liked, Truc! I think the spacing looks nice. I’ve seen it done with a narrower space too, and I liked that also. Keep in mind that with my boards, there wasn’t a beveled diagonal edge, like is cut on some store-bought shiplap. With the beveled boards, you can butt them tight and they’ll still appear to have a slight spacing, or at least a visual delineation between each board.
Hi Emily, just curious why the boards have to have the rabbet joint? No one where I live stocks it like that so I have pay a fortune to have them run to make that joint. What would happen if I just nailed the boards on the wall with the nickels in between as spacers? Thanks!
It would work the same way, but the seam back to the wall would run deeper (obviously). Make sure the wall is painted to coordinate with the boards because you’ll have trouble jamming a brush in that gap.
Hi! I’m thinking about installing shiplap over what I THINK is a plaster wall in my home. How did you know where to put in the nails? The other tutorials I’ve read have dealt with installing shiplap over drywall (and instructed that you should nail into the studs). I don’t think there are really studs with lath and plaster, though? Pointers would be appreciated. Thank you :)
I encountered some of this :) Still possible! The lath is, fortunately, wood, so if you can’t hit a stud with a long nail, you should still be able to secure the board at least into that material. Use more nails, and insert those nails at a slightly downward angle… the board will be a little more secure that way. Hope this helps.