• Home
  • about emily
  • before + after
  • HGTV + DIY Network
  • good press
  • contact
  • Let’s Organize These Posts:

    • Art Attack
    • Backyard
    • Barn
    • Basement
    • Bathroom
    • Beach
    • Bedrooms
    • Being Thrifty
    • Business-y
    • Buying and Renting and Selling
    • Casual Celebrations
    • Closets
    • Curb Appeal
    • Dainty Details
    • Deck
    • Decor
    • Dining Room
    • DIY
    • Dog-Related
    • Entryway
    • Flooring
    • For the Kids
    • Garage
    • Gardening
    • Helping The Economy
    • HGTV + DIY Network Projects
    • Holiday-Related Projects
    • Home Safety
    • Kitchen
    • Lighting
    • Living Room
    • Merry Travels
    • Office Space
    • Organized
    • Other Pads
    • Outdoor Living
    • Scooter Fun
    • Stairwell
    • Sunroom
    • Supporting Sponsors
    • The Art Room
    • Tools
    • Uncategorizable
    • Wedding
    • Windows
    • Work-pads
  • Search

  • Hi, I’m Emily

    Emily Fazio

    I'm a home improvement enthusiast, living a very merry DIY lifestyle.

    You can find me writing for Home Living Handbook, HGTV.com, and a handful of other websites. Follow me on facebook and instagram, or drop me a note if you'd like. I love notes.

    Thanks for visiting!

  • BROWSE POSTS BY CATEGORY:

    • Art Attack (7)
    • Backyard (92)
    • Barn (8)
    • Basement (27)
    • Bathroom (43)
    • Beach (13)
    • Bedrooms (73)
    • Being Thrifty (53)
    • Business-y (12)
    • Buying and Renting and Selling (23)
    • Casual Celebrations (36)
    • Closets (17)
    • Curb Appeal (44)
    • Dainty Details (8)
    • Deck (23)
    • Decor (286)
    • Dining Room (37)
    • DIY (578)
    • Dog-Related (24)
    • Entryway (59)
    • Flooring (58)
    • For the Kids (32)
    • Garage (17)
    • Gardening (70)
    • Helping The Economy (30)
    • HGTV + DIY Network Projects (283)
    • Holiday-Related Projects (80)
    • Home Safety (12)
    • Kitchen (87)
    • Lighting (31)
    • Living Room (77)
    • Merry Travels (21)
    • Office Space (21)
    • Organized (41)
    • Other Pads (14)
    • Outdoor Living (12)
    • Scooter Fun (8)
    • Stairwell (20)
    • Sunroom (22)
    • Supporting Sponsors (43)
    • The Art Room (3)
    • Tools (43)
    • Uncategorizable (1)
    • Wedding (28)
    • Windows (14)
    • Work-pads (10)
  • Search

  • Pages

    • blog
    • Good Press: Special Features, Freelance Projects, and Long-Term Clients
    • Privacy Policy
    • about emily
    • before + after
      • before + after – transforming my first home
      • before + after, our current home
    • contact me
    • choose a badge and share the merrypad.com love
merrypad website logo with acorn and text
  • Home
  • about emily
  • before + after
  • HGTV + DIY Network
  • good press
  • contact

DIY Octo-Art

December 19, 2011

The empty frame in the new office gallery wasn’t ignored for long. I had a little design in mind to try, and because it would be totally f-r-e-e with unused materials I already had on hand, I leapt right in to see what I could accomplish.

Octopus art, anyone?

Last spring, Pete and I went to American Museum of Natural History and saw something like a prehistoric octopus positioned into a small space (pictures from our trip were documented here, but there was no shot of the inspiring octo). Since that day, I wanted to create a print of an octopus so that the head and tentacles were maximized, but squished and twisted to fit into a large frame (I happened to have an IKEA RIBBA frame that would fit the bill perfectly). You might be thinking I’m crazy; I have no history of loving swarms of squirmy octopod, but the freeflowing tentacles are kind of cool, and I have to say that I’m drawn to their obscurity. I even tried attempting something like this a few months ago, but it kind of fizzled out (shown here, I took the time to hand draw an octo onto a map that I found at a yard sale, but it was kind of ho-hum).

Octo-start. Attempt #1 was abandoned.

In this, my second attempt, I pulled four pieces of watercolor paper from my stash (each page sized 15″x20″). The frame that I had is just about 29″x20″ and two pieces of paper, butted together side-by-side, would be just enough to fill the space. My plan was to have two pieces fill in the background of the frame (as opposed to buying a piece of posterboard), and the other two pieces would be dip-dyed into a gray dye that I had on hand and cut carefully to create an octopus.

Pieces of watercolor paper side by side are the perfect size to fill the RIBBA frame.

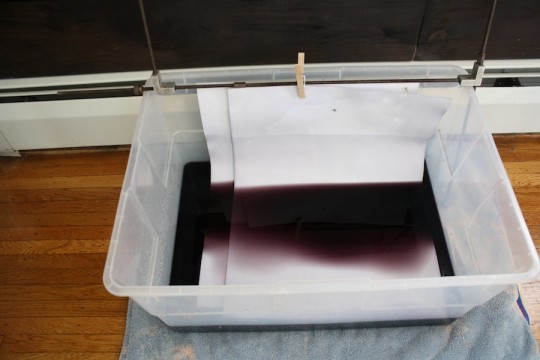
I had a large plastic bin on hand to mix the dye in, and used a picture frame clamp to create a temporary support for the paper while it dried. I also considered using a clothing drying rack, but I happened to be doing laundry simultaneously and that plan just didn’t work out. Anyways, the pieces of paper clipped to the metal frame would be just fine, and would allow both sheets to drip back into the bin.
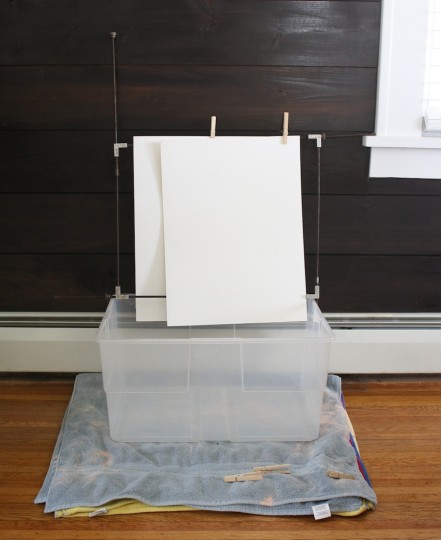
Plastic tub (on towels for floor protection) and frame clamp setup. The dye that I used, as I mentioned, was some gray iDye that I had on hand (it’s the same Silver Gray dye that I’m using for the Bear Rug and liked for my bedroom curtains). I didn’t use a whole packet, but I had a little dye left over because of the way I was lightly dying the bear rug fabric, and that would be enough to saturate a small bin of water.

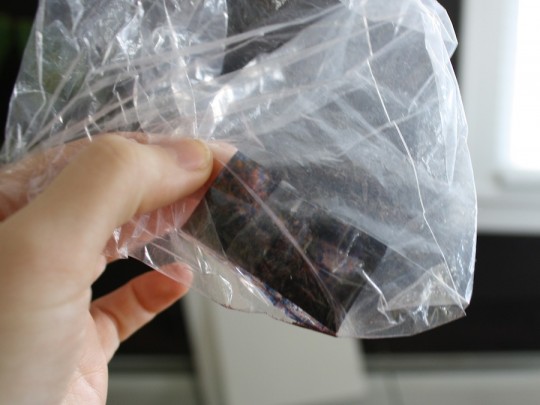
Just a little bit of dye. A wee little bit.

Mixing the dye with hot water from the kitchen sink, I positioned the plastic against the wall in the dining room (over plenty of towels just in case the bin had a crack that I wasn’t aware of).

I slowly began dip dying the papers together for a few seconds, and then clipping them back up to try in the heat of the air vent. With the first dip which fully consumed both sheets, you could hardly notice a difference.

Just a little bit of dye, but a lot of towels.

But after it dried, I re-dipped the papers again and again into the dye, each time letting it sit longer and longer, 2-minutes, 15-minutes, 25-minutes, checking in on it regularly to make sure it was transforming into the gradient I had been envisioning.

Dying the paper.

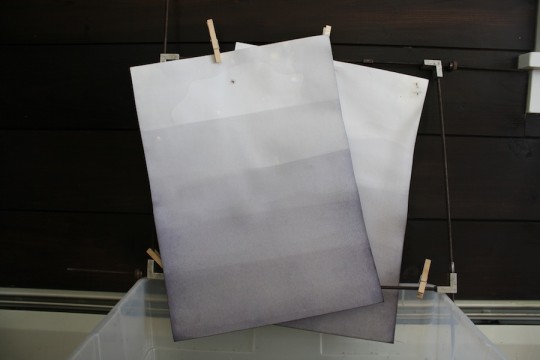
By the time all colors were dyed and dried, I was basking in ombre action.

Ombre gray by dip-dying water color paper into iDye formula.

Because the edges of the water color paper saturated a little bit more than the main area, it’s a bit apparent that they’re two separate pieces of paper. Obviously it’s ideal to use one sheet of paper for fluidity, but remember that I was keeping this cheap by using materials that I had on hand (spending $0).

I proceeded optimistically, taping the two sheets together with heavy shipping tape and started to sketch an outline of the octopus on the back of the paper (because I didn’t want pencil marks on what would be the front of the paper, and because getting the octo shape with desired effect right-on, it took a bit of sketching and erasing and sketching and erasing, and I figured that my vigorous erasing would probably lighten up the dyed areas unevenly. And yes, I numbered the legs so that I didn’t flub up and end up with a nanopus (it happened in my first attempt, what can I say).

Octo-sketching.

I kept the octopus hung on the wall for a few hours to make sure that the placement of the legs and proportions were good, and moved forward with creating the background paper to mount little octo onto. As I mentioned, I was going to use the same watercolor paper, although un-dyed because it was free and on-hand. To create a little extra pattern and interest, I cut the paper into 3″ sections with the help of my picture frame mat cutter, and then taped the pieces back together to create a vertical-line textured background (again, using the straight edge of the mat cutter to keep the pieces square and even as I taped).

Taping together strips of paper to create a textured background for the picture frame.

Taped together securely (using shipping tape once again), I thought the background alone was looking pretty spiffy in the frame. Subtle, it’d be a nice little somethin’-somethin’ for the octo to pop off of. (Oh, and I’m waving in the reflection.)

Hi, Octo print background in the frame.

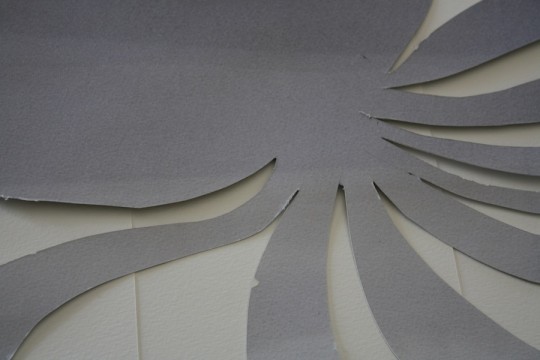
Happy with the shape and scale and size of the octopus sketch that was still hanging on the wall, I used a sharp utility knife to carefully carve out the shape along the lines. Careful not to cut the overlapping areas, it turned out really nice, except then I turned the piece over and saw a few scuffy-looking cuts that would need to be cleaned up.

Scuffy octo parts. Might be more obvious to me than you here.

I blame that on the blade getting dull by the time I reached those parts, and corrected the issue by using a sharp blade to clean up and remove the scuffy parts (narrowing some of the legs, but in a way that didn’t effect the overall look of octo).

Also, it was more than slightly obvious that there were two pieces of paper taped together to make this little guy a reality, so I tried to minimize that effect by lining the dyed layer to the background layer lines. I think it helps.

Blending the lines. I think it helps.

Framed securely and re-hung on the office wall, it adds a nice little (animalistic) feature to the space. Cute, considering that it was free and totally DIYed.

Octo-art, hung.

Finished octopus art.

Anyone else working still working through completely non-holiday projects this week? Anyone else infusing Octopods into everyday decor?

Share

Decor  / DIY  / Office Space

Emily
I'm a home improvement enthusiast living a very merry, DIY-filled lifestyle. As a freelance writer, you can find my work on many popular home and garden sites, including HGTV.com, HomeLivingHandbook.com, and other outlets. Follow me on social, or drop me a note.

3 Comments


Jane @ The Borrowed Abode
December 19, 2011 at 8:39 am
Reply

That’s really clever! I love that you dyed the paper to make it work.

I’m totally working on non-holiday projects. Just didn’t have time for holiday decor this year.


Arlene
December 19, 2011 at 5:31 pm
Reply

Cool idea, and it turned out really well!


    Emily
    December 19, 2011 at 5:39 pm

    Thanks Arlene!

Leave a Reply Cancel reply

Your email address will not be published. Required fields are marked *

This site uses Akismet to reduce spam. Learn how your comment data is processed.

  • HI, I’m Emily

    Emily Fazio

    I'm a home improvement enthusiast, living a very merry DIY lifestyle. Follow me on facebook and instagram, or drop me a note if you'd like. I love notes.

    You can find me writing for Home Living Handbook, HGTV.com, and a handful of other websites.

    Thanks for visiting!

  • Instagram

    merrypad

    I’ll always say yes to a maker space experience, I’ll always say yes to a maker space experience, and The Shed at @timberland’s HQ did not disappoint ✌️🥾 @homelivinghandbook 

Final footwear design not shown 🙂

PS tagging some cute shoes they gifted from the Fall 2024 collection!
    I made the call and snapped off the elephant garli I made the call and snapped off the elephant garlic scapes yesterday evening. Who’s going to help us harvest and eat the next 1,000? 🧄🧄🧄🧄
    Hi! Boy, do I have things to share. 🎉 🫶 Fr Hi! Boy, do I have things to share. 🎉 

🫶 Friendly reminder to focus on balance and wellness: Pete and I lived abroad with our family for the entire month of August 2023. If you ever have the opportunity to work remotely, I promise it to be a worthwhile adventure that’ll change your POV in so many ways. And, If you need an in with an incredible AirBnB in Denmark, DM me. From new playgrounds and museums to the culture and design, making this trip a reality continues to be something we celebrate every day, and I wish everyone can experience it on some level.

💻 Friendly reminder to say yes to new (overwhelming) opportunities: The professional celebration happened upon our return. Last fall, I was approached to launch @homelivinghandbook, a new Pursuit channel for @mensjournal that highlights home improvement and DIY! It has been really fun to see it come to light, and truly one of the most exciting partnerships I’ve ever had. Timing couldn’t have been better, and I’m really happy to see how it grows over time. Please follow along — the team published 150 articles in two months, covering all kinds topics for home enthusiasts! So much more to come. #linkinbio #homelivinghandbook

✌️ the end, many thanks for your support!
    How much garlic is too much garlic? Maybe we’ll How much garlic is too much garlic? Maybe we’ll find out in 2024. Finished planting 1,005 cloves (and 19 shallots) in three new beds at the farm, and crossed one huge chore off my list 📝 #gardennotes #garden2024
    Instagram post 18003690670970980 Instagram post 18003690670970980
    We grew these fools. We grew these fools.
    pumpkin patch is doing great✌️#year1 #squashbl pumpkin patch is doing great✌️#year1 #squashblossoms #pumpkinpatch
    follow emily: @merrypad


  • Like Us On Facebook

    Facebook Pagelike Widget


  • Popular Posts

    • How to Dye Pasta Different Colors (Halloween Recipe) 75 views
    • The Easy Way to Hang Art on Brick or Stone 23 views
    • 7 Steps for Restoring an Old Midcentury Sideboard Buffet 17 views
    • How to Hang a Frameless Mirror (Without Adhesive) 17 views
    • How to Make Your Own Barn Quilt 16 views
    • Reasons We Recessed Our Induction Cooktop 15 views
    • Retiring NuTone, Replacing with Atomic 14 views
    • Because Who Doesn’t Like A Good Knob Story 13 views
    • Using Counter-Snap Screws to Fix Squeaky Floors 12 views
    • Create a Unique Spider Web Pumpkin 11 views


  • BROWSE POSTS BY CATEGORY:

    • Art Attack (7)
    • Backyard (92)
    • Barn (8)
    • Basement (27)
    • Bathroom (43)
    • Beach (13)
    • Bedrooms (73)
    • Being Thrifty (53)
    • Business-y (12)
    • Buying and Renting and Selling (23)
    • Casual Celebrations (36)
    • Closets (17)
    • Curb Appeal (44)
    • Dainty Details (8)
    • Deck (23)
    • Decor (286)
    • Dining Room (37)
    • DIY (578)
    • Dog-Related (24)
    • Entryway (59)
    • Flooring (58)
    • For the Kids (32)
    • Garage (17)
    • Gardening (70)
    • Helping The Economy (30)
    • HGTV + DIY Network Projects (283)
    • Holiday-Related Projects (80)
    • Home Safety (12)
    • Kitchen (87)
    • Lighting (31)
    • Living Room (77)
    • Merry Travels (21)
    • Office Space (21)
    • Organized (41)
    • Other Pads (14)
    • Outdoor Living (12)
    • Scooter Fun (8)
    • Stairwell (20)
    • Sunroom (22)
    • Supporting Sponsors (43)
    • The Art Room (3)
    • Tools (43)
    • Uncategorizable (1)
    • Wedding (28)
    • Windows (14)
    • Work-pads (10)


  • a little bit of everything, friends, DIY, and inspiration

    • Dadand.com < My husband and his BFF
    • HGTV
    • Home Living Handbook, a Pursuit Channel for Men's Journal
  • Some Legal

    Merrypad incorporates the occasional affiliate link to Amazon.com and Minted; we link to many other websites and products, but if it is in context of a paid sponsorship, it is always noted as such. Please review the privacy policy and contact me if you have any additional questions.

    Theme customized by Pete Fazio Creative, the guy from dadand.com.


© Copyright Merrypad