• Home
  • about emily
  • before + after
  • HGTV + DIY Network
  • good press
  • contact
  • Let’s Organize These Posts:

    • Art Attack
    • Backyard
    • Barn
    • Basement
    • Bathroom
    • Beach
    • Bedrooms
    • Being Thrifty
    • Business-y
    • Buying and Renting and Selling
    • Casual Celebrations
    • Closets
    • Curb Appeal
    • Dainty Details
    • Deck
    • Decor
    • Dining Room
    • DIY
    • Dog-Related
    • Entryway
    • Flooring
    • For the Kids
    • Garage
    • Gardening
    • Helping The Economy
    • HGTV + DIY Network Projects
    • Holiday-Related Projects
    • Home Safety
    • Kitchen
    • Lighting
    • Living Room
    • Merry Travels
    • Office Space
    • Organized
    • Other Pads
    • Outdoor Living
    • Scooter Fun
    • Stairwell
    • Sunroom
    • Supporting Sponsors
    • The Art Room
    • Tools
    • Uncategorizable
    • Wedding
    • Windows
    • Work-pads
  • Search

  • Hi, I’m Emily

    Emily Fazio

    I'm a home improvement enthusiast, living a very merry DIY lifestyle.

    You can find me writing for HGTV and DIY Network, follow me on facebook and instagram, or drop me a note if you'd like. I love notes.

    Thanks for visiting!

  • BROWSE POSTS BY CATEGORY:

    • Art Attack (7)
    • Backyard (92)
    • Barn (8)
    • Basement (27)
    • Bathroom (43)
    • Beach (13)
    • Bedrooms (73)
    • Being Thrifty (53)
    • Business-y (12)
    • Buying and Renting and Selling (23)
    • Casual Celebrations (36)
    • Closets (17)
    • Curb Appeal (44)
    • Dainty Details (8)
    • Deck (23)
    • Decor (286)
    • Dining Room (37)
    • DIY (577)
    • Dog-Related (24)
    • Entryway (59)
    • Flooring (58)
    • For the Kids (32)
    • Garage (17)
    • Gardening (70)
    • Helping The Economy (30)
    • HGTV + DIY Network Projects (283)
    • Holiday-Related Projects (80)
    • Home Safety (12)
    • Kitchen (83)
    • Lighting (31)
    • Living Room (77)
    • Merry Travels (21)
    • Office Space (21)
    • Organized (41)
    • Other Pads (14)
    • Outdoor Living (12)
    • Scooter Fun (8)
    • Stairwell (20)
    • Sunroom (22)
    • Supporting Sponsors (43)
    • The Art Room (3)
    • Tools (43)
    • Uncategorizable (1)
    • Wedding (28)
    • Windows (14)
    • Work-pads (10)
  • Search

  • Pages

    • blog
    • Merrypad Features
    • Privacy Policy
    • about emily
    • before + after
      • before + after, our current home
      • before + after, our first house
    • contact me
    • choose a badge and share the merrypad.com love
  • Home
  • about emily
  • before + after
  • HGTV + DIY Network
  • good press
  • contact

Making It H’Ombre

June 6, 2012

Refinishing the buffet infused a nice energy into the previously empty sunroom, and pushed me to complete another jobber while I was on a roll. The project? Oversized art to occupy the wall above the buffet. My first attempt at creating some new sunroom art (outlined here), was a major flop. That trial of white tracing paper on white plywood with white paint accents didn’t work, and the polyurethane that I used like modpodge even dried with a yellowish tinge. I didn’t like that. You wouldn’t have either, see?

Sunroom art in its #megafail stage.

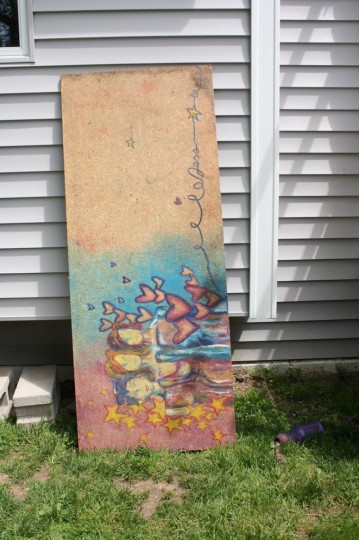
Back track: I’ve been lugging around a piece of art from my old roommate Katie for years (seriously, almost 6 years). It’s a piece I really like even though it was designed as a desktop for Katie’s friend Jess (see her named written in amongst the stars?). And because I’ve liked it, I’ve bothered to find ways to store it safely for the last almost-six years, wishing that I had the perfect place to display the colorful piece in this house.

An original piece by artist Katie Duane.

After we cleared out and reorganized the garage, I decided I wanted to move it inside and make better use of it, and so the idea to use the backside of the plywood as an art surface was born. I trimmed it to a shorter length (took 12″ off the less-ornate end that didn’t even so much effect the name “JESS”) and then primed it to have a clean finish in the backyard.

Primed plywood panel.

After my efforts to create a more textured, decoupaged look with tracing paper failed, I moved forward with brainstorming a new design. I knew I still wanted something clean and simple, something that wouldn’t compete with the sunburst floor or the chair cushions that I’m still planning on making in the next few weeks, and something that wouldn’t considerably darken the room; the walls are entirely white paint and windows right now, and I love the brightness that comes with that when the rest of the main house features more saturated tones and dark, cozier colors (my paint palette can be seen here).

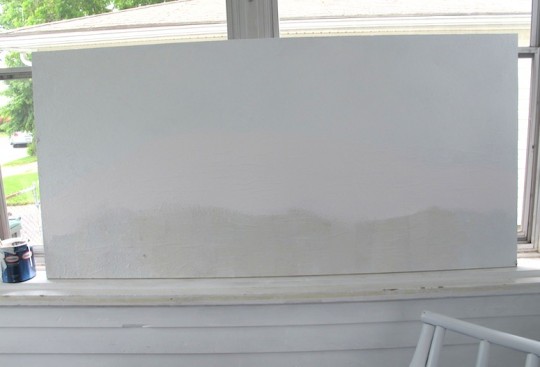
As much as the polyurethane yellowed the plywood surface and the tracing paper rippled, I didn’t consider the plywood unusable. Instead, I started fresh with a clean coat of white paint (interior satin, straight out of my leftover paint stash in the basement, a.k.a. free).

Sunroom #megafail art, getting a once-over with white paint.

As you see in the above picture, I only painted the top 2/3 with white paint, leaving the lower 1/3 blank to be painted different colors.

The plan? Create an oversized ombre painting. In pink. Home + Ombre = H’Ombre, mi hombres.

Because there wasn’t much paint left in the quart of white, I began adding quarter-teaspoons of pink paint from a leftover Benjamin Moore sample into it gradually to slowly tint it.

Adding pink paint gradually to tint the white.

Faintly tinted for the first application, a stripe that spanned the plywood in a rounded stripe around the middle of the board, you can only faintly see a difference between the white and the light pink.

Beginning the ombre with a faint pink application.

With a little more pink added to the quart of paint, I added another streak of pink just slightly below (and overlapping) the first stripe of light pink. Note: I didn’t let the paint dry before moving on to the next color, and this helped make slightly blurred transitions and kept things from looking harsh.

Continuing the ombre with a faint pink application.

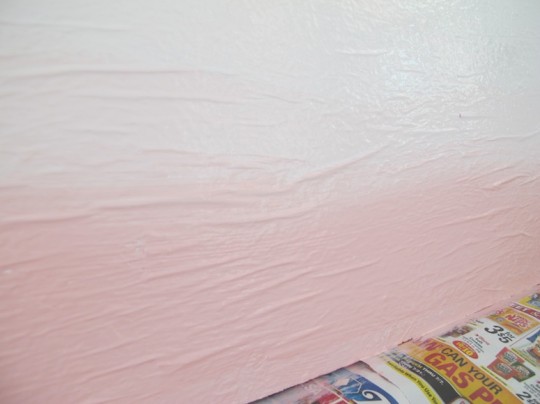
The process continued as I tinted and painted about 3 additional shades before adding a dramatically pink stripe right along the bottom.

Finishing the ombre layers on the sunroom art.

Up close, I actually ended up liking how the rippled tracing paper added texture behind the gradation in colors; almost has a wave-like effect that adds to the piece. It’s a #megafail made happy!

#megafail made happy as the ripples of the tissue paper show through the paint gradation.

I hung it on the wall in the sunroom above the new buffet table quite easily by myself, considering the heavy weight of the plywood.

After considering the placement of the studs in the wall, and measuring for height, I determined the placement for two d-rings on the back of the plywood, one on each end of the panel to distribute the weight.

Installing d-rings to the plywood so the new ombre art can be hung.

To securely hook the d-rings on the wall, I opted to install a two heavy-duty anchor screws directly into the studs. I left them unscrewed out about 1/4″ so that the d-ring could loop right over them.

Using anchor screws to serve as a place to hang the art.

I mentioned installing it myself; I covered the new buffet with thick towels, hoisted the plywood on top of it, and then hooked one side at a time. Once the left side was hooked and felt secure, it was easy to move to the right side and do the same by doing that motion where one hand reaches behind to hold the hook and you try and remain as flat as possible, even sucking in your gut, while you watch through the remaining gap between the plywood and the wall and try and watch the hooking action happen. Don’t say you haven’t done it, it’s frustrating as can be with nothing but relief and grand achievement when you finally get it to hook satisfactorily.

The piece, as a whole, feels very anchored on the wall. It doesn’t shift when I jump around or bang on the wall. Doesn’t loosen when I pull downward on it, or when I try to pull it straight off the wall; it’s hooked well, and its weight will work in its favor, keeping it safely in place.

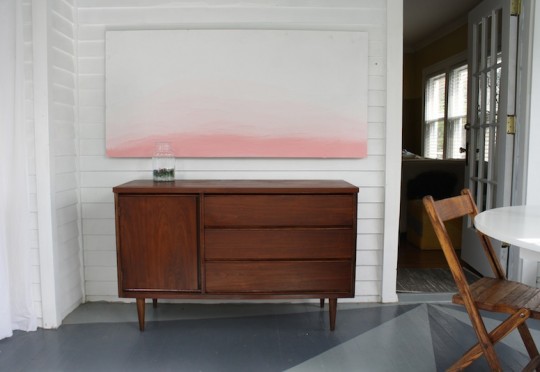
How’s it look?

New pink ombre art in the sunroom.

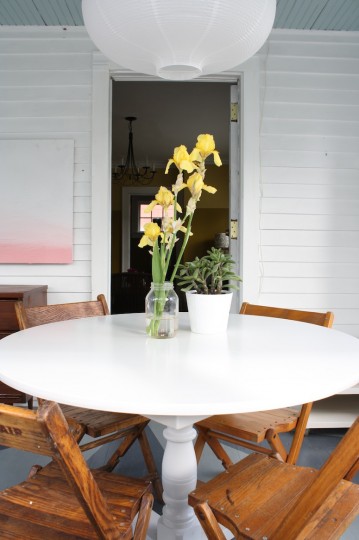
Additional little fact: I made a little/impacting change in the organization of the sunroom by moving both the table and the pendant light over to the right (closer to the front of the house by about 2-feet) in a way so that they align with the door opening; this gives us more space in the back of the sunroom to play and move around the room.

Moved the light and the table in the sunroom to align with the door.

And another fact, because I’m full of factoids today: I took these photos from outside, looking through the open windows to give a perspective I wouldn’t normally be able to in the very narrow sunroom. Pretty, right?

Moved the light and the table in the sunroom to align with the door.

The pendant was easy enough to shift; all it required was moving the hook that the wire wraps around. You can see in this picture how it had been centered in the room beneath the wooden ceiling patch (fixed here) and shifted to the left about 2-feet. By moving it that closer to where the outlet was, I was able to lower the pendant 2-feet also, bringing it down to a nicer over-the-table height.

Moving the pendant light over almost 2'.

It was previously anchored higher on the ceiling because we were needing to walk beneath the pendant, but now with the table in place, I realized that I could bring it down a little bit and I’m really glad to have made the adjustment.

The biggest impact happens from the living room, where the pendant and table are now so nicely centered in the glass paned doorway.

Looking into the sunroom from the living room.

Stepping back further, the line of sight is so nice when you’re walking into the house, even if it is a bit over-lit in this photograph.

Looking into the sunroom from the living room.

What do you think? Nothing quite like impacting art and a little furniture wiggle to make a room really stand out.

Share

Decor  / DIY  / Sunroom

Emily
I'm a home improvement enthusiast, living a very merry DIY lifestyle. I've been a freelancer writer for 10+ years and you can find my work on popular home and garden sites, like HGTV.com. Follow me on facebook and instagram, or drop me a note.

9 Comments


Brittany aka Pretty Handy Girl
June 6, 2012 at 4:44 pm
Reply

Emily, I love it and what a happy CraftFail!


    Emily
    June 6, 2012 at 5:15 pm

    Thanks Brittany!

Lisa Davies
June 6, 2012 at 7:41 pm
Reply

I love the artwork. The room is really coming together – I love all the sunlight.

I particularly like your photo from the loungeroom!
Lisa


    Emily
    June 6, 2012 at 9:40 pm

    Thanks Lisa! It’s been a nice small transformation and really didn’t take too much investment or time. We use it so much more than we did last spring!

Colleen @ Mommy Panda
June 7, 2012 at 12:19 pm
Reply

That ombre looks great! Haha I’m surprised you have pink paint though…did I miss a pink project? Most of your color choices are so much darker!


    Colleen @ Mommy Panda
    June 7, 2012 at 12:19 pm

    Or was it one of the cheapy clearance paint cans?

    Emily
    June 7, 2012 at 12:23 pm

    Thanks Colleen :) I picked up a couple of Benjamin Moore samples in random shades last summer while they were having a Facebook promotion. I hadn’t used that specific pink yet, it was just sitting around.

Mindy
June 7, 2012 at 1:30 pm
Reply

Love it ALL! It makes me long for a sun room! (Someday!)
Keep the cleverness coming! :-)


    Emily
    June 7, 2012 at 1:33 pm

    Thanks Mindy! Glad you like!

Leave a Reply Cancel reply

Your email address will not be published. Required fields are marked *

This site uses Akismet to reduce spam. Learn how your comment data is processed.

  • HI, I’m Emily

    Emily Fazio

    I'm a home improvement enthusiast, living a very merry DIY lifestyle. Follow me on facebook and instagram, or drop me a note if you'd like. I love notes.

    Thanks for visiting!

  • Instagram

    merrypad

    Merrypad by Emily Fazio
    One straggler from #garlic2021 debuted with 7 stal One straggler from #garlic2021 debuted with 7 stalks and 7 scapes, and I can’t wait to see this mammoth looks like when it’s pulled next month. #garlic2022 

Also, fierce springtime performance by parsley, chamomile, and self-seeded cilantro.
    Annual garlic notes #garden2022 ~315 cloves total Annual garlic notes #garden2022
~315 cloves total
50 in new, unfenced garden
Still need thick mulch on everything
Did a terrible job tracking varieties when I harvested, so it’s all a mix of hardneck now 😒
Added some big cloves from @chasefarms and look forward to adding some @fruition_seeds in #garden2023 when @porterfarmscsa delivers.
    #smellovision — 22 pounds of concord grapes harv #smellovision — 22 pounds of concord grapes harvested from my parents pseudo-vineyard 🌈🍇 happy holidays, everyone. You’re getting jelly. #grapesfarming
    Teddy bear sunflowers 😍 #gardennotes @fruition_ Teddy bear sunflowers 😍 #gardennotes @fruition_seeds #garden2021
    🥔🥔🥔🥔🥔 〰️ decent yield from one 🥔🥔🥔🥔🥔 〰️ decent yield from one sprouted seed potato in the pantry! #garden2021 #hotpotato #misfitsmarket #organicpotato #plantapotatogetapotato
    Haven’t been able to grow green beans to the top Haven’t been able to grow green beans to the top of the trellis in a minute but this variety already scaled to the top AND back down. No beans yet. #gardennotes #garden2021 #trellis
    Annual 7/12 garden; tomatillos far left. #LDD wood Annual 7/12 garden; tomatillos far left. #LDD woods.
    Load More... follow emily: @merrypad


  • Like Us On Facebook

    Facebook Pagelike Widget


  • Popular Posts

    • How to fix an IKEA drawer. Cheap IKEA Drawers (And The Quick Fix) 59.8k views
    • DIY sideboard rehab. Our Refinished Midcentury Buffet 52.5k views
    • How to design and make a barn quilt. How to Make Your Own Barn Quilt 45.4k views
    • How to hang art on brick surfaces using specialty clips. The Easy Way to Hang Art on Brick or Stone 35.3k views
    • DIY driveway removal. The Driveway Rocks 33.2k views
    • Our DIY flagstone patio. Building a Patio in One Day 30.9k views
    • Goodbye, gold fireplace covering. Less Is More: How to Remove a Fireplace Surround 27.5k views
    • Tips for dying pasta different colors, and a Halloween Recipe for the kids. Tips for Dying Pasta Different Colors (+ A Special Halloween Recipe) 24.9k views
    • Fix an ikea dresser drawer. Life Support For An IKEA Dresser 24.4k views
    • After: Custom wooden garden fence. Expanding Our Backyard Garden 20.7k views


  • BROWSE POSTS BY CATEGORY:

    • Art Attack (7)
    • Backyard (92)
    • Barn (8)
    • Basement (27)
    • Bathroom (43)
    • Beach (13)
    • Bedrooms (73)
    • Being Thrifty (53)
    • Business-y (12)
    • Buying and Renting and Selling (23)
    • Casual Celebrations (36)
    • Closets (17)
    • Curb Appeal (44)
    • Dainty Details (8)
    • Deck (23)
    • Decor (286)
    • Dining Room (37)
    • DIY (577)
    • Dog-Related (24)
    • Entryway (59)
    • Flooring (58)
    • For the Kids (32)
    • Garage (17)
    • Gardening (70)
    • Helping The Economy (30)
    • HGTV + DIY Network Projects (283)
    • Holiday-Related Projects (80)
    • Home Safety (12)
    • Kitchen (83)
    • Lighting (31)
    • Living Room (77)
    • Merry Travels (21)
    • Office Space (21)
    • Organized (41)
    • Other Pads (14)
    • Outdoor Living (12)
    • Scooter Fun (8)
    • Stairwell (20)
    • Sunroom (22)
    • Supporting Sponsors (43)
    • The Art Room (3)
    • Tools (43)
    • Uncategorizable (1)
    • Wedding (28)
    • Windows (14)
    • Work-pads (10)


  • a little bit of everything, friends, DIY, and inspiration

    • Dadand.com < My husband and his BFF
    • DIY Network
    • HGTV
  • Get Posts Via Email

  • Some Legal

    Merrypad incorporates the occasional affiliate link to Amazon.com and Minted; we link to many other websites and products, but if it is in context of a paid sponsorship, it is always noted as such. Please review the privacy policy and contact me if you have any additional questions.

    Theme customized by Pete Fazio Creative, the guy from dadand.com.


© Copyright Merrypad