• Home
  • about emily
  • before + after
  • HGTV + DIY Network
  • good press
  • contact
  • Let’s Organize These Posts:

    • Art Attack
    • Backyard
    • Barn
    • Basement
    • Bathroom
    • Beach
    • Bedrooms
    • Being Thrifty
    • Business-y
    • Buying and Renting and Selling
    • Casual Celebrations
    • Closets
    • Curb Appeal
    • Dainty Details
    • Deck
    • Decor
    • Dining Room
    • DIY
    • Dog-Related
    • Entryway
    • Flooring
    • For the Kids
    • Garage
    • Gardening
    • Helping The Economy
    • HGTV + DIY Network Projects
    • Holiday-Related Projects
    • Home Safety
    • Kitchen
    • Lighting
    • Living Room
    • Merry Travels
    • Office Space
    • Organized
    • Other Pads
    • Outdoor Living
    • Scooter Fun
    • Stairwell
    • Sunroom
    • Supporting Sponsors
    • The Art Room
    • Tools
    • Uncategorizable
    • Wedding
    • Windows
    • Work-pads
  • Search

  • Hi, I’m Emily

    Emily Fazio

    I'm a home improvement enthusiast, living a very merry DIY lifestyle.

    You can find me writing for HGTV and DIY Network, follow me on facebook and instagram, or drop me a note if you'd like. I love notes.

    Thanks for visiting!

  • BROWSE POSTS BY CATEGORY:

    • Art Attack (7)
    • Backyard (92)
    • Barn (8)
    • Basement (27)
    • Bathroom (43)
    • Beach (13)
    • Bedrooms (73)
    • Being Thrifty (53)
    • Business-y (12)
    • Buying and Renting and Selling (23)
    • Casual Celebrations (36)
    • Closets (17)
    • Curb Appeal (44)
    • Dainty Details (8)
    • Deck (23)
    • Decor (286)
    • Dining Room (37)
    • DIY (577)
    • Dog-Related (24)
    • Entryway (59)
    • Flooring (58)
    • For the Kids (32)
    • Garage (17)
    • Gardening (70)
    • Helping The Economy (30)
    • HGTV + DIY Network Projects (283)
    • Holiday-Related Projects (80)
    • Home Safety (12)
    • Kitchen (83)
    • Lighting (31)
    • Living Room (77)
    • Merry Travels (21)
    • Office Space (21)
    • Organized (41)
    • Other Pads (14)
    • Outdoor Living (12)
    • Scooter Fun (8)
    • Stairwell (20)
    • Sunroom (22)
    • Supporting Sponsors (43)
    • The Art Room (3)
    • Tools (43)
    • Uncategorizable (1)
    • Wedding (28)
    • Windows (14)
    • Work-pads (10)
  • Search

  • Pages

    • blog
    • Merrypad Features
    • Privacy Policy
    • about emily
    • before + after
      • before + after, our current home
      • before + after, our first house
    • contact me
    • choose a badge and share the merrypad.com love
  • Home
  • about emily
  • before + after
  • HGTV + DIY Network
  • good press
  • contact

The Perfect Bouquet For The Allergy-Riddled

January 8, 2013

I didn’t actually go into planning our wedding thinking that we wouldn’t have any real flowers at our ceremony or reception… it kind of just happened, and turns out, I was completely fine with it. I don’t think a lot of brides would take that approach, or even consider it for more than a few minutes (unless maybe they’re severely allergic to pollen, which I’m not). I always envisioned myself with a ginormous bouquet of peonies, all springtime-ish and lush and full of scent and so heavy that it made my arm muscles pop, but when we scheduled our wedding for Christmas Eve and chose to have it in a fake flower shop, I began to consider the alternatives. Peonies don’t scream “winter wonderland.”

On any given day, Preferred Plants has a really wide assortment of flowers, and sure, they’re all silk and plastic, but they look good, not good, great, not great, like the healthiest fresh-cut botanicals you’d find anywhere (and truth, they fooled and amazed many of our guests, some of whom even came with allergy pills):

Enjoying the flowers in Preferred Plants.

The owners clued us in on a trend that I was in no way aware of: Recreating your wedding bouquet using silk flowers.

Genius, really. Of course, the likeliness of a bride to do this probably is more dependent on the style of her bouquet and its ability to actually fit in with her family’s home decor, but I thought it was a brilliant idea, especially since so many mementos of your wedding day are quickly packed away in boxes or trashed. It’s kind of the best of both worlds, for brides who are dead set on the real deal–get a live bouquet for the big day, and a faux-recreation to have forever.

Given that I would be getting married in this shop, surrounded by silk inventory, I also chose to make my bouquet (and Julia’s best girl mini-bouquet) out of their flowers. I locked in on this decision after visiting the shop on its Night of Lights, wherein it presented its seasonal merchandise including wintery branches and flowers that fit in oh so well with the winter timeliness of our wedding.

Night of Lights at Preferred Plants.

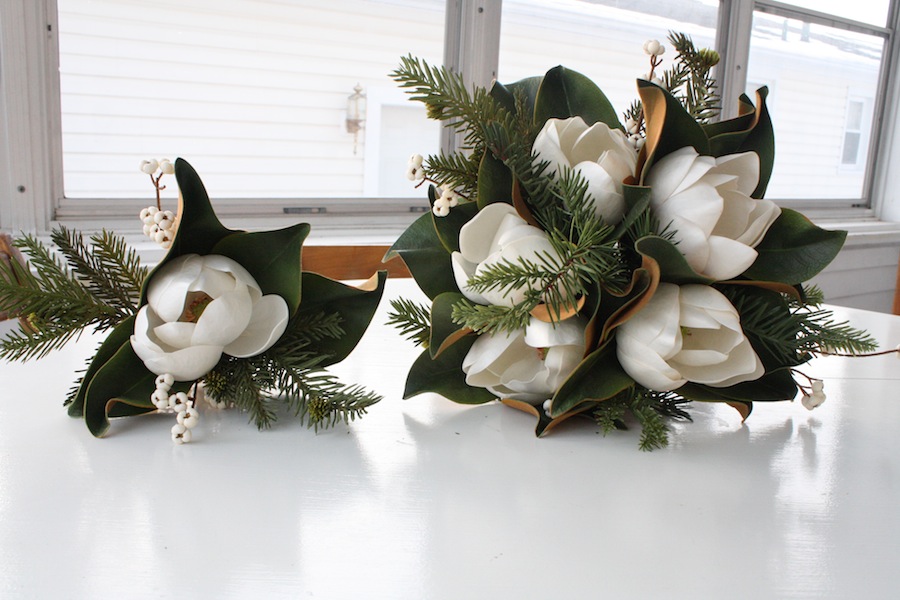
As an lush alternate to the springtime peony, I fell in love with these perfectly white magnolias that were part of the seasonal merchandise selection (complete with thick leaves and a detailed stamen and pistil and pollen). Blurriest iPhone picture ever.

Blurriest faux-magnolia photo ever.

To accent the magnolias, I chose an assortment of faux pine branches (specifically, douglas fir and colonial), and tallow berries. Wintertime bliss.

All of the chosen flowers and branches for my DIY bouquet.

Purchased, I brought the flowers, branches, and berries home, laid them out on our own coffee table and began to dissect what I had. Most everything assembled nicely without adjustments, I would only need to trim the ends to length when it was complete. One major benefit of working with silk was that the flowers, stems, and leaves are lightly wired so I was able to bend pieces into better positioning in areas where it felt too crowded.

The tallow berry branches were the only component I deconstructed a little bit, because there were multiple stems bundled within each long piece sold, and I only wanted small bunches popping between the magnolia leaves.

Deconstruction the faux Tallow berry branches for my DIY bouquet.

I used a fine florist wire to cinch the bouquet together, something I had on hand which only cost a few dollars. It was Julia’s bouquet that I was assembling when I snapped this picture; her bouquet was composed of a single magnolia, one pine branch divided into two sections, and a few lengths of berry.

Assembling my DIY wedding bouquet.

For my bouquet, I used 5 magnolias, 2 pine branches, and several branches of hallow which mostly popped out from between the flowers. The wire wrap was concealed with florists tape, not in any especially fancy fashion, just to get the job done. I used brown so help it blend in with the stems.

Wrapping the stem of our fake bouquets with florist tape.

Once trimmed, the ends of the stems exposed a green paper lining which makes them look even more like fresh-cut flowers, I love this detail.

Cut ends of these fake flowers look real.

All in all, it ended up being perfect for me.

Love that DIY bouquet, love that man.

Maybe our photographer got a better close-up of the bouquet. You should also know that I didn’t throw it, it’s home with us sitting in a vase on our living room (or, as shown, photographed in the sunroom).

Finished magnolia bouquets.

I have no idea how real bouquets price out but I’m pretty happy to have ours forever. They’re not so much wedding-y that they won’t fit into our wintertime decor, and I’m looking forward to seeing them every year. If you’re curious on pricing (because Preferred Plants does sell online), the total for both my bouquets was $133.25:

  • Magnolias, $87.00 ($14.50/each)
  • Douglas Fir Pine, $9.75
  • Colonial Pine, $14.00 ($7.00/each)
  • Tallow, $22.50 ($7.50/each)

Finished magnolia bouquets.

Did anyone else surround themselves with silk flowers at their wedding? How about that recreate-your-bouquet idea, would anyone out there do that?

Share

DIY  / Wedding

Emily
I'm a home improvement enthusiast, living a very merry DIY lifestyle. You can find me writing for HGTV and DIY Network, follow me on facebook and instagram, or drop me a note if you'd like. I love notes.

5 Comments


Jessica@J.ParisDesigns
January 8, 2013 at 10:10 am
Reply

I was dead set AGAINST real flowers at our October wedding. It always felt like such a waste, because once you set out on your honeymoon right after the wedding, your guests get to take home and enjoy the flowers for that following week – when you get back, they’re all brown and dead! Plus, pricing out florists was unbelievable and waaay out of our price range. I didn’t use silk (because I don’t have a place like Preferred Plants and everything else looked fake) but I made a brooch bouquet which seems to be big right now. It, too, is sitting in a vase in our living room. I love alternatives to the traditional bouquet – and better yet when you can keep it afterwards. Nice work! :)


    Emily
    January 8, 2013 at 10:28 am

    I’m always impressed with the unconventional approaches, like brooches or wooden flowers or sparkly diamonds. How’d you find enough to use (and how many exactly did it take to create your bouquet)?

Jessica@J.ParisDesigns
January 8, 2013 at 11:20 am
Reply

I got some from mom, grandma, misc. family members. Mine weren’t all old. I bought a lot new at stores -craft and department stores – antique stores, flea markets. I got the idea very soon in our engagement so I had a year to look. I used beads as filler…I’d say about 50 brooches or so. It. Was. Heavy.


    Emily
    January 8, 2013 at 11:37 am

    Love the idea as beads as filler, too! Impressed with your effort!

Harper
January 8, 2013 at 11:21 am
Reply

Loved your flowers and super impressed that you did them yourself (although knowing you, I shouldn’t be surprised!). I never would have guessed that they were silk flowers. Great that you can keep it as a forever momento.


Leave a Reply Cancel reply

Your email address will not be published. Required fields are marked *

This site uses Akismet to reduce spam. Learn how your comment data is processed.

  • HI, I’m Emily

    Emily Fazio

    I'm a home improvement enthusiast, living a very merry DIY lifestyle. Follow me on facebook and instagram, or drop me a note if you'd like. I love notes.

    Thanks for visiting!

  • Instagram

    Can’t believe I ever bought dumpling wrappers. 🥟 Pulse a few cups of flour in the food processor drizzling in cold water until it forms dough. Roll smooth. Use a conveniently large cookie cutter, or just trim out squares. The end ❤️ #hny #dumplings
    Didn’t think I’d be making more masks, but her Didn’t think I’d be making more masks, but here we are (now feat. recycled t-shirt layer for added softness and bonus-layer protection). #diy #amateurseamstress #diymask
    Get out there ☀️ Get out there ☀️
    The gang finally showed up. 👻 The gang finally showed up. 👻
    A record 233 cloves + 10 shallots 🧛🏻‍♀️ 
#merrypadathome #garden2021 #garlic #gardennotes #whatisnormal
    ⭐️⭐️⭐️⭐️⭐️ ⭐️⭐️⭐️⭐️⭐️
    Immeasurably tall, lanky tomatillos. #garden2020 # Immeasurably tall, lanky tomatillos. #garden2020 #tomatillos #nofilter
    32 oz., reserved for the brave 🌶🌶 😍#homeg 32 oz., reserved for the brave 🌶🌶 😍#homegrown #tomatillos #harvest2020
    Nothing says “let’s stay home all fall, too” Nothing says “let’s stay home all fall, too” like a badass custom fireplace on our patio. 🔥 #chiminea #merrypadathome
    Load More... follow emily: @merrypad


  • Like Us On Facebook

    Facebook Pagelike Widget


  • Popular Posts

    • How to fix an IKEA drawer. Cheap IKEA Drawers (And The Quick Fix) 40.3k views
    • DIY sideboard rehab. Our Refinished Midcentury Buffet 39.9k views
    • How to design and make a barn quilt. How to Make Your Own Barn Quilt 33.4k views
    • DIY driveway removal. The Driveway Rocks 24.9k views
    • How to hang art on brick surfaces using specialty clips. The Easy Way to Hang Art on Brick or Stone 24.5k views
    • Goodbye, gold fireplace covering. Less Is More: How to Remove a Fireplace Surround 22.3k views
    • Our DIY flagstone patio. Building a Patio in One Day 17.6k views
    • Bedroom paint, freshened up with Snowbound paint. Painting Everything White: We Chose Snowbound, By Sherwin Williams 16.6k views
    • Tips for dying pasta different colors, and a Halloween Recipe for the kids. Tips for Dying Pasta Different Colors (+ A Special Halloween Recipe) 15.4k views
    • Fix an ikea dresser drawer. Life Support For An IKEA Dresser 14.3k views


  • BROWSE POSTS BY CATEGORY:

    • Art Attack (7)
    • Backyard (92)
    • Barn (8)
    • Basement (27)
    • Bathroom (43)
    • Beach (13)
    • Bedrooms (73)
    • Being Thrifty (53)
    • Business-y (12)
    • Buying and Renting and Selling (23)
    • Casual Celebrations (36)
    • Closets (17)
    • Curb Appeal (44)
    • Dainty Details (8)
    • Deck (23)
    • Decor (286)
    • Dining Room (37)
    • DIY (577)
    • Dog-Related (24)
    • Entryway (59)
    • Flooring (58)
    • For the Kids (32)
    • Garage (17)
    • Gardening (70)
    • Helping The Economy (30)
    • HGTV + DIY Network Projects (283)
    • Holiday-Related Projects (80)
    • Home Safety (12)
    • Kitchen (83)
    • Lighting (31)
    • Living Room (77)
    • Merry Travels (21)
    • Office Space (21)
    • Organized (41)
    • Other Pads (14)
    • Outdoor Living (12)
    • Scooter Fun (8)
    • Stairwell (20)
    • Sunroom (22)
    • Supporting Sponsors (43)
    • The Art Room (3)
    • Tools (43)
    • Uncategorizable (1)
    • Wedding (28)
    • Windows (14)
    • Work-pads (10)


  • a little bit of everything, friends, DIY, and inspiration

    • Dadand.com < My husband and his BFF
    • DIY Network
    • HGTV
  • Get Posts Via Email

  • Some Legal

    Merrypad incorporates the occasional affiliate link to Amazon.com and Minted; we link to many other websites and products, but if it is in context of a paid sponsorship, it is always noted as such. Please review the privacy policy and contact me if you have any additional questions.

    Theme customized by Pete Fazio Creative, the guy from dadand.com.


© Copyright Merrypad