• Home
  • about emily
  • before + after
  • HGTV + DIY Network
  • good press
  • contact
  • Let’s Organize These Posts:

    • Art Attack
    • Backyard
    • Barn
    • Basement
    • Bathroom
    • Beach
    • Bedrooms
    • Being Thrifty
    • Business-y
    • Buying and Renting and Selling
    • Casual Celebrations
    • Closets
    • Curb Appeal
    • Dainty Details
    • Deck
    • Decor
    • Dining Room
    • DIY
    • Dog-Related
    • Entryway
    • Flooring
    • For the Kids
    • Garage
    • Gardening
    • Helping The Economy
    • HGTV + DIY Network Projects
    • Holiday-Related Projects
    • Home Safety
    • Kitchen
    • Lighting
    • Living Room
    • Merry Travels
    • Office Space
    • Organized
    • Other Pads
    • Outdoor Living
    • Scooter Fun
    • Stairwell
    • Sunroom
    • Supporting Sponsors
    • The Art Room
    • Tools
    • Uncategorizable
    • Wedding
    • Windows
    • Work-pads
  • Search

  • Hi, I’m Emily

    Emily Fazio

    I'm a home improvement enthusiast, living a very merry DIY lifestyle.

    You can find me writing for HGTV and DIY Network, follow me on facebook and instagram, or drop me a note if you'd like. I love notes.

    Thanks for visiting!

  • BROWSE POSTS BY CATEGORY:

    • Art Attack (7)
    • Backyard (92)
    • Barn (8)
    • Basement (27)
    • Bathroom (43)
    • Beach (13)
    • Bedrooms (73)
    • Being Thrifty (53)
    • Business-y (12)
    • Buying and Renting and Selling (23)
    • Casual Celebrations (36)
    • Closets (17)
    • Curb Appeal (44)
    • Dainty Details (8)
    • Deck (23)
    • Decor (286)
    • Dining Room (37)
    • DIY (577)
    • Dog-Related (24)
    • Entryway (59)
    • Flooring (58)
    • For the Kids (32)
    • Garage (17)
    • Gardening (70)
    • Helping The Economy (30)
    • HGTV + DIY Network Projects (283)
    • Holiday-Related Projects (80)
    • Home Safety (12)
    • Kitchen (83)
    • Lighting (31)
    • Living Room (77)
    • Merry Travels (21)
    • Office Space (21)
    • Organized (41)
    • Other Pads (14)
    • Outdoor Living (12)
    • Scooter Fun (8)
    • Stairwell (20)
    • Sunroom (22)
    • Supporting Sponsors (43)
    • The Art Room (3)
    • Tools (43)
    • Uncategorizable (1)
    • Wedding (28)
    • Windows (14)
    • Work-pads (10)
  • Search

  • Pages

    • blog
    • Good Press: Special Features, Freelance Projects, and Long-Term Clients
    • Privacy Policy
    • about emily
    • before + after
      • before + after – transforming my first home
      • before + after, our current home
    • contact me
    • choose a badge and share the merrypad.com love
  • Home
  • about emily
  • before + after
  • HGTV + DIY Network
  • good press
  • contact

Make a Colorful, Kid-Friendly DIY Abacus Toy

March 24, 2016

This post was originally published on DIY Network’s blog Made + Remade in July 2014.

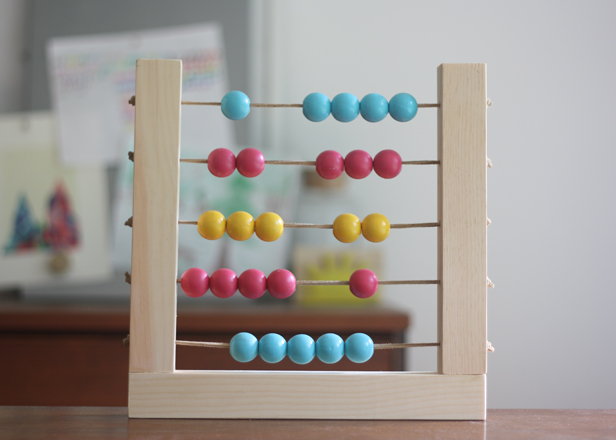
Wooden playthings are timeless and enjoyed by kids of all ages. There’s something to be said about classic wooden train sets and hand-carved rattles when you compare them to the mass produced plastic, light-up toys that inevitably also occupy space in your family’s toy chest, and I’m here today to show you one that you can make at home: A colorful DIY abacus.

How to make a DIY abacus for your kids to play with.

Step 1

Cut a board of 2×2 wood into three pieces: The two sides measure 12″ in length, the base will measure 15″ in length.

Step 2

You will want to make sure your abacus rungs are even, and the best way to do this is to create a template using scrap wood. Measure and pre-drilling 5 holes, each spaced 1-1/2″ apart.

How to make a DIY abacus for your kids to play with.

Step 3 

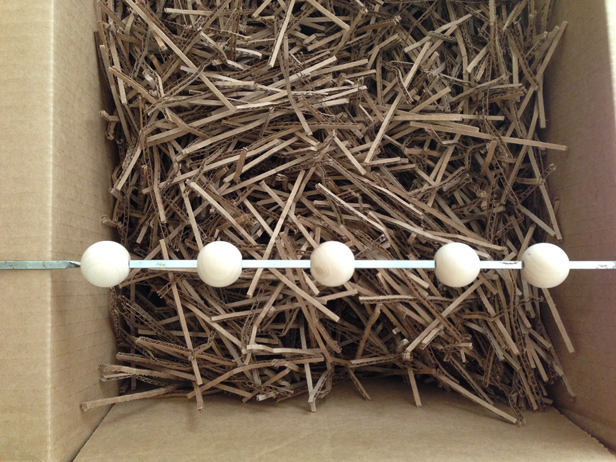
Prepare to paint the wooden beads your chosen colors. It’s really not easy to evenly paint something that’s round, but in this case, I was able to string the beads onto a grilling skewer and balance them over a wooden box for elevation.

How to paint round beads.

Step 4 

Coat your beads using non-toxic paint. Most of mine required 3 coats to achieve an opaque look.

How to paint round beads.

Step 5

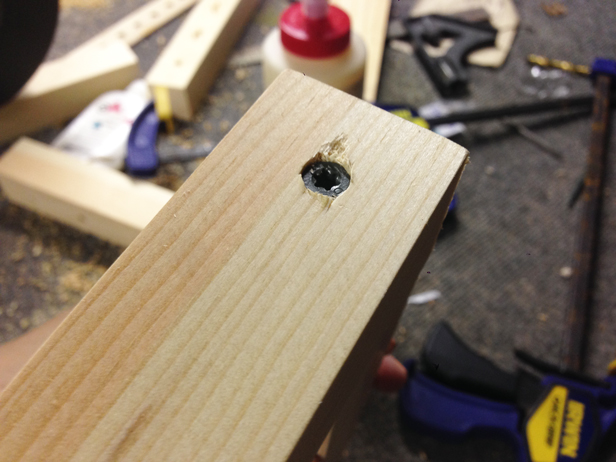
While the paint dries, assemble your abacus frame by joining the pieces using a screw at each lap joint. Tip: In addition to pre-drilling to ward against splitting, use a second drill bit that is slightly larger than your screw head to widen the opening and allow for you to countersink the screw so that it is out of sight completely.

How to make a DIY abacus for your kids to play with.

Step 6

Sand the assembled abacus using a fine sandpaper (tap into a palm sander if you have one handy). Smoothing down the edges and surfaces evens out the abacus frame nicely. If you want to seal the wood, I recommend a non-toxic finish like beeswax, or a salad bowl oil finish to keep the toy kid-friendly.

How to make a DIY abacus for your kids to play with.

Step 7

String your beads onto 16″ lengths of leather cord, and attach them to the frame row by row. I like using leather cord for this project versus a dowel, because the narrow dowels that you would need to fit through these beads seems apt to snap like a twig if pulled the wrong way by a child. Leather has a little stretch, making it more kid-friendly.

How to make a DIY abacus for your kids to play with.

Step 8

Knot each end so that they are very taut, and trim any excess leather away.

How to make a DIY abacus for your kids to play with.

Step 9

Enjoy your DIY abacus as a piece of classic home decor, or as a toy for your child!

How to make a DIY abacus for your kids to play with.

Share

Decor  / DIY  / For the Kids  / HGTV + DIY Network Projects

Emily
I'm a home improvement enthusiast, living a very merry DIY lifestyle. I've been a freelancer writer for 10+ years and you can find my work on popular home and garden sites, like HGTV.com. Follow me on facebook and instagram, or drop me a note.

2 Comments


cd
March 24, 2016 at 1:40 pm
Reply

Did I miss a pot about an extended vacation or something? I like catching up on these old projects – but do you have any current projects scheduled?


    Emily
    March 24, 2016 at 1:46 pm

    Hey there! No extended vaca and still have plenty of projects in progress (especially now that the weather is improving!). I’ve just been slowly migrating a bunch of old content from DIY Network so that it can live on Merrypad – I’m about half way done with what was a very long list. I was going to sprinkle in new posts as well but once I got rolling I actually figured they’d get overlooked in the shuffle, so I’ll hold off publishing new projects until I get caught up on the stuff you’re seeing now. I did a quick mention of it in this post last month. In short, please bear with me and I promise it will be done soon and you’ll never have to read about old projects again :) http://www.merrypad.com/2016/02/19/diy-network-projects-3/

    Emily

Leave a Reply Cancel reply

Your email address will not be published. Required fields are marked *

This site uses Akismet to reduce spam. Learn how your comment data is processed.

  • HI, I’m Emily

    Emily Fazio

    I'm a home improvement enthusiast, living a very merry DIY lifestyle. Follow me on facebook and instagram, or drop me a note if you'd like. I love notes.

    Thanks for visiting!

  • Instagram

    merrypad

    Merrypad by Emily Fazio
    Instagram post 17902304861708711 Instagram post 17902304861708711
    Highly recco mining those #herkimerdiamonds ✌️ Highly recco mining those #herkimerdiamonds ✌️
    Pt. 2: Well before Halloween, the last of the garl Pt. 2: Well before Halloween, the last of the garlic went into the home garden: 10 rows [L>R] 6 whole Nootka Rose as an experiment, 3x8 Mennonite-grown cloves from Aman’s, and 6x8 (and, I think, total 112? notes are cryptic) “normal.”
#gardennotes #growinggarlic #garden2023 #whatisnormal #merrypadathome
    Out of sight but [documented so it’s] not out of Out of sight but [documented so it’s] not out of mind! #garden2024 kicks off with my favorite biennial: elephant garlic! 15 cloves planted from small, to medium, to enormous. #gardennotes
    Annual garlic notes for #garden2023, pt. 1: this i Annual garlic notes for #garden2023, pt. 1: this is getting ooc, and I love it. 👩‍🌾🧑‍🌾

🧄 65% of the planting is in a new plot in the country. 🧄 Seeing if NR grows bigger with more sunlight. 🧄 Big @chasefarms cloves from 2021 were really productive in our home garden; can’t wait to see how they can show up next year in the new space. 🧄

Hand-turned a small bed, but big thanks to my sister, who rolled into town just in time to help me double its size (and did not complain once).
    One straggler from #garlic2021 debuted with 7 stal One straggler from #garlic2021 debuted with 7 stalks and 7 scapes, and I can’t wait to see this mammoth looks like when it’s pulled next month. #garlic2022 

Also, fierce springtime performance by parsley, chamomile, and self-seeded cilantro.
    Annual garlic notes #garden2022 ~315 cloves total Annual garlic notes #garden2022
~315 cloves total
50 in new, unfenced garden
Still need thick mulch on everything
Did a terrible job tracking varieties when I harvested, so it’s all a mix of hardneck now 😒
Added some big cloves from @chasefarms and look forward to adding some @fruition_seeds in #garden2023 when @porterfarmscsa delivers.
    Load More... follow emily: @merrypad


  • Like Us On Facebook

    Facebook Pagelike Widget


  • Popular Posts

    • How to fix an IKEA drawer. The Easy Fix For Broken IKEA Drawers 66.9k views
    • DIY sideboard rehab. 7 Steps for Restoring an Old Midcentury Sideboard Buffet 56.8k views
    • How to design and make a barn quilt. How to Make Your Own Barn Quilt 50k views
    • How to hang art on brick surfaces using specialty clips. The Easy Way to Hang Art on Brick or Stone 40.1k views
    • DIY driveway removal. How to Remove an Old Asphalt Driveway 35.1k views
    • Our DIY flagstone patio. Building a Flagstone Patio in One Day 32.8k views
    • Tips for dying pasta different colors, and a Halloween Recipe for the kids. How to Dye Pasta Different Colors (Halloween Recipe) 32.5k views
    • Fix an ikea dresser drawer. Life Support For An IKEA Dresser 29.7k views
    • Goodbye, gold fireplace covering. Less Is More: How to Remove a Fireplace Surround 29.5k views
    • After: Custom wooden garden fence. Designing a Durable Wooden Fence For Our Beautiful Backyard Garden 23k views


  • BROWSE POSTS BY CATEGORY:

    • Art Attack (7)
    • Backyard (92)
    • Barn (8)
    • Basement (27)
    • Bathroom (43)
    • Beach (13)
    • Bedrooms (73)
    • Being Thrifty (53)
    • Business-y (12)
    • Buying and Renting and Selling (23)
    • Casual Celebrations (36)
    • Closets (17)
    • Curb Appeal (44)
    • Dainty Details (8)
    • Deck (23)
    • Decor (286)
    • Dining Room (37)
    • DIY (577)
    • Dog-Related (24)
    • Entryway (59)
    • Flooring (58)
    • For the Kids (32)
    • Garage (17)
    • Gardening (70)
    • Helping The Economy (30)
    • HGTV + DIY Network Projects (283)
    • Holiday-Related Projects (80)
    • Home Safety (12)
    • Kitchen (83)
    • Lighting (31)
    • Living Room (77)
    • Merry Travels (21)
    • Office Space (21)
    • Organized (41)
    • Other Pads (14)
    • Outdoor Living (12)
    • Scooter Fun (8)
    • Stairwell (20)
    • Sunroom (22)
    • Supporting Sponsors (43)
    • The Art Room (3)
    • Tools (43)
    • Uncategorizable (1)
    • Wedding (28)
    • Windows (14)
    • Work-pads (10)


  • a little bit of everything, friends, DIY, and inspiration

    • Dadand.com < My husband and his BFF
    • HGTV
  • Some Legal

    Merrypad incorporates the occasional affiliate link to Amazon.com and Minted; we link to many other websites and products, but if it is in context of a paid sponsorship, it is always noted as such. Please review the privacy policy and contact me if you have any additional questions.

    Theme customized by Pete Fazio Creative, the guy from dadand.com.


© Copyright Merrypad