This post was originally published on DIY Network’s blog Made + Remade in June 2013.
I’ve planted a tomato garden for as many years as I’ve been a homeowner. I do it because it enables me to affordably eat my body weight in BLT sandwiches every summer, and also because I’ve really enjoyed learning how to cultivate garden space. More so the latter, I guess, though I do really like a good BLT.
My family moved recently, which uprooted our gardening situation (pun totally intended) and put us in the position to build a new gardening space. Unlike our previous backyard, we are having to take extra precautions to protect our plants from the wandering deer and wildlife. It’s a problem that I know many deal with, but an easy issue to overcome with a little planning and barricading.

It’s not too late to get your tomatoes into the ground if you haven’t already (living in NY I have had success getting them rooted from early May through early July), and you can even grow tomatoes in hanging baskets if you’re tight on space. Keep on reading so see how I created a brand new, deer-resistant garden bed at our home. Grow babies, grow!
Step 1
I chose a space for the new garden, keeping in mind that tomatoes require a lot of sunlight (6 or more hours daily) to produce to their maximum potential. One particular area in our backyard has a generous amount of natural light during the day, so we are testing it as the home for our tomatoes this year. If it’s successful, we’ll plant here again next year, and if it isn’t, we’ll look for a different area to garden.

Step 2
I cleared the garden bed of grass, shaving off the top layer of soil and the grass roots. If you have barren spots in other parts of your yard, consider transplanting these grass “toupees” and water them generously to help them take root.
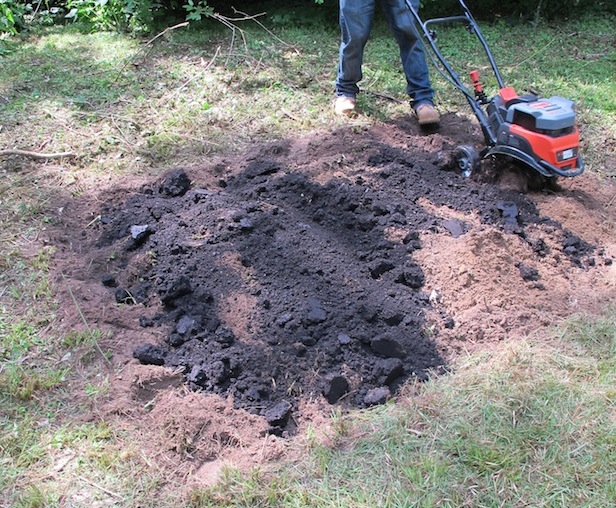
Step 3
Next, I tilled the soil. You can easily break up the soil with a rototiller, or loosen it with a shovel.

Step 4
Soil doesn’t always naturally possess the nutrients required for nourishing baby plants, so I like to help it out a little bit. Natural manure is the perfect fertilizer (one reason to love living next door to a dairy farm), but you can get it by the bag in stores too. This year, I selected an in-ground product by Miracle-Gro and bought 4 cubic feet to help fertilize the garden bed. There’s a lot to know when it comes to finding the perfect fertilizer for your soil type, and this article about fertilizer can shed some additional light.
Using your tiller or shovel, mix the new fertilizer so that it is combined with the natural soil.
Step 5
Begin planting! This year, I have five tomato varieties – two tall vine heirlooms, a Cherokee Purple, a Fourth of July, and a Virginia Sweet – and as they’re at a good height already, I surrounded them with individual tomato trellises for support. I chose the metal variety (because we already owned them) but you can make your own trellis too. Each plant is approximately 2-3 feet apart, allowing plenty of room for growth in our small garden.

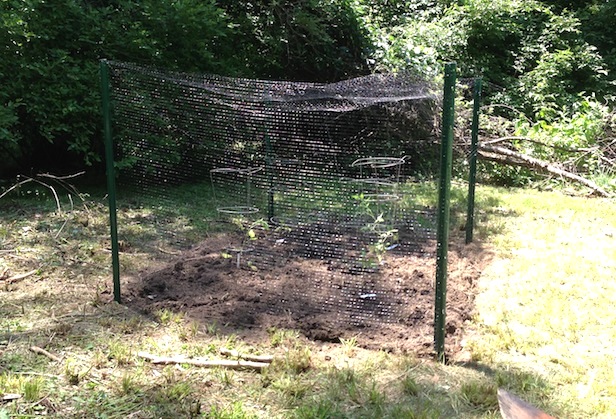
Step 6
Living in a deer-filled backyard is somewhat new to us, although I’m optimistic that we can protect tomatoes as they grow by surrounding the whole garden with deer fencing. The roll that I bought is 8′ high and cost $20. (Yes, apparently deer can leap very high. I was surprised to learn this since ours only mosey through the yard.) I also bought four 5′ stakes to anchor and secure the netting in the garden.
Step 7
The height of the netting allowed us to fold it over the top to meet in the middle. We cinched it together with zip ties. Hopefully it is enough to keep the deer from getting their heads into the garden. Equally as important as height is creating a secure base so that rabbits and other curious tomato-loving wildlife are kept out. As I installed ours, I allowed the netting to extend long at the bottom and buried it generously to keep pests from easily burrowing beneath the fencing.

Step 8
Water your garden generously, especially for the first few days as the roots take hold. Within a week, you will see substantial new growth, and before you know it, you’ll see little tomatoes forming! Happy planting!


Comment
Hi-I like it because its simple and inexpensive. But I have one question–how did you leave it to make the area accessible for weeding, picking etc?
Thank you
Dean–Rhode Island