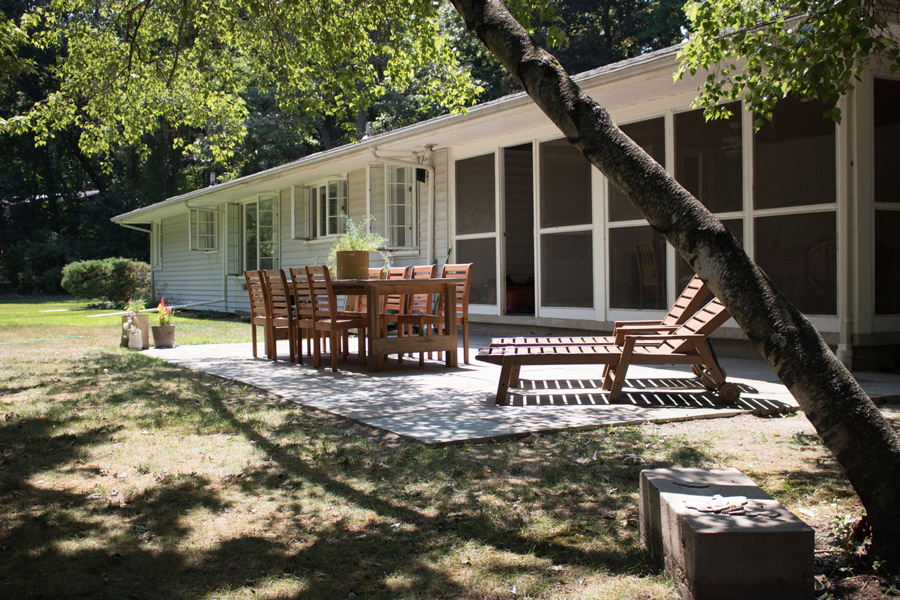
Our time- and cost-intensive projects are fewer and farther between than they used to be, but I had one big goal for the first half of this year, that being to install a giant, wonderful flagstone patio. This post is going to appear as though I brainstormed and executed this project lickity split, even though it took several months to plan and weeks to install, but I figured I’d skip the slow runaround, and cut right to the chase: A wonderful, new living area that our family (and future families) will enjoy until the end of time:
Not too long ago, it looked like this:

If you’ve been reading long enough you know already that I’ve installed a flagstone patio or two already in the last 5 years, so I guess this is just a testament to how much I love the install process and the look of the finished product. Flagstone for this house in particular was not a hard decision. Our living room fireplace sits within a whole wall of common Pennsylvia bluestone, as does the front of the house, and there’s a sidewalk of it extending around half of the house too – all original to the 1950’s construct. Adding a different style of stone or paver would have felt completely unnatural, and fortunately we didn’t feel at all hindered by the idea of sticking to the tried and true. Just gimme an I <3 Flagstone bumper sticker.
Last time I ordered stone it was from a local company (Fairport, NY) and the stones were irregular in shape and size, and also not bluestone but a little more rainbow-y in color. They were lovely, I had a great experience with that company, but the installation was a hell of a lot more time consuming if you do it the way we did, basically smashing and sledgehammering the stones into shapes that fit like a perfect puzzle. No giant stone saw. It’s still one of my favorite projects (ever).
This go-round, I shopped for stone at a few different locations and found Genesee Valley Timber and Stone in Scottsville, NY to be the best resource for our job. Throwback to June 2015, when I dragged my then 1-year old and Pete to the stoneyard to look around. Teach ’em young.

The product selection and range of sizes was undeniably great, and I really enjoyed learning about the stone from the guy who runs the place (his name’s Chip. Go say Hi to Chip). Must also note that they have a killer selection of raw edge wood, so ask to poke around the back of the garage if you stop in. Piles upon piles upon piles.
I made a list of the most common bluestone sizes that they had in stock at that point – the selection ranged from the smaller 12″x12″ to 18″x24″ to 36″x48″ and a wide variety in between, all priced at $5/square foot which I now understand is a pretty awesome rate compared to a few other local shops in the $6-7/foot range. The list of stone sizes got squirreled away until a cold winter day when I had enough time to map out a to-scale replica of our would-be flagstone patio, figuring out how many stones I needed to fit our desired space. I was optimistic too that we would be able to use a bunch of the flagstones that comprised the sidewalk behind our house (because I estimated that it would save us about $500 in new materials), and measured out various rows of stone from there. I’m not going to go into depth on that creative little replica because our friend Jeff who owns Irondequoit Landscape was quick to tell me that this is totally not how you should plan a stone patio (that’s why he’s the pro and that’s why it’s good to have friends who are pros) but for me it was helpful in the sense that I was able to see how many big stones vs. small stones would offer a nice balance, which I used when placing my order with the stone guy. The visualization really helped me, even if in the end we didn’t end up following the drawn map of stones in any way at all. In short, what you should do is order a complete range of sizes + a solid 10-15% overage and then intermingle those babies during the install.
The stones arrived in May. We were happy people, except that we quickly realized those big slabs were 2-3″ thick and who-even-knows how many hundreds of pounds.

I’ll mention now that at this point I was like, 7 months pregnant (and right now I’m like 12 months pregnant). Aside from being the stone-planner, order-placer, bill-payer, delivery-coordinator, I’ve been pretty much feet up in a chair (and of course I would have loved to get dirty, but it’s been pretty swell outsourcing the job to my husband and instead shopping for patio furnishings).
So, back to Jeff. There was one bit of our last flagstone patio install that we definitely didn’t feel like DIY-ing again, that being the excavation of the soil where the patio would sit. We got really lucky befriending Jeff when we did over the winter; he was an absolute wealth of knowledge and had this bizarre, happy willingness to help us out.
Pete measured and edged the area that we planned to install within, and in a quick 45-minutes on a Bobcat, Jeff cleared some ~500 square feet of soil to a perfect 6-10″ depth. We watched on.

Once the soil was leveled and more compacted, Jeff also offered the crusher run stone base, which Pete transported and raked and leveled and finessed for days to create the thick, solid base that supports the patio and will prevent the stones from shifting about over time.

Jeff and his son returned to help with the tamping of the stone with serious power tools. Power tampers all the way, guys. Rent one and make yourself a happy person.

There was a lot of emphasis placed on making sure the stones graded properly from the house, which is one of the biggest, most concerning aspects of the whole installation. If it tilts the wrong way, rain water is going to feed right into the foundation. Unless you look closely at the cinderblock beneath the patio screens (not in the below pic, but in others), you might not notice that the area close to the house is about 6″ higher than it used to be – all so that as the patio extended outward, and the pitch was great enough to encourage rain runoff.
Atop the crusher the guys dumped a lot of sand. It was spread loosely, but not compacted. The stones were incredibly heavy, and they got to laying them right away.

The priority was getting the stones set nearby the backdoor so that us humans and the dog could still easily access the entryway during the few weeks of stone installation. This photo was on Memorial Day 2016, and the kids and Pete’s parents and I sat on the sidelines with burgers watching the guys at work. Super productive! Small memory for our own future recollection.

It should go without saying that things go a lot faster when you have a few extra hands to help you haul the big stones. It’s even better if you’re getting big-time help from a professional landscaper who has done it so many times that he can instinctively organize the placement of giant stones with his eyes closed. Nonetheless, Pete did a bit of the install by himself after work, even into the nights if Jeff couldn’t join him. He used this time to organize smaller stones, and ensure that the set stones were perfectly embedded and had no tendency to rock or shift underfoot.

The polymeric sand was the last thing to go in, an evening activity for Pete and Julia so that the sand could dry and cure overnight. The only real thing to note here is that there must be NO sand atop the stones when you wet them. By the following morning, the seams were solid and the patio was perfection.

Both you and I would be hard pressed to identify the 16 stones that were used in the home’s original sidewalk – all of these stones ranging from 24″x24″ to 30″x36″ were integrated throughout to not only save money, but to help the new and old blend together in a natural way. Turned out that new and old looked so similar, that the whole patio itself looks like it’s been there a long, long time (for that, I have to thank Chip at Genesee Valley Timber and Stone who reviewed photos of our stone sidewalk right on the spot from photos on this blog, and assured us that the stones he had would be a great match).
Flashback quickly to last spring, early 2015 when I decided we would certainly need to extend our little backyard living area. We dragged one of the two farmhouse-style tables that we built for our wedding (and still use to this day!) into the yard to see how it might feel to have a backyard that offered a great outdoor living space. That great big table deserved a great big patio, and it was decided then that it was time for a flagstone upgrade (see Pete acting as role of the corner of the future patio?).

We left that table outdoors in the grass all last summer to make sure we really liked it and to test how it held up in the elements. It did great (and if/when we ever need to rebuild, it’s nice to know that from experience it can be constructed for $75). Lowe’s helped us take our new living space a big step further by supplying Eucalyptus stackable patio chairs that surround the table and make a world of a difference. They’re beautiful, a perfect fit for our home, and comfortable too. Patio dinners all of the time!

We own a Eucalyptus outdoor coffee table already, and over the years it has weathered really well – it and the farm-house style table actually have very similar finishes now that they’ve both spent time outdoors, so I know that the chairs will transition nicely and probably look a lot like the table and chairs were sold as a set!

They also supplied us with two outdoor chaises made of durable high-density polyethylene (a.k.a. chaises that will hold up to all of the sunshine and rain we throw at them, and might just outlive us too).

I know you guys haven’t spent as much time in this yard as we have, but we’re totally one step closer to having a Parenthood backyard. Insert string lights and a lush (deer-resistant) landscape!


*Huge thanks to Jeff at Irondequoit Landscape who spent many late nights and weekends helping us with our installation, and to Lowe’s for giving us chairs that will do our family well for a long, long time. Neither required me to write about their contributions to our project but certainly deserve a big hug.*


2 Comments
Your new patio looks amazing! I really want a Parenthood backyard (and alllllll the string lights), too.
Also, I love the photo with the table and Pete acting as the corner of the future patio. I somehow totally missed him the first time I looked, and now I’m laughing at myself. Going back to read the post about your wedding tables again now, because I was just telling Robert I want a big table for the backyard.
Congratulations on your new patio. It seems that everyone are really busy giving a helping hand to create this comfortable patio. It will be great from outdoor parties or events. And it’s very comforting also to stay here while bonding with your family or friends too.