• Home
  • about emily
  • before + after
  • HGTV + DIY Network
  • good press
  • contact
  • Let’s Organize These Posts:

    • Art Attack
    • Backyard
    • Barn
    • Basement
    • Bathroom
    • Beach
    • Bedrooms
    • Being Thrifty
    • Business-y
    • Buying and Renting and Selling
    • Casual Celebrations
    • Closets
    • Curb Appeal
    • Dainty Details
    • Deck
    • Decor
    • Dining Room
    • DIY
    • Dog-Related
    • Entryway
    • Flooring
    • For the Kids
    • Garage
    • Gardening
    • Helping The Economy
    • HGTV + DIY Network Projects
    • Holiday-Related Projects
    • Home Safety
    • Kitchen
    • Lighting
    • Living Room
    • Merry Travels
    • Office Space
    • Organized
    • Other Pads
    • Outdoor Living
    • Scooter Fun
    • Stairwell
    • Sunroom
    • Supporting Sponsors
    • The Art Room
    • Tools
    • Uncategorizable
    • Wedding
    • Windows
    • Work-pads
  • Search

  • Hi, I’m Emily

    Emily Fazio

    I'm a home improvement enthusiast, living a very merry DIY lifestyle.

    You can find me writing for HGTV and DIY Network, follow me on facebook and instagram, or drop me a note if you'd like. I love notes.

    Thanks for visiting!

  • BROWSE POSTS BY CATEGORY:

    • Art Attack (7)
    • Backyard (92)
    • Barn (8)
    • Basement (27)
    • Bathroom (43)
    • Beach (13)
    • Bedrooms (73)
    • Being Thrifty (53)
    • Business-y (12)
    • Buying and Renting and Selling (23)
    • Casual Celebrations (36)
    • Closets (17)
    • Curb Appeal (44)
    • Dainty Details (8)
    • Deck (23)
    • Decor (286)
    • Dining Room (37)
    • DIY (577)
    • Dog-Related (24)
    • Entryway (59)
    • Flooring (58)
    • For the Kids (32)
    • Garage (17)
    • Gardening (70)
    • Helping The Economy (30)
    • HGTV + DIY Network Projects (283)
    • Holiday-Related Projects (80)
    • Home Safety (12)
    • Kitchen (83)
    • Lighting (31)
    • Living Room (77)
    • Merry Travels (21)
    • Office Space (21)
    • Organized (41)
    • Other Pads (14)
    • Outdoor Living (12)
    • Scooter Fun (8)
    • Stairwell (20)
    • Sunroom (22)
    • Supporting Sponsors (43)
    • The Art Room (3)
    • Tools (43)
    • Uncategorizable (1)
    • Wedding (28)
    • Windows (14)
    • Work-pads (10)
  • Search

  • Pages

    • blog
    • Merrypad Features
    • Privacy Policy
    • about emily
    • before + after
      • before + after, our current home
      • before + after, our first house
    • contact me
    • choose a badge and share the merrypad.com love
  • Home
  • about emily
  • before + after
  • HGTV + DIY Network
  • good press
  • contact

The Best Stain for a Natural Wood Shiplap Wall

September 12, 2011

Yeeeehah, I’m bubbling stained shipboard wall happies. (If you’re just arriving, see how I installed that pine shiplap paneling, and how I stained it. Also – I think you’ll like how impacting the shiplap is in my dining room.)

Finished shiplap wall! Can you believe that the stain worked out after all? (I can't.)

After finishing the wall on Thursday after I showed you my progress, I cleaned up and let it sit for several days (for good drying measure before shoving my clean sheets into a sticky dark walnut wall). I’m relieved to say that the staining worked out after all. And happy to report that the whole project from beginning to end only cost $110. $100 for the shiplap, $10 for the stain. 

Finished shiplap wall! Can you believe that the stain worked out after all? (I can't.)

That whole hiccup with the stain not covering the wood filler really threw a wrench into my plans, and I even went as far as to pull the old can old gray paint up from the basement with plans to prime and paint the walls and pretend the staining fiasco never happened. I was also worried about the old stain sample areas showing through the dark walnut finish, so in an moment of desperation decided to add a second coat of stain, this time the sample of Jacobean, to the lighter areas.

To quote my favorite dweebs from The Big Bang Theory, Bazinga, it worked.

Can you believe that adding a coat of Jacobean Minwax stain over the Dark Walnut left me with this beautiful, rich color? (I can't!)

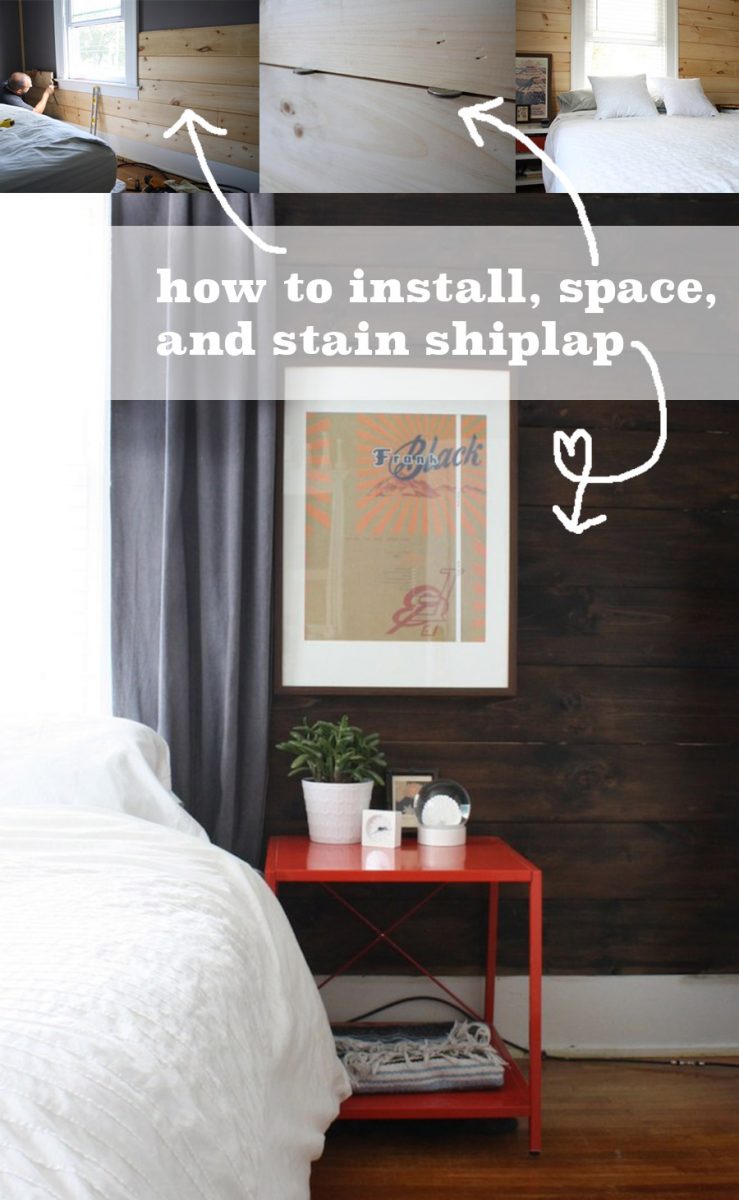
In places where I had tested the colors and experienced the wood filler discoloration the first time, it’s still faintly apparent that the stain didn’t adhere to the filler correctly, even though it’s better than it was when I first showed you what I was dealing with. Nothing a little strategically hung Frank Black poster can’t fix. Pretty Frank Black in its pretty dark brown IKEA Ribba Frame. Ooh, so happy. Pete saw the star (as Black Francis) in a concert last Thursday at a Buffalo venue so small it was practically just him and the band. And no, he didn’t tell him that I was vying to hang this poster over our bed. I can only imagine what kind of stalker list he’d have been on after that casual conversation.

Frank Black framed in Ribba happies. Really loving the contrast with the dark brown wall.

The window and blinds now pop in a way that I envision my future dark-stained cedar-sided house exterior will shine, and I’m especially happy how the IKEA drawers that I inherited a little over a year ago stand out so nicely in the contrast of gray, dark wood, and low-rise bed.

You think that’s good?

I have another surprise. BAM.

It's lobster love. Mine. My own CB2 Harvey Lobsters. Snuggle, snuggle.

This is where bedside table love begins. Bear with me people, I’m obscenely happy.

I’ve been on the lookout for the Harvey Lobster bedside tables since I originally saw them in the CB2 catalogue a few years ago. I even got thisclose to buying one when I caught it posted on Rochester’s Craigslist last year, but the seller wanted $80, and because I knew it originally would have only been $100 without taxes and shipping, I couldn’t justify the purchase at only a 20% discount.

I let the dream evaporate, bought a little white IKEA ODDA table on casters (half-priced at $25, also via Craigslist) that you saw in some of those previous bedroom pictures above, and paired it with my DIY-but-so-wanna-be-authentic West Elm papier-mache side table. And life was good.

That is, until last week when I saw this:

Lucked out! Lobsters!

$60 each seemed more reasonable, considering but still more than I cared to pay for secondhand CB2. And there weren’t original photos from the seller, so I couldn’t be sure that their product was in great shape. Or even lobster, for that matter.

But I inquired anyways, asking uber-optimistically if the price was for the set or per piece (Woot! $60 for the set!) and if they were the original lobster color from CB2 (Yes! It was!) and getting in the thrifting spirit, asked if they’d take $50 for the pair meaning that my total payment would be 75% below retail (holding breath, holding breath, holding breath, yes! Yes, they would!). Oh-em-gee.

And so I ventured out to a dead end road to meet strangers in a never-before-trekked part of town (not joking) and brought my new babies home.

It's lobster love. Mine. My own CB2 Harvey Lobsters. Snuggle, snuggle.

Sidenote: At a glance, that looks like a wicked shadow on the floor. It’s actually the sunroom floor that I just re-painted last week; you can catch up on the whole project right here if you missed it!

It’s really no surprise that I jumped at the lobster color versus holding out for the Carbon or Pool Blue options that are still sold at CB2; I’ve been wild for anything tomato-y, orangey-red for awhile and have been trying to infuse more of it as an overall accent color since the day I brought home the Energetic and Laughing Orange paints.

Stained shiplap AND Harvey Lobster table happies!

I’m obsessed with the way it looks with the rich wooden wall. Not to mention, it goes great with both the Frank Black and Pixies posters.

Shiplap wall and Harvey Lobster table happies!

Shiplap wall and Harvey Lobster table happies!

Also worth mentioning, the width of the Harvey Lobster is slightly narrower than the width of the ODDA bedside table, meaning that I was able to shift the bed slightly to the left and let it sit perfectly centered beneath the window. Stars do align.

Speaking of tomato-y, I’m up to my eyeballs over here:

One day's pick. Tomato insanity.

Pete and I have eaten BLTs for lunch or dinner for the last 3.5 weeks. We’re going to be tomatoes by October.

If you want to see how the bedroom looks now that curtains are installed, click over to this post.

A two-step process to get a rich, dark mocha stain on shiplap boards.

How to install shiplap boards.

Share

Bedrooms  / Being Thrifty  / Decor  / DIY

Emily
I'm a home improvement enthusiast, living a very merry DIY lifestyle. You can find me writing for HGTV and DIY Network, follow me on facebook and instagram, or drop me a note if you'd like. I love notes.

15 Comments


Elisa
September 12, 2011 at 10:46 am
Reply

That dark stain looks fabulous! And the tables.. who DOESN’T get a high off of the perfect CL find?! And they are the perfect pop of color! BAM.


    Emily
    September 12, 2011 at 10:58 am

    Thanks Elisa and Cait! This was the first morning I woke up next to those tables; definitely loud to have a metal surface for cell-phone-alarm reverberations, but so pretty in the morning sunlight.

Cait @ Hernando House
September 12, 2011 at 10:55 am
Reply

It all turned out great!


Ashley @ DesignBuildLove.co
September 13, 2011 at 4:27 pm
Reply

stunning wall is about all I can say!!!!!!!!! LOVE IT! And those nightstands are awesome!!!


    Emily
    September 13, 2011 at 4:32 pm

    Thanks Ashley :)

rach-dawgg
September 15, 2011 at 6:36 pm
Reply

Love how the stain turned out- very cabinish-esque which I love the contrast with the white duvet!
Also love the bed side tables! (I have also had an encounter with an Austin Powers cat due to a freecycle exchange!)


    Emily
    September 15, 2011 at 6:43 pm

    Haha. The cat. :)

    Glad you like it! I’m still in love with how it turned out.

Marylou M
September 23, 2011 at 12:08 am
Reply

I love those tables!
G. S. find…a wooden kids rocking chair that they gave for free..either I will just clean it, or think of something to make it look sharper…hopefully the grandkids can come again & get to use it.


    Emily
    September 23, 2011 at 8:05 am

    Excellent find; if the wood isn’t in great shape, a fun coat of glossy enamel would probably make it look brand new!

Dione
January 16, 2012 at 2:22 am
Reply

OMG. I LOOOOVVVEE that shipboard wall. We just bought a house (haven’t even moved in yet) and the master bedroom is small as well, and the bed will have to go under a window, so I am so glad you have a picture so I can see what that will look like. Question, is there a tutorial (there may be one, I am blind) on how you did the wall? I realllllly would like to do this in my room.
Thanks!!


    Emily
    January 16, 2012 at 8:32 am

    Glad you like it Dione (and congrats on the new home purchase)! I did a few other posts as I tested the install/staining process – you can see related ones here:

    http://www.merrypad.com/2011/08/31/shiplap-bedroom-1/
    http://www.merrypad.com/2011/09/06/shiplap-paneling-headboard/
    http://www.merrypad.com/2011/09/08/wood-filler-staining-fail/

    It’s pretty easy to install, my only tip relates to staining – avoid wood filler because it won’t accept the stain evenly!
    Good luck!

Rebecca
February 1, 2016 at 3:42 pm
Reply

So was it the sanding with the sandpaper dipped in stain or using a darker stain that fixed the problem with the wood filler?


    Emily
    February 1, 2016 at 3:54 pm

    Wet sanding the dried filler did help… the combo of roughening the surface and massaging in the stain had a better effect than just trying to poke on a darker color. Hope this helps!

    http://www.merrypad.com/2011/09/08/wood-filler-staining-fail/

TammyFriesth
February 14, 2020 at 5:58 pm
Reply

What is the stain color used for this wall?


    Emily
    February 20, 2020 at 5:23 pm

    Pretty sure it was a jacobean or java stain by Minwax! I usually recommend people try multiple shades and even layer them for desired color.

Leave a Reply Cancel reply

Your email address will not be published. Required fields are marked *

This site uses Akismet to reduce spam. Learn how your comment data is processed.

  • HI, I’m Emily

    Emily Fazio

    I'm a home improvement enthusiast, living a very merry DIY lifestyle. Follow me on facebook and instagram, or drop me a note if you'd like. I love notes.

    Thanks for visiting!

  • Instagram

    Can’t believe I ever bought dumpling wrappers. 🥟 Pulse a few cups of flour in the food processor drizzling in cold water until it forms dough. Roll smooth. Use a conveniently large cookie cutter, or just trim out squares. The end ❤️ #hny #dumplings
    Didn’t think I’d be making more masks, but her Didn’t think I’d be making more masks, but here we are (now feat. recycled t-shirt layer for added softness and bonus-layer protection). #diy #amateurseamstress #diymask
    Get out there ☀️ Get out there ☀️
    The gang finally showed up. 👻 The gang finally showed up. 👻
    A record 233 cloves + 10 shallots 🧛🏻‍♀️ 
#merrypadathome #garden2021 #garlic #gardennotes #whatisnormal
    ⭐️⭐️⭐️⭐️⭐️ ⭐️⭐️⭐️⭐️⭐️
    Immeasurably tall, lanky tomatillos. #garden2020 # Immeasurably tall, lanky tomatillos. #garden2020 #tomatillos #nofilter
    32 oz., reserved for the brave 🌶🌶 😍#homeg 32 oz., reserved for the brave 🌶🌶 😍#homegrown #tomatillos #harvest2020
    Nothing says “let’s stay home all fall, too” Nothing says “let’s stay home all fall, too” like a badass custom fireplace on our patio. 🔥 #chiminea #merrypadathome
    Load More... follow emily: @merrypad


  • Like Us On Facebook

    Facebook Pagelike Widget


  • Popular Posts

    • How to fix an IKEA drawer. Cheap IKEA Drawers (And The Quick Fix) 40k views
    • DIY sideboard rehab. Our Refinished Midcentury Buffet 39.7k views
    • How to design and make a barn quilt. How to Make Your Own Barn Quilt 33.3k views
    • DIY driveway removal. The Driveway Rocks 24.7k views
    • How to hang art on brick surfaces using specialty clips. The Easy Way to Hang Art on Brick or Stone 24.4k views
    • Goodbye, gold fireplace covering. Less Is More: How to Remove a Fireplace Surround 22.1k views
    • Our DIY flagstone patio. Building a Patio in One Day 17.4k views
    • Bedroom paint, freshened up with Snowbound paint. Painting Everything White: We Chose Snowbound, By Sherwin Williams 16.5k views
    • Tips for dying pasta different colors, and a Halloween Recipe for the kids. Tips for Dying Pasta Different Colors (+ A Special Halloween Recipe) 15.3k views
    • Finished stained kitchen cabinets. Javalicious, A Gel Staining Reveal (Update #3) 14.2k views


  • BROWSE POSTS BY CATEGORY:

    • Art Attack (7)
    • Backyard (92)
    • Barn (8)
    • Basement (27)
    • Bathroom (43)
    • Beach (13)
    • Bedrooms (73)
    • Being Thrifty (53)
    • Business-y (12)
    • Buying and Renting and Selling (23)
    • Casual Celebrations (36)
    • Closets (17)
    • Curb Appeal (44)
    • Dainty Details (8)
    • Deck (23)
    • Decor (286)
    • Dining Room (37)
    • DIY (577)
    • Dog-Related (24)
    • Entryway (59)
    • Flooring (58)
    • For the Kids (32)
    • Garage (17)
    • Gardening (70)
    • Helping The Economy (30)
    • HGTV + DIY Network Projects (283)
    • Holiday-Related Projects (80)
    • Home Safety (12)
    • Kitchen (83)
    • Lighting (31)
    • Living Room (77)
    • Merry Travels (21)
    • Office Space (21)
    • Organized (41)
    • Other Pads (14)
    • Outdoor Living (12)
    • Scooter Fun (8)
    • Stairwell (20)
    • Sunroom (22)
    • Supporting Sponsors (43)
    • The Art Room (3)
    • Tools (43)
    • Uncategorizable (1)
    • Wedding (28)
    • Windows (14)
    • Work-pads (10)


  • a little bit of everything, friends, DIY, and inspiration

    • Dadand.com < My husband and his BFF
    • DIY Network
    • HGTV
  • Get Posts Via Email

  • Some Legal

    Merrypad incorporates the occasional affiliate link to Amazon.com and Minted; we link to many other websites and products, but if it is in context of a paid sponsorship, it is always noted as such. Please review the privacy policy and contact me if you have any additional questions.

    Theme customized by Pete Fazio Creative, the guy from dadand.com.


© Copyright Merrypad