• Home
  • about emily
  • before + after
  • HGTV + DIY Network
  • good press
  • contact
  • Let’s Organize These Posts:

    • Art Attack
    • Backyard
    • Barn
    • Basement
    • Bathroom
    • Beach
    • Bedrooms
    • Being Thrifty
    • Business-y
    • Buying and Renting and Selling
    • Casual Celebrations
    • Closets
    • Curb Appeal
    • Dainty Details
    • Deck
    • Decor
    • Dining Room
    • DIY
    • Dog-Related
    • Entryway
    • Flooring
    • For the Kids
    • Garage
    • Gardening
    • Helping The Economy
    • HGTV + DIY Network Projects
    • Holiday-Related Projects
    • Home Safety
    • Kitchen
    • Lighting
    • Living Room
    • Merry Travels
    • Office Space
    • Organized
    • Other Pads
    • Outdoor Living
    • Scooter Fun
    • Stairwell
    • Sunroom
    • Supporting Sponsors
    • The Art Room
    • Tools
    • Uncategorizable
    • Wedding
    • Windows
    • Work-pads
  • Search

  • Hi, I’m Emily

    Emily Fazio

    I'm a home improvement enthusiast, living a very merry DIY lifestyle.

    You can find me writing for HGTV and DIY Network, follow me on facebook and instagram, or drop me a note if you'd like. I love notes.

    Thanks for visiting!

  • BROWSE POSTS BY CATEGORY:

    • Art Attack (7)
    • Backyard (92)
    • Barn (8)
    • Basement (27)
    • Bathroom (43)
    • Beach (13)
    • Bedrooms (73)
    • Being Thrifty (53)
    • Business-y (12)
    • Buying and Renting and Selling (23)
    • Casual Celebrations (36)
    • Closets (17)
    • Curb Appeal (44)
    • Dainty Details (8)
    • Deck (23)
    • Decor (286)
    • Dining Room (37)
    • DIY (577)
    • Dog-Related (24)
    • Entryway (59)
    • Flooring (58)
    • For the Kids (32)
    • Garage (17)
    • Gardening (70)
    • Helping The Economy (30)
    • HGTV + DIY Network Projects (283)
    • Holiday-Related Projects (80)
    • Home Safety (12)
    • Kitchen (83)
    • Lighting (31)
    • Living Room (77)
    • Merry Travels (21)
    • Office Space (21)
    • Organized (41)
    • Other Pads (14)
    • Outdoor Living (12)
    • Scooter Fun (8)
    • Stairwell (20)
    • Sunroom (22)
    • Supporting Sponsors (43)
    • The Art Room (3)
    • Tools (43)
    • Uncategorizable (1)
    • Wedding (28)
    • Windows (14)
    • Work-pads (10)
  • Search

  • Pages

    • blog
    • Good Press: Special Features, Freelance Projects, and Long-Term Clients
    • Privacy Policy
    • about emily
    • before + after
      • before + after – transforming my first home
      • before + after, our current home
    • contact me
    • choose a badge and share the merrypad.com love
  • Home
  • about emily
  • before + after
  • HGTV + DIY Network
  • good press
  • contact

Installing a Brand New Bathtub

January 5, 2012

Excitement ensued on Day 2 as we hauled home a brand new bathtub and hooked it up.

There is nothing not exciting about cleanliness, and something invariably more special about cleanliness when associated with a brand-spankin’-new bathtub. Of course, there’s probably some degree of negation when you’re bathing in a brand new tub in the middle of an otherwise gutted bathroom, but I’ll take what I can get. The install was surprisingly painless for us first-timer’s, but not without a bit of prep, a few little surprises, and extra expenses.

Removing the vinyl bathtub and surround during a DIY bathroom renovation.

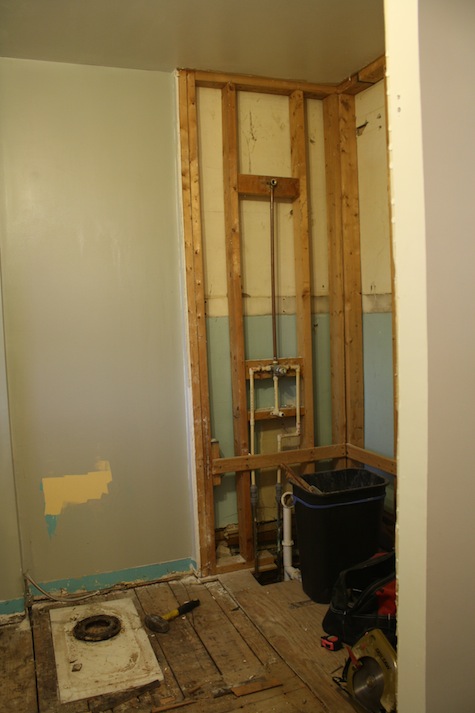
After we completely gutted our only bathroom during Day 1 (removing bathtub, floors, and vanity), it was a high priority to get a working bathtub back in order. Neither myself nor my boyfriend are pros at this, and we’ve never done any sort of bathroom remodeling, but a combination of common sense/renovation research from bathroom pros made us feel confident enough to start by re-installing the bathtub.

The good (no, amazing) news is that we were able to get the tub installed by the end of Day 2, and I was able to bathe at home again. Follow me through the progress we made in the bathroom renovation.

I planned all along to gut the room and then buy an off-the-shelf tub that was already in stock from our local big box store (convenient, affordable, no long ordering process). I was looking for a porcelain-on-steel make, ideally, because I considered that because I would be installing tile shower surround, steel would feel more solid and timeless than an acrylic/plastic bathtub.

Fortunately, as I found when the tub was completely removed, the stall in the bathroom would happily accommodate a 30″x60″ bathtub (standard size) even though the previous insert measured a bit smaller. The winning model (after not much deliberating) was a Bootz Maui porcelain-on-steel design. White. With the appropriate left-hand plumbers openings. It was the only one in stock, so that was good. It was shockingly affordable too ($179, and I had a coupon so the price was actually just $161). Unlike other models (even more expensive models), this one had a full-length self-leveling support pad that eliminated the need for us to create a mortar bed for the tub to rest on.

The tub was also really lightweight (under 90 lbs,. about 410 pounds lighter than I was expecting). It fit in the back of my Jeep Patriot without a problem with the seats folded down, and up to the second story bathroom in a pinch. Thumbs up.

New tub, thumbs up.

Along with purchasing the bathtub, we also had to make our first plumbing repairs, because when I lifted out of the old tub, we found that the old drain pipe was hanging on by a thread (and it was chopped inexplicably short, so I can’t imagine that it was ever very securely fastened). I can’t believe that I haven’t had mammoth leaks.
Faulty plumbing (cut too short) found during a bathroom remodel.

We picked up an entire bath drain kit that allowed us to replace all tub-related plumbing, so I spent $26 on that to make sure we could hook everything up properly.

Buying a new plumbing kit to repair faulty PVC during a bathroom remodel and bathtub installation.

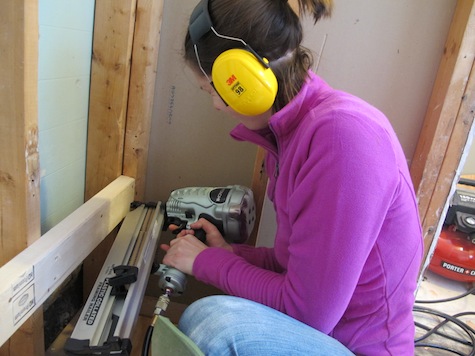
Neither Pete nor I had ever hooked up a bathtub, though he had a slightly better understanding of how it was meant to come together. before anything could happen, I removed furring strips that supported the old tub and replaced them with a leveled 2×4 board along the back wall to reinforce the structure and keep it level in its final positions (manufacturer’s instructions, even though the tub is also resting on its leveling pad). Also, we like any opportunity to use the pancake compressor and framing nailer – I realize not everyone has one of these tools, but they are handy, pretty foolproof, and eliminates lots of hammering. Always wear eye protection, especially when you’re taking photos for a major digital outlet.

Adding reinforcement to the wall where the tub will be installed.

We made some quick flooring updates before we dropped in the new tub, too. Some of the hardwoods surrounding the toilet had some water damage and felt a little soft (though the subfloor and joists beneath them still seemed strong). The floorboards came out, and in their place, I laid a piece of 3/4″ plywood to bring the height of the floor back to level. We also replaced the plywood that sits beneath the tub so that we could make sure it was level too.

The new drain pipe plumbing was also assembled at this time. Based on the drain hole measurements from the bathtub manufacturer, we were able to get the new kit assembled and at a position where it would closely align beneath the drain of the new tub. We left the connections loose at this point, not fully tightened because we weren’t sure if we’d need to remove the tub again and adjust.

You can see both the new plywood and the new drain pipe in this next picture, as Pete balanced the tub on its edge, we lifted it in.

Installing a new bathtub during a bathroom remodel.

Good news all around:

  • The tub fell right into place, with the self-leveling support pad sitting nicely on the ground, and the 2×4 on the back wall holding the tub in place.
  • The drain pipes were very closely aligned to where they needed to be, and because there wasn’t enough room to wiggle my arm behind the installed tub, I was able to reach in and tighten all of the connections by hand without removing the tub to make tweaks.
  • Even though there wasn’t a spout installed yet, we had free-flowing water coming straight into the tub and draining well. A perk of being able to reach through the studs and behind the tub at this point was that I was able to test for leaks. An easy test? Hold paper tissues around the connection. If it’s wet when you pull it back up, it should clearly signal any moisture.

Testing plumbing and checking for water leaks during a bathtub installation.

And then we could bathe, and life was good. Next, we’ll begin to seal off the walls of this space around the tub.

To read more stories about this renovation:

Shopping for materials

Day 1: Demo Day 

Share

Bathroom  / DIY  / HGTV + DIY Network Projects

Emily
I'm a home improvement enthusiast, living a very merry DIY lifestyle. I've been a freelancer writer for 10+ years and you can find my work on popular home and garden sites, like HGTV.com. Follow me on facebook and instagram, or drop me a note.

Leave A Reply


Leave a Reply Cancel reply

Your email address will not be published. Required fields are marked *

This site uses Akismet to reduce spam. Learn how your comment data is processed.

  • HI, I’m Emily

    Emily Fazio

    I'm a home improvement enthusiast, living a very merry DIY lifestyle. Follow me on facebook and instagram, or drop me a note if you'd like. I love notes.

    Thanks for visiting!

  • Instagram

    merrypad

    Merrypad by Emily Fazio
    Instagram post 17902304861708711 Instagram post 17902304861708711
    Highly recco mining those #herkimerdiamonds ✌️ Highly recco mining those #herkimerdiamonds ✌️
    Pt. 2: Well before Halloween, the last of the garl Pt. 2: Well before Halloween, the last of the garlic went into the home garden: 10 rows [L>R] 6 whole Nootka Rose as an experiment, 3x8 Mennonite-grown cloves from Aman’s, and 6x8 (and, I think, total 112? notes are cryptic) “normal.”
#gardennotes #growinggarlic #garden2023 #whatisnormal #merrypadathome
    Out of sight but [documented so it’s] not out of Out of sight but [documented so it’s] not out of mind! #garden2024 kicks off with my favorite biennial: elephant garlic! 15 cloves planted from small, to medium, to enormous. #gardennotes
    Annual garlic notes for #garden2023, pt. 1: this i Annual garlic notes for #garden2023, pt. 1: this is getting ooc, and I love it. 👩‍🌾🧑‍🌾

🧄 65% of the planting is in a new plot in the country. 🧄 Seeing if NR grows bigger with more sunlight. 🧄 Big @chasefarms cloves from 2021 were really productive in our home garden; can’t wait to see how they can show up next year in the new space. 🧄

Hand-turned a small bed, but big thanks to my sister, who rolled into town just in time to help me double its size (and did not complain once).
    One straggler from #garlic2021 debuted with 7 stal One straggler from #garlic2021 debuted with 7 stalks and 7 scapes, and I can’t wait to see this mammoth looks like when it’s pulled next month. #garlic2022 

Also, fierce springtime performance by parsley, chamomile, and self-seeded cilantro.
    Annual garlic notes #garden2022 ~315 cloves total Annual garlic notes #garden2022
~315 cloves total
50 in new, unfenced garden
Still need thick mulch on everything
Did a terrible job tracking varieties when I harvested, so it’s all a mix of hardneck now 😒
Added some big cloves from @chasefarms and look forward to adding some @fruition_seeds in #garden2023 when @porterfarmscsa delivers.
    Load More... follow emily: @merrypad


  • Like Us On Facebook

    Facebook Pagelike Widget


  • Popular Posts

    • How to fix an IKEA drawer. The Easy Fix For Broken IKEA Drawers 66.9k views
    • DIY sideboard rehab. 7 Steps for Restoring an Old Midcentury Sideboard Buffet 56.8k views
    • How to design and make a barn quilt. How to Make Your Own Barn Quilt 50k views
    • How to hang art on brick surfaces using specialty clips. The Easy Way to Hang Art on Brick or Stone 40.1k views
    • DIY driveway removal. How to Remove an Old Asphalt Driveway 35.1k views
    • Our DIY flagstone patio. Building a Flagstone Patio in One Day 32.8k views
    • Tips for dying pasta different colors, and a Halloween Recipe for the kids. How to Dye Pasta Different Colors (Halloween Recipe) 32.5k views
    • Fix an ikea dresser drawer. Life Support For An IKEA Dresser 29.7k views
    • Goodbye, gold fireplace covering. Less Is More: How to Remove a Fireplace Surround 29.5k views
    • After: Custom wooden garden fence. Designing a Durable Wooden Fence For Our Beautiful Backyard Garden 23k views


  • BROWSE POSTS BY CATEGORY:

    • Art Attack (7)
    • Backyard (92)
    • Barn (8)
    • Basement (27)
    • Bathroom (43)
    • Beach (13)
    • Bedrooms (73)
    • Being Thrifty (53)
    • Business-y (12)
    • Buying and Renting and Selling (23)
    • Casual Celebrations (36)
    • Closets (17)
    • Curb Appeal (44)
    • Dainty Details (8)
    • Deck (23)
    • Decor (286)
    • Dining Room (37)
    • DIY (577)
    • Dog-Related (24)
    • Entryway (59)
    • Flooring (58)
    • For the Kids (32)
    • Garage (17)
    • Gardening (70)
    • Helping The Economy (30)
    • HGTV + DIY Network Projects (283)
    • Holiday-Related Projects (80)
    • Home Safety (12)
    • Kitchen (83)
    • Lighting (31)
    • Living Room (77)
    • Merry Travels (21)
    • Office Space (21)
    • Organized (41)
    • Other Pads (14)
    • Outdoor Living (12)
    • Scooter Fun (8)
    • Stairwell (20)
    • Sunroom (22)
    • Supporting Sponsors (43)
    • The Art Room (3)
    • Tools (43)
    • Uncategorizable (1)
    • Wedding (28)
    • Windows (14)
    • Work-pads (10)


  • a little bit of everything, friends, DIY, and inspiration

    • Dadand.com < My husband and his BFF
    • HGTV
  • Some Legal

    Merrypad incorporates the occasional affiliate link to Amazon.com and Minted; we link to many other websites and products, but if it is in context of a paid sponsorship, it is always noted as such. Please review the privacy policy and contact me if you have any additional questions.

    Theme customized by Pete Fazio Creative, the guy from dadand.com.


© Copyright Merrypad