• Home
  • about emily
  • before + after
  • HGTV + DIY Network
  • good press
  • contact
  • Let’s Organize These Posts:

    • Art Attack
    • Backyard
    • Barn
    • Basement
    • Bathroom
    • Beach
    • Bedrooms
    • Being Thrifty
    • Business-y
    • Buying and Renting and Selling
    • Casual Celebrations
    • Closets
    • Curb Appeal
    • Dainty Details
    • Deck
    • Decor
    • Dining Room
    • DIY
    • Dog-Related
    • Entryway
    • Flooring
    • For the Kids
    • Garage
    • Gardening
    • Helping The Economy
    • HGTV + DIY Network Projects
    • Holiday-Related Projects
    • Home Safety
    • Kitchen
    • Lighting
    • Living Room
    • Merry Travels
    • Office Space
    • Organized
    • Other Pads
    • Outdoor Living
    • Scooter Fun
    • Stairwell
    • Sunroom
    • Supporting Sponsors
    • The Art Room
    • Tools
    • Uncategorizable
    • Wedding
    • Windows
    • Work-pads
  • Search

  • Hi, I’m Emily

    Emily Fazio

    I'm a home improvement enthusiast, living a very merry DIY lifestyle.

    You can find me writing for Home Living Handbook, HGTV.com, and a handful of other websites. Follow me on facebook and instagram, or drop me a note if you'd like. I love notes.

    Thanks for visiting!

  • BROWSE POSTS BY CATEGORY:

    • Art Attack (7)
    • Backyard (92)
    • Barn (8)
    • Basement (27)
    • Bathroom (43)
    • Beach (13)
    • Bedrooms (73)
    • Being Thrifty (53)
    • Business-y (12)
    • Buying and Renting and Selling (23)
    • Casual Celebrations (36)
    • Closets (17)
    • Curb Appeal (44)
    • Dainty Details (8)
    • Deck (23)
    • Decor (286)
    • Dining Room (37)
    • DIY (578)
    • Dog-Related (24)
    • Entryway (59)
    • Flooring (58)
    • For the Kids (32)
    • Garage (17)
    • Gardening (70)
    • Helping The Economy (30)
    • HGTV + DIY Network Projects (283)
    • Holiday-Related Projects (80)
    • Home Safety (12)
    • Kitchen (87)
    • Lighting (31)
    • Living Room (77)
    • Merry Travels (21)
    • Office Space (21)
    • Organized (41)
    • Other Pads (14)
    • Outdoor Living (12)
    • Scooter Fun (8)
    • Stairwell (20)
    • Sunroom (22)
    • Supporting Sponsors (43)
    • The Art Room (3)
    • Tools (43)
    • Uncategorizable (1)
    • Wedding (28)
    • Windows (14)
    • Work-pads (10)
  • Search

  • Pages

    • blog
    • Good Press: Special Features, Freelance Projects, and Long-Term Clients
    • Privacy Policy
    • about emily
    • before + after
      • before + after – transforming my first home
      • before + after, our current home
    • contact me
    • choose a badge and share the merrypad.com love
merrypad website logo with acorn and text
  • Home
  • about emily
  • before + after
  • HGTV + DIY Network
  • good press
  • contact

The Art Of Floor Planning (With Many Interpretations)

February 22, 2012

Clearly, I’m one of those people who enjoys making more work for herself. But the flooring in the kitchen is one of those places where I’m letting my normal full-destruct tendencies subside, and embracing easy-street.

Easy street in this town might still a little more work than a lot of people would care to do on their day off, but really, replacing this kitchen floor should be a piece of cake.

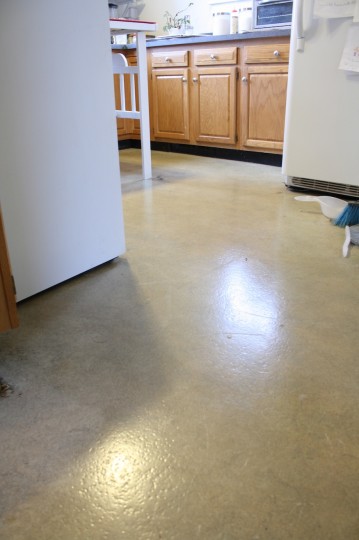
Uggles. 1940's flooring.

For one thing, I’m installing vinyl tiles instead of porcelain, marble, or ceramic tile. Sure, with some economy mortar-and-grout tile styles, I probably could have had a new floor priced pretty low (think: between 50-80-cents/sq. ft.), but then consider the added costs to lay new cement board and mortar, and I’ve priced myself back up above the cost of my vinyl for what could still end up being a really inexpensive look. I think the resilient vinyl will hold up really well in the kitchen (good for the dog paws, good for the food spills, not freezing cold underfoot), and because I love the tile I bought (it’s the same kind that I used in the bathroom), I know it’ll look great beside the natural hardwoods and help to pull the house together in a cohesive way.

Additionally, I’ve decided to leave the original vinyl sheet flooring unharmed and tile the new “concrete” vinyl tiles straight on top of it. I do like ripping things clean down to the core, exposing studs and underlayment because there’s always something fresh and invigorating about starting from scratch, but here, now, I genuinely think I’ll be better off cost-wise and efficiency-wise to lay flat on top of the old layer without disturbing it.

I ramped this floor-replacement plan into gear yesterday by doing a few necessary (and unnecessary but fun) things to prepare for installation:

1. I mapped out my game plan:

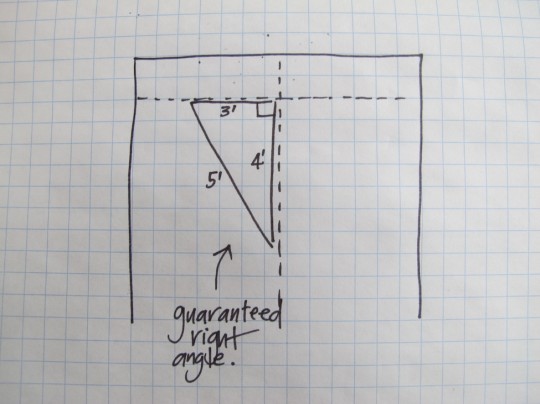
Girl’s gotta know what’s up and down, what’s level, what’s on the straight and narrow, so we spent an evening planning out the best plan of action for the tiling throw-down. In no way is this sketch to proportion, but it shows you how we decided to have the tiles centered horizontally along the middle of the main part of the room. By starting 6″ from the wall with the dishwasher (at the top of the picture), I think the placement feels a little more natural and anally-orderly than if it started with a perfectly square whole tile in the corner and working outward. I believe that’s why any and all home improvement show would advise against starting in the corner (also, it’s easier to get going unevenly… I like to compare it to trying to handwrite a note on unlined paper). With that said, I would start tiling in the open area of the kitchen, matching the corners of my first tiles squarely with the lines that were on the floor,  leaving the edges which would require cuts for last.

Planning the kitchen floor tile placement.

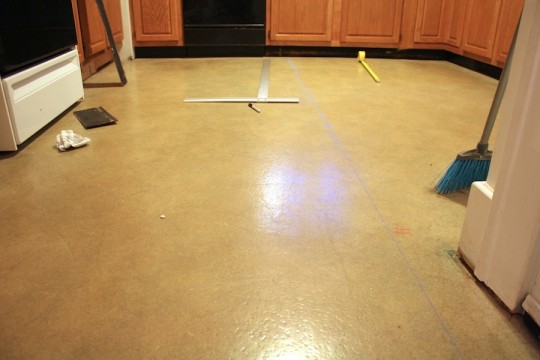
Measuring it out in real-life, we first found the center point of the room, and then blasted it with a chalk line. (The room is 8.5′ floorspace across, so the line divides it at the 4.25′ point.)

Planning the kitchen floor tile placement.

I went back over that chalk line with a Sharpie so that our socks and dog paws wouldn’t erase it, and then measured out a line to overlap it perpendicularly towards one end of the room. Instead of relying on the cabinets being square, we opted for good ol’ math and Pythagorean’ed all over that floor to make sure our lines were square and extended evenly (that’s the good ol’ a2 + b2 = c2 for folks who have forgotten 9th grade math). Guaranteed right angle. High-five.

Pythagorean Theorem on the kitchen floor.

2. I reinforced the floor (that I had inadvertently weakened):

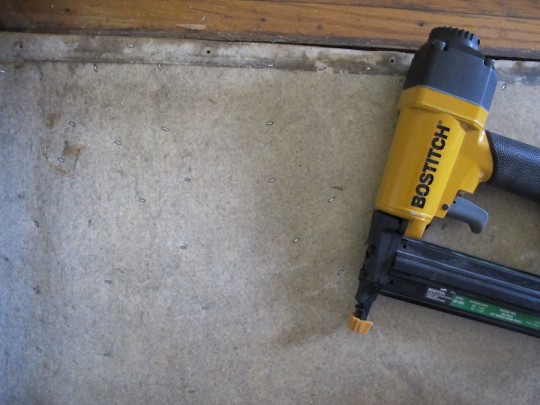
True, I peeled up a few corners of that vinyl when I was exploring to see just how securely it was glued to the underlayment (verdict: very). Best case scenario, there would have been zero adhesion and I could have pulled it right up, but second-best case scenario, we just go straight over the top of it. To reinforce those corners I had pulled up manually and eliminate any chance of them popping loose and effecting my new vinyl tiles and the grout between each tile, I threw a few rounds of 1-1/4″ staples along all of the edges of the floor and in areas that felt like it had a little bounce with Pete’s nail/staple gun (always, I appreciate any opportunity to use the pancake compressor, insert Tim Taylor grunt… and hey, has anyone been watching Last Man Standing besides me and Pete?).

That vinyl isn't going anywhere.

3. We got artsy-schmartsy with permanent markers and practiced out bubble letters:

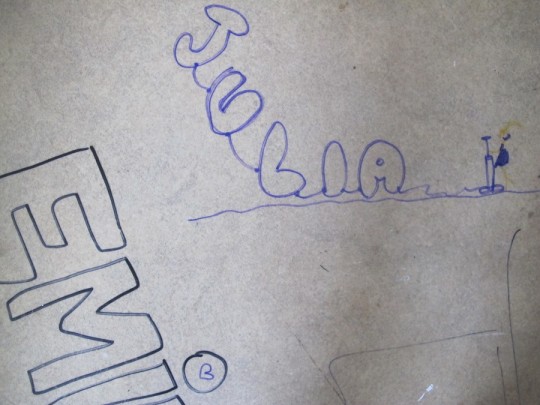
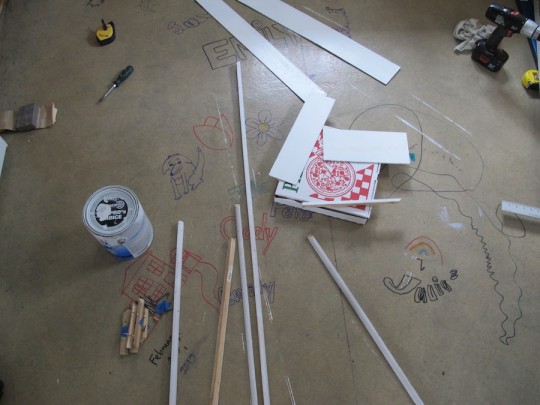
Unrelated to the installation, but fun. Because, why not? I like to think surface is a canvas, especially canvases that are going to be soon covered up. Nothing like leaving a little treasure for future homeowners who want to make the room their own.

Coloring on the vinyl floor.

I do realize that 99% of our artwork is going to be removed the moment I swipe over it with a cloth soaked in denatured alcohol (to remove any residue and grease that may affect how the tiles adhere), but it was a fun creative release. Bubble letters, I excel at. Dogs, not. “What’s that, Emily?” “Um… maybe Cody.”

Coloring on the vinyl floor.

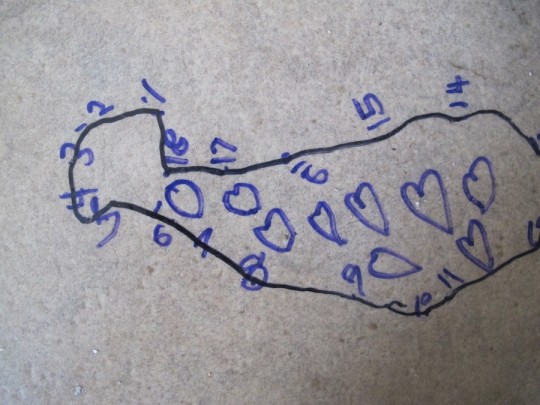
And there’s nothing quite like a DIY connect-the-dots game. What is that, a heart-y whale?

Coloring on the vinyl floor.

4. And lastly, I painted my little heart out:

Oh yeah, maybe you haven’t noticed how grimy the space beneath the cabinets is. It’s been nasty for as long as I’ve lived here. Thin and narrow plywood boards had been painted flat black and positioned to create a seamless cabinet front all around the room (except in front of appliances). As it was held in place by the laminate floor and quarter round, I didn’t actually realize how easily it could be removed until the room was cleared, but with it out, I was able to clean, prime and paint all of the existing pieces with a fresh coat of straight-from-the-can Behr white (the same can that I used when painting the bathroom ceiling and office trim). I did the quarter round too while I was at it, still thinking it’ll be worth my while (and $15.00) to replace as many pieces of it as I can after the floor is installed. Pizza box drying rack, that’s what you’re seeing here.

Painting baseboard and trim for the kitchen.

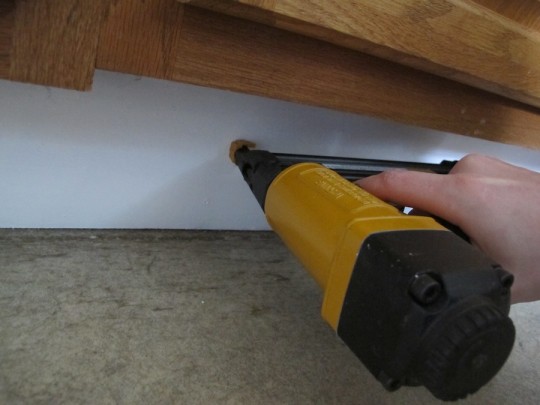
The freshly painted plywood panels were re-installed onto the base of each cabinets with a few pops of the nail gun (no big honkin’ long nails this time, just 1″ finishing brads). The quarter round will be held aside until the flooring itself if installed and grouted.

Reattaching painted plywood beneath the cabinets.

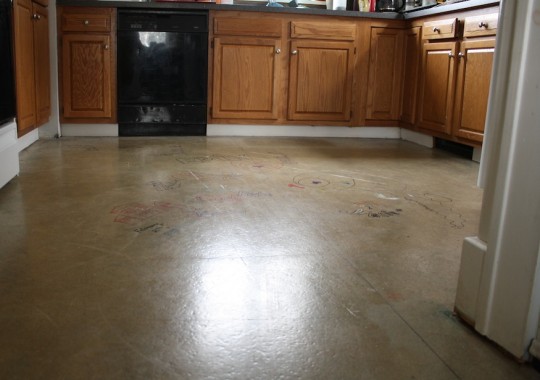
With all of those steps taken to prep the space for tiling, we’re off! The black strip beneath the cabinets on the right is an airvent, BTW. Still planning to minimize its appearance once the floor is in, it is what it is.

Ready for tile!

Looking forward to getting started on the floor this weekend or sooner if possible, and especially looking forward to having the kitchen looking all spiffy and clean-clean with a brand new floor!

Share

Flooring  / Kitchen

Emily
I'm a home improvement enthusiast living a very merry, DIY-filled lifestyle. As a freelance writer, you can find my work on many popular home and garden sites, including HGTV.com, HomeLivingHandbook.com, and other outlets. Follow me on social, or drop me a note.

3 Comments


Mindy
February 22, 2012 at 1:25 pm
Reply

I’m so excited to see the new kitchen floor completed!


Katie S.
February 22, 2012 at 10:18 pm
Reply

I love Last Man Standing!!


    Emily
    February 22, 2012 at 10:49 pm

    Haha, I never thought I’d find a show that could match Home Improvement again… until now… but with girls… and outdoorsman equipment.

Leave a Reply Cancel reply

Your email address will not be published. Required fields are marked *

This site uses Akismet to reduce spam. Learn how your comment data is processed.

  • HI, I’m Emily

    Emily Fazio

    I'm a home improvement enthusiast, living a very merry DIY lifestyle. Follow me on facebook and instagram, or drop me a note if you'd like. I love notes.

    You can find me writing for Home Living Handbook, HGTV.com, and a handful of other websites.

    Thanks for visiting!

  • Instagram

    merrypad

    I’ll always say yes to a maker space experience, I’ll always say yes to a maker space experience, and The Shed at @timberland’s HQ did not disappoint ✌️🥾 @homelivinghandbook 

Final footwear design not shown 🙂

PS tagging some cute shoes they gifted from the Fall 2024 collection!
    I made the call and snapped off the elephant garli I made the call and snapped off the elephant garlic scapes yesterday evening. Who’s going to help us harvest and eat the next 1,000? 🧄🧄🧄🧄
    Hi! Boy, do I have things to share. 🎉 🫶 Fr Hi! Boy, do I have things to share. 🎉 

🫶 Friendly reminder to focus on balance and wellness: Pete and I lived abroad with our family for the entire month of August 2023. If you ever have the opportunity to work remotely, I promise it to be a worthwhile adventure that’ll change your POV in so many ways. And, If you need an in with an incredible AirBnB in Denmark, DM me. From new playgrounds and museums to the culture and design, making this trip a reality continues to be something we celebrate every day, and I wish everyone can experience it on some level.

💻 Friendly reminder to say yes to new (overwhelming) opportunities: The professional celebration happened upon our return. Last fall, I was approached to launch @homelivinghandbook, a new Pursuit channel for @mensjournal that highlights home improvement and DIY! It has been really fun to see it come to light, and truly one of the most exciting partnerships I’ve ever had. Timing couldn’t have been better, and I’m really happy to see how it grows over time. Please follow along — the team published 150 articles in two months, covering all kinds topics for home enthusiasts! So much more to come. #linkinbio #homelivinghandbook

✌️ the end, many thanks for your support!
    How much garlic is too much garlic? Maybe we’ll How much garlic is too much garlic? Maybe we’ll find out in 2024. Finished planting 1,005 cloves (and 19 shallots) in three new beds at the farm, and crossed one huge chore off my list 📝 #gardennotes #garden2024
    Instagram post 18003690670970980 Instagram post 18003690670970980
    We grew these fools. We grew these fools.
    pumpkin patch is doing great✌️#year1 #squashbl pumpkin patch is doing great✌️#year1 #squashblossoms #pumpkinpatch
    follow emily: @merrypad


  • Like Us On Facebook

    Facebook Pagelike Widget


  • Popular Posts

    • The Easy Way to Hang Art on Brick or Stone 27 views
    • The Man’s New Throne 18 views
    • Make This Awesome Oversized, Outdoor Star Decoration 17 views
    • Honestly, This Is the West Elm Tillary Sectional Sofa 16 views
    • Designing a Durable Wooden Fence For Our Beautiful Backyard Garden 16 views
    • Reasons We Recessed Our Induction Cooktop 14 views
    • How to Hang a Frameless Mirror (Without Adhesive) 13 views
    • Building a Flagstone Patio in One Day 12 views
    • How to Build New Front Stairs and Railings 11 views
    • Learn How to Hang a Floating Shelf With an French Cleat 10 views


  • BROWSE POSTS BY CATEGORY:

    • Art Attack (7)
    • Backyard (92)
    • Barn (8)
    • Basement (27)
    • Bathroom (43)
    • Beach (13)
    • Bedrooms (73)
    • Being Thrifty (53)
    • Business-y (12)
    • Buying and Renting and Selling (23)
    • Casual Celebrations (36)
    • Closets (17)
    • Curb Appeal (44)
    • Dainty Details (8)
    • Deck (23)
    • Decor (286)
    • Dining Room (37)
    • DIY (578)
    • Dog-Related (24)
    • Entryway (59)
    • Flooring (58)
    • For the Kids (32)
    • Garage (17)
    • Gardening (70)
    • Helping The Economy (30)
    • HGTV + DIY Network Projects (283)
    • Holiday-Related Projects (80)
    • Home Safety (12)
    • Kitchen (87)
    • Lighting (31)
    • Living Room (77)
    • Merry Travels (21)
    • Office Space (21)
    • Organized (41)
    • Other Pads (14)
    • Outdoor Living (12)
    • Scooter Fun (8)
    • Stairwell (20)
    • Sunroom (22)
    • Supporting Sponsors (43)
    • The Art Room (3)
    • Tools (43)
    • Uncategorizable (1)
    • Wedding (28)
    • Windows (14)
    • Work-pads (10)


  • a little bit of everything, friends, DIY, and inspiration

    • Dadand.com < My husband and his BFF
    • HGTV
    • Home Living Handbook, a Pursuit Channel for Men's Journal
  • Some Legal

    Merrypad incorporates the occasional affiliate link to Amazon.com and Minted; we link to many other websites and products, but if it is in context of a paid sponsorship, it is always noted as such. Please review the privacy policy and contact me if you have any additional questions.

    Theme customized by Pete Fazio Creative, the guy from dadand.com.


© Copyright Merrypad