• Home
  • about emily
  • before + after
  • HGTV + DIY Network
  • good press
  • contact
  • Let’s Organize These Posts:

    • Art Attack
    • Backyard
    • Barn
    • Basement
    • Bathroom
    • Beach
    • Bedrooms
    • Being Thrifty
    • Business-y
    • Buying and Renting and Selling
    • Casual Celebrations
    • Closets
    • Curb Appeal
    • Dainty Details
    • Deck
    • Decor
    • Dining Room
    • DIY
    • Dog-Related
    • Entryway
    • Flooring
    • For the Kids
    • Garage
    • Gardening
    • Helping The Economy
    • HGTV + DIY Network Projects
    • Holiday-Related Projects
    • Home Safety
    • Kitchen
    • Lighting
    • Living Room
    • Merry Travels
    • Office Space
    • Organized
    • Other Pads
    • Outdoor Living
    • Scooter Fun
    • Stairwell
    • Sunroom
    • Supporting Sponsors
    • The Art Room
    • Tools
    • Uncategorizable
    • Wedding
    • Windows
    • Work-pads
  • Search

  • Hi, I’m Emily

    Emily Fazio

    I'm a home improvement enthusiast, living a very merry DIY lifestyle.

    You can find me writing for Home Living Handbook, HGTV.com, and a handful of other websites. Follow me on facebook and instagram, or drop me a note if you'd like. I love notes.

    Thanks for visiting!

  • BROWSE POSTS BY CATEGORY:

    • Art Attack (7)
    • Backyard (92)
    • Barn (8)
    • Basement (27)
    • Bathroom (43)
    • Beach (13)
    • Bedrooms (73)
    • Being Thrifty (53)
    • Business-y (12)
    • Buying and Renting and Selling (23)
    • Casual Celebrations (36)
    • Closets (17)
    • Curb Appeal (44)
    • Dainty Details (8)
    • Deck (23)
    • Decor (286)
    • Dining Room (37)
    • DIY (578)
    • Dog-Related (24)
    • Entryway (59)
    • Flooring (58)
    • For the Kids (32)
    • Garage (17)
    • Gardening (70)
    • Helping The Economy (30)
    • HGTV + DIY Network Projects (283)
    • Holiday-Related Projects (80)
    • Home Safety (12)
    • Kitchen (87)
    • Lighting (31)
    • Living Room (77)
    • Merry Travels (21)
    • Office Space (21)
    • Organized (41)
    • Other Pads (14)
    • Outdoor Living (12)
    • Scooter Fun (8)
    • Stairwell (20)
    • Sunroom (22)
    • Supporting Sponsors (43)
    • The Art Room (3)
    • Tools (43)
    • Uncategorizable (1)
    • Wedding (28)
    • Windows (14)
    • Work-pads (10)
  • Search

  • Pages

    • blog
    • Good Press: Special Features, Freelance Projects, and Long-Term Clients
    • Privacy Policy
    • about emily
    • before + after
      • before + after – transforming my first home
      • before + after, our current home
    • contact me
    • choose a badge and share the merrypad.com love
merrypad website logo with acorn and text
  • Home
  • about emily
  • before + after
  • HGTV + DIY Network
  • good press
  • contact

How to Make a Vintage Marble Tile Frame

July 3, 2012

A kid-friendly house needs a kid-friendly bathroom. The wooden step stool that I built a few months ago is 100% useful (editor’s update 2023: we still use it a decade later). The next phase involved making a small mirror that could be tastefully installed at child height.

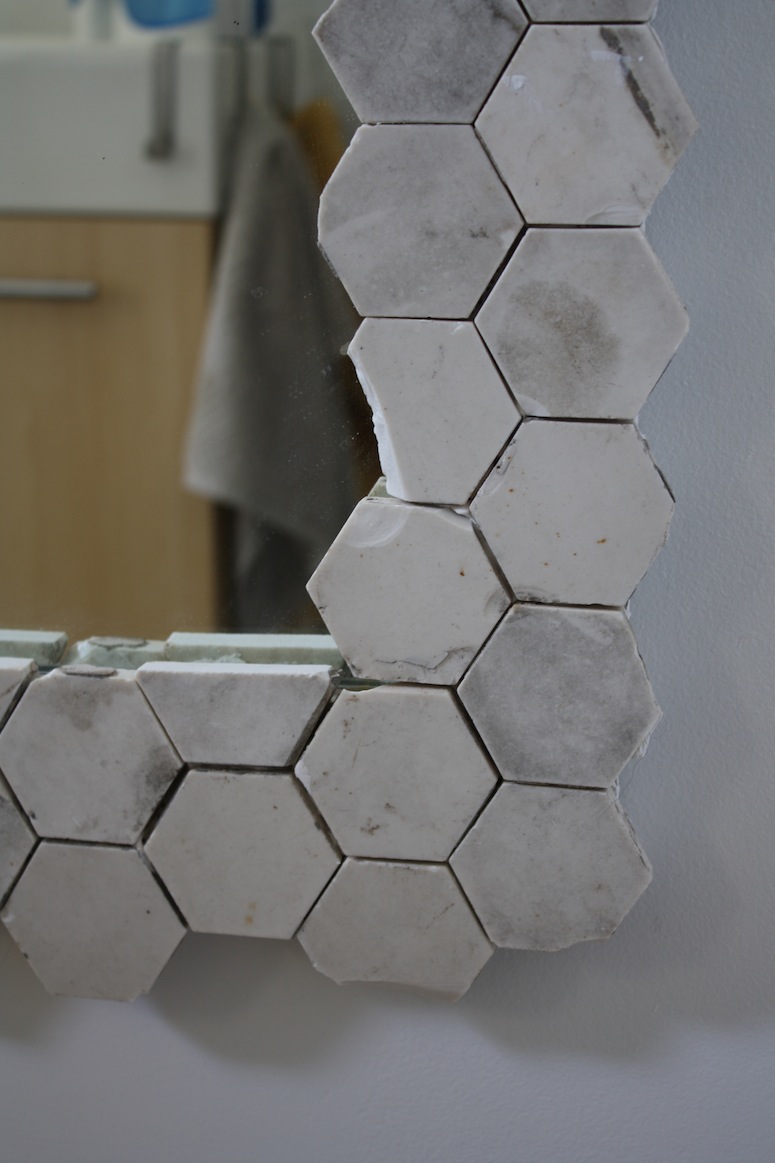
I set out to make a nice mirror using a scrap piece of mirror glass and vintage marble hex tiles sourced locally at a salvage shop. How’d I do?

Vintage marble hex tiles upcycled to become a mirror frame.

Vintage marble hex tiles upcycled to become a mirror frame.

To make your own custom mirror frame like mine, you’ll need need:

  • Mirror
  • Plywood and Cement Board. Thickness can vary however you think is best, so long as the backing of your mirror can support the weight of your frame.
  • Mirror-formulated adhesive. And no, industrial-strength adhesives won’t do. It may eat through the mirror backing.
  • Caulking gun
  • Utility knife or multicutter
  • Tile. I sourced a big box of salvaged tile from ReHouse in Rochester, NY. Bingo.
  • Tile mastic. Or Thinset. Either works, depending on the placement of the finished product. Don’t use mastic in super-moist-inside-of-the-shower places.
  • Notched trowel
  • Screws. Cement screws are ideal, but keep them less than 1″ (you don’t want them biting through your board).
  • D-rings
  • Circular saw
  • Tile saw (optional)
  • Eye protection

1. Cut Plywood to Size

Cut the plywood to size so it is 1-2″ wider and longer than the mirror itself.

2. Glue the Mirror to the Plywood

Employ the caulking gun to squirt glue along the plywood and the back of the mirror. Then, place the mirror on the piece of plywood and press it firmly to disperse the adhesive. As I mentioned in the materials list, don’t rely on the construction adhesives for this connection; the glues may deteriorate the mirror backing on the glass, which is probably why you sometimes see mirrors with big black spots or transparent areas on the side of the road on trash day.

Gluing a mirror to plywood using mirror adhesive.

Glue your mirror down to the plywood using mirror adhesive.

3. Allow Adhesive to Dry

After gluing, I placed the box of reclaimed tiles on top of the mirror and let it sit overnight.

Gluing the mirror to the plywood. A weighted box sits on top to help the adhesive stay in place.

Gluing the mirror to the plywood. A weighted box sits on top to help the adhesive stay in place.

4. Organize Your Tiles

I used vintage marble hexagon tiles from a salvage shop, so unlike new tiles, many were dirty and still had grout along the edges. Most were imperfect and chipped, but they were symmetrical, plentiful, and really pretty.

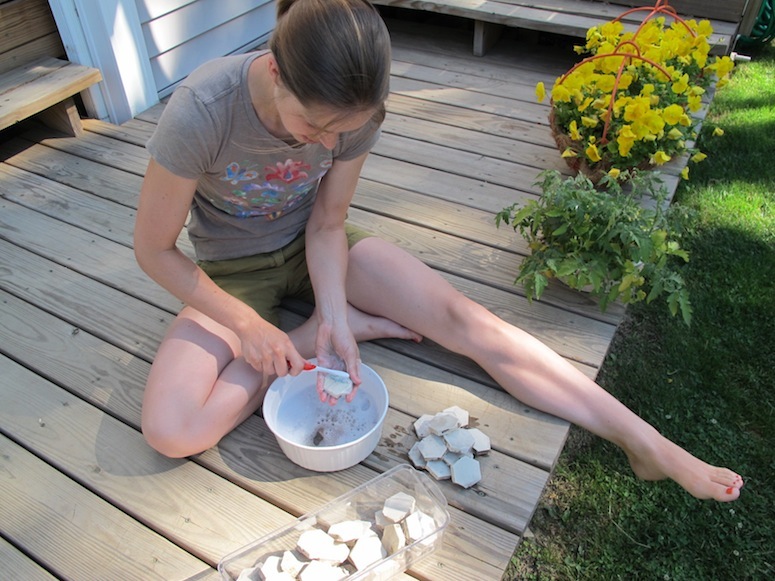
To prepare salvage tiles, take the time to wash them by hand in soapy water. Use a toothbrush and a razor blade to loosen and clean any dirt and mortar.

Cleaning vintage hexagon marble tiles in a bath of soapy water.

Cleaning vintage hexagon marble tiles in a bath of soapy water.

They cleaned up well. Most were clean without excessive mortar stuck to the back side, so they had a lot of potential in my eyes.

Vintage hexagon marble tiles are washed in soapy water before repurposing them.

Vintage hexagon marble tiles are clean and ready to be upcycled.

5. Cut Strips of Cement Board to Size

Next, cut a secondary backing for the mirror using cement board, like Hardibacker. Whether adding this additional cementboard surface was imperative, I’m not sure. People have glued tiles to crazier things than plywood, that I know.  But, I figured if I had the board, I should use it. The tile would be heavy, and I wanted to create a good surface to support them.

Cement board itself is a bear to cut when you’re dealing with a full sheet, and exponentially harder when you’re dealing with narrow pieces.

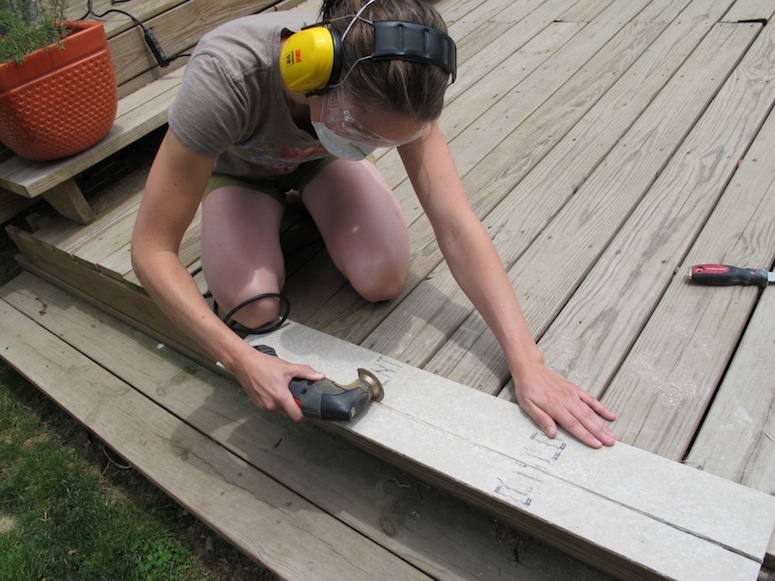
This was no “score and snap” project. I ended up bringing out the Craftsman multitool with a carbide circular blade (and a pre-covid mask, and glasses, and ear protection) to cut the strips I needed to surround the frame. This wasn’t fast since it was still a tiny blade cutting through cement, and I’m sure it’s not what manufacturers and doctors recommend, but it was accurate.

Cutting through cement board with a multitool.

Cutting strips of cement board with a multitool.

6. Glue and Screw Cement Board to the Edges of the Frame

With the pieces of cement board cut to length to frame the mirror itself, I squeezed out the rest of the mirror adhesive and positioned each piece in place. Use heavy-duty adhesive, or use whatcha got. This is going to be screwed in place, too, so you don’t have to put all your trust in the glue.

Glue strips of cement board to plywood with heavy-duty adhesive.

Glue strips of cement board to plywood with heavy-duty adhesive.

Yes, the good ol’ glue it and screw it technique at its finest. Once the glue is holding the cement board in place, place screws through the top so they secure into the plywood.

The cement board attached to the plywood with screws and adhesive.

The cement board attached to the plywood with screws and adhesive.

7. Dry-fit the Tiles

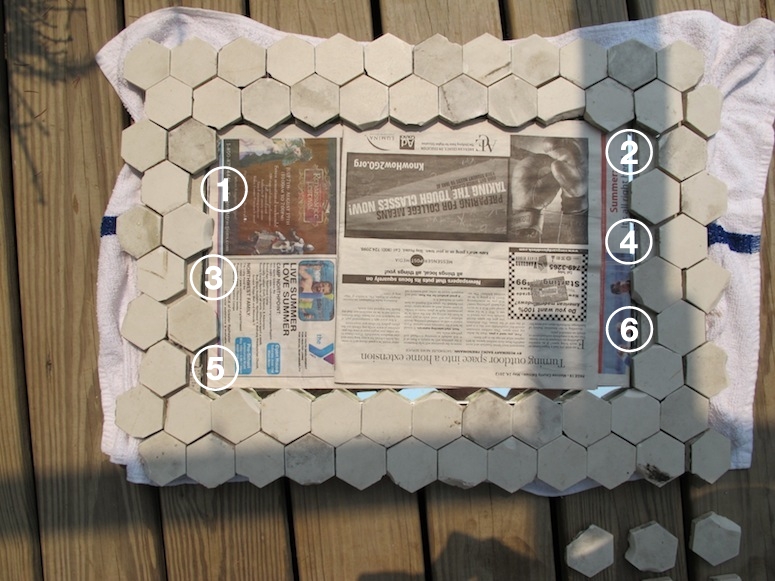
Positioning the tiles around the frame before you mortar to determine their fit. I ended up positioning the whole selection of tiles like this:
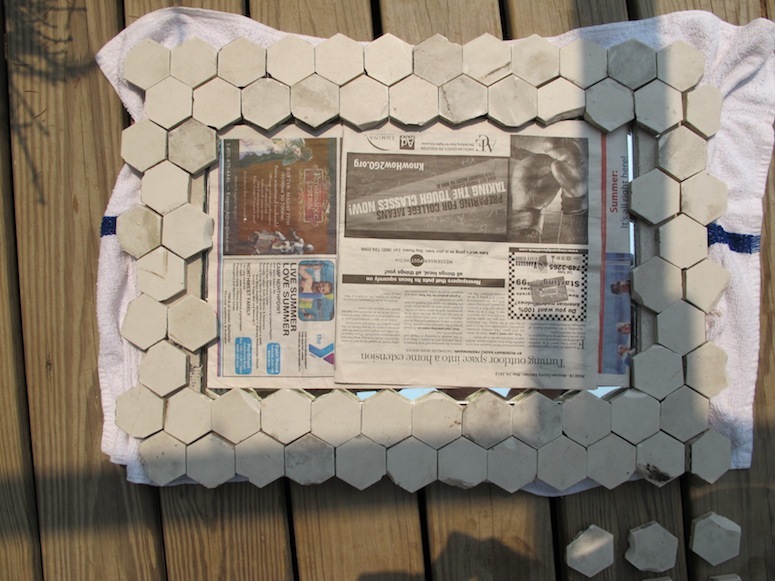
Vintage marble hex tiles positioned around the edge of a mirror protected by newspaper.

Play with the orientation of your tiles until you’re happy with how they will fit together around your mirror.

Mine looked pretty good. I opted to cut three individual tiles in half using a tile saw, and those six half tiles would fill the remaining spaces in my mirror puzzle.

Planning cuts for the final tiles used for the mirror frame.

Planning cuts for the final tiles used for the mirror frame.

Using a wet saw outdoors during the summer is very nice. When I made a jewelry hook, I cut all of the tiles in the basement, which was still a pretty chilly place at the time.

Emily cuts vintage marble hex tiles using a wet saw on her backyard deck.

Cutting tiles using a wet saw.

The finished layout of the tiles looked great and fit together very well. The pieces that were more prominently damaged and chipped began to flow together, becoming less obvious than if standing alone. All in all, the vintage tiles contributed to the frame looking like a well-aged and beautiful piece.

Laying out vintage hex marble tiles before securing them with mortar.

The final layout of all the tiles used to create my mirror frame.

8. Use Mastic to Secure the Tiles

Tiling the pieces into place was the easiest and quickest part. I bought a container of AcrylPro for this project. Mastic is a bit easier to work with than thinset mortar, that’s for sure. This mirror would be fine using mastic as it would not be in a heavily dampened space (like inside a moist shower).

I only used 1/20th of this container, so keep in mind that one container of mastic can go a long way.

AcrylPro tile adhesive container.

Mastic is a great adhesive product for projects that aren’t subject to moisture.

How do you use Mastic?

  • Scoop the adhesive out of the container
  • Spread it on your tiling surface with a notched trowel
  • Position your tiles and press them firmly into the adhesive
  • Let it set, undisturbed

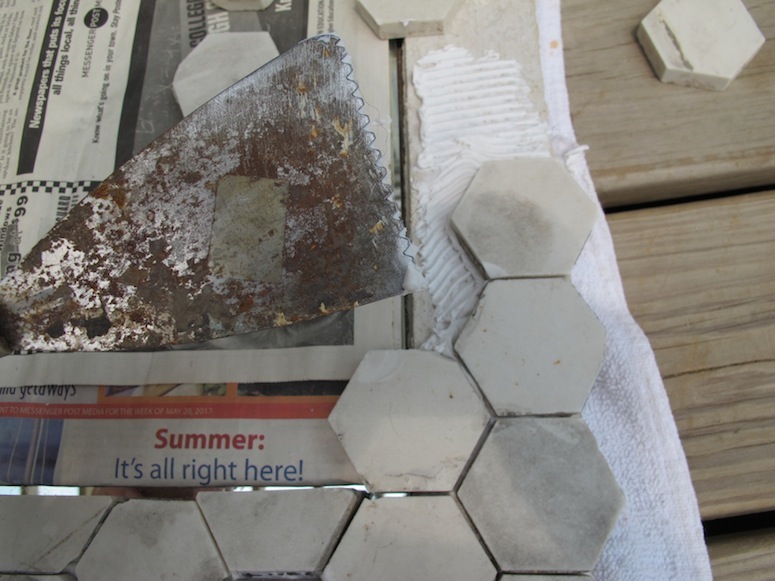
I used a 3/16 notched trowel as recommended by the adhesive manufacturer. My tiles were smaller, so smaller notches were helpful in effectively securing the vintage marble hex tile.

Using mastic to secure the tiles to the cement board.

Mastic adhesive secures tiles to cement board.

I worked in small areas, moving the carefully placed tiles out of my way and then putting them back in place over the notched mastic with a lightly buttered backside. And yes, our Christmas tree is officially dead. It’s tragic.

Using mastic to position the marble tiles on the mirror frame.

Using mastic to position the marble tiles on the mirror frame.

I worked to keep the mastic light so it wouldn’t squish up between the tiles themselves, but in a way where they were close enough to not need grout. There was no intention of grouting these beauties.

9. Allow the Adhesive to Dry

Quickly and easily, the frame itself was done and left to dry for 24 hours.

Allow mastic adhesive to dry, securing vintage hex marble tiles.

Allow the mastic to dry for 24 hours before disturbing the finished frame.

10. Attach D-rings for Hanging

After 24 hours, I was finally brave enough to bring the mirror and its heavy frame into a vertical state.

Using two heavy-weight D-rings instead of a wire or a single hook, I hung the frame directly on the wall on two hooks. Hanging each D-ring independently takes a little more work (making sure your placement is level and all) but it ends up feeling a lot more secure, and that’s important if a kid’s going to be holding the edges or smashing her nose against it for fun.

I love it. I’ve said that already, right?

Marble mirror frame installed securely in a kid-friendly bathroom.

Repurposing vintage marble hex tiles to create a custom mirror frame.

Making fair use of an otherwise blank space in the bathroom, the new mirror fits perfectly and is hung specifically to child height (and my own hips).

Marble mirror frame installed securely in a kid-friendly bathroom.

Repurposing vintage marble hex tiles to create a custom mirror frame.

If you’re not familiar with the orientation of my bathroom, this little frame was hung on the wall opposite the mirror, meaning that I can see its pretty reflection in the main mirror itself.

Reflection of a custom mirror frame in a modern mirror frame.

Marble hex tiles are upcycled into a custom mirror frame.

Close-up, this vintage tile mirror’s imperfectness is completely charming and wholly unique.

Detail on a mirror frame made using vintage marble hex tiles.

Detail on a mirror frame made using vintage marble hex tiles.

Share

Bathroom  / Decor  / DIY

Emily
I'm a home improvement enthusiast living a very merry, DIY-filled lifestyle. As a freelance writer, you can find my work on many popular home and garden sites, including HGTV.com, HomeLivingHandbook.com, and other outlets. Follow me on social, or drop me a note.

6 Comments


Staci @ My Friend Staci
July 3, 2012 at 9:30 am
Reply

Wow! It doesn’t look so small/low until you show the picture with the lightswitch in it. How sweet for Pete’s daughter to have a perfectly-customized, one of a kind mirror! I’m sure she will make good use of it.


    Emily
    July 3, 2012 at 1:35 pm

    Ooh, it really only registered with me this afternoon that the light switch in that picture is actually pretty high — 55″ from the ground! Definitely not standard-to-code height! Visual deception.

jb @BuildingMoxie
July 3, 2012 at 1:21 pm
Reply

Another great project Emily . . . and I do love that you left the outside edge unfinished. I happened to hop over too to check out the headboard… a series I missed. good option there. thanks. jb


    Emily
    July 3, 2012 at 1:36 pm

    Thanks jb! Glad you liked all of them :)

Cait @ Hernando House
July 4, 2012 at 9:54 pm
Reply

Aww, R proposed while we were hunting beach glass, too! Congrats again!!

Onto the mirror: I love it!! Great job! :)


    Emily
    July 5, 2012 at 10:17 am

    I remember reading that :) So sweet. Glad you like the mirror!

Leave a Reply Cancel reply

Your email address will not be published. Required fields are marked *

This site uses Akismet to reduce spam. Learn how your comment data is processed.

  • HI, I’m Emily

    Emily Fazio

    I'm a home improvement enthusiast, living a very merry DIY lifestyle. Follow me on facebook and instagram, or drop me a note if you'd like. I love notes.

    You can find me writing for Home Living Handbook, HGTV.com, and a handful of other websites.

    Thanks for visiting!

  • Instagram

    merrypad

    I’ll always say yes to a maker space experience, I’ll always say yes to a maker space experience, and The Shed at @timberland’s HQ did not disappoint ✌️🥾 @homelivinghandbook 

Final footwear design not shown 🙂

PS tagging some cute shoes they gifted from the Fall 2024 collection!
    I made the call and snapped off the elephant garli I made the call and snapped off the elephant garlic scapes yesterday evening. Who’s going to help us harvest and eat the next 1,000? 🧄🧄🧄🧄
    Hi! Boy, do I have things to share. 🎉 🫶 Fr Hi! Boy, do I have things to share. 🎉 

🫶 Friendly reminder to focus on balance and wellness: Pete and I lived abroad with our family for the entire month of August 2023. If you ever have the opportunity to work remotely, I promise it to be a worthwhile adventure that’ll change your POV in so many ways. And, If you need an in with an incredible AirBnB in Denmark, DM me. From new playgrounds and museums to the culture and design, making this trip a reality continues to be something we celebrate every day, and I wish everyone can experience it on some level.

💻 Friendly reminder to say yes to new (overwhelming) opportunities: The professional celebration happened upon our return. Last fall, I was approached to launch @homelivinghandbook, a new Pursuit channel for @mensjournal that highlights home improvement and DIY! It has been really fun to see it come to light, and truly one of the most exciting partnerships I’ve ever had. Timing couldn’t have been better, and I’m really happy to see how it grows over time. Please follow along — the team published 150 articles in two months, covering all kinds topics for home enthusiasts! So much more to come. #linkinbio #homelivinghandbook

✌️ the end, many thanks for your support!
    How much garlic is too much garlic? Maybe we’ll How much garlic is too much garlic? Maybe we’ll find out in 2024. Finished planting 1,005 cloves (and 19 shallots) in three new beds at the farm, and crossed one huge chore off my list 📝 #gardennotes #garden2024
    Instagram post 18003690670970980 Instagram post 18003690670970980
    We grew these fools. We grew these fools.
    pumpkin patch is doing great✌️#year1 #squashbl pumpkin patch is doing great✌️#year1 #squashblossoms #pumpkinpatch
    follow emily: @merrypad


  • Like Us On Facebook

    Facebook Pagelike Widget


  • Popular Posts

    • How to Dye Pasta Different Colors (Halloween Recipe) 81 views
    • The Easy Way to Hang Art on Brick or Stone 29 views
    • How to Make Your Own Barn Quilt 27 views
    • Designing a Durable Wooden Fence For Our Beautiful Backyard Garden 22 views
    • Create a Unique Spider Web Pumpkin 20 views
    • The Easy Fix For Broken IKEA Drawers 19 views
    • Using Counter-Snap Screws to Fix Squeaky Floors 17 views
    • Stepping It Up 17 views
    • Reasons We Recessed Our Induction Cooktop 15 views
    • Honestly, This Is the West Elm Tillary Sectional Sofa 14 views


  • BROWSE POSTS BY CATEGORY:

    • Art Attack (7)
    • Backyard (92)
    • Barn (8)
    • Basement (27)
    • Bathroom (43)
    • Beach (13)
    • Bedrooms (73)
    • Being Thrifty (53)
    • Business-y (12)
    • Buying and Renting and Selling (23)
    • Casual Celebrations (36)
    • Closets (17)
    • Curb Appeal (44)
    • Dainty Details (8)
    • Deck (23)
    • Decor (286)
    • Dining Room (37)
    • DIY (578)
    • Dog-Related (24)
    • Entryway (59)
    • Flooring (58)
    • For the Kids (32)
    • Garage (17)
    • Gardening (70)
    • Helping The Economy (30)
    • HGTV + DIY Network Projects (283)
    • Holiday-Related Projects (80)
    • Home Safety (12)
    • Kitchen (87)
    • Lighting (31)
    • Living Room (77)
    • Merry Travels (21)
    • Office Space (21)
    • Organized (41)
    • Other Pads (14)
    • Outdoor Living (12)
    • Scooter Fun (8)
    • Stairwell (20)
    • Sunroom (22)
    • Supporting Sponsors (43)
    • The Art Room (3)
    • Tools (43)
    • Uncategorizable (1)
    • Wedding (28)
    • Windows (14)
    • Work-pads (10)


  • a little bit of everything, friends, DIY, and inspiration

    • Dadand.com < My husband and his BFF
    • HGTV
    • Home Living Handbook, a Pursuit Channel for Men's Journal
  • Some Legal

    Merrypad incorporates the occasional affiliate link to Amazon.com and Minted; we link to many other websites and products, but if it is in context of a paid sponsorship, it is always noted as such. Please review the privacy policy and contact me if you have any additional questions.

    Theme customized by Pete Fazio Creative, the guy from dadand.com.


© Copyright Merrypad