Pete bought a chalkboard for Julia a few years ago – a real Pottery Barn Kids piece at garage sale prices. You’ve probably seen it in photos before, it was one of those things I happily incorporated into our home’s decor, mostly because we use it all the time (all of us, not just Julia), and because it made me all warm and nostalgic as my sister and I had a great chalkboard just like it when we were growing up.

There was one thing I really wanted to do to improve it though, and that was to add a simple shelf to rest in between it’s A-frame and provide more storage for the chalk, activity books, everything art-related that has been accumulating. Have I said before just how many art supplies a crafty 6-year old can acquire? Yes, in fact I have, it’s an issue that I’m always working to solve.
Said shelf-installation project could be done very simply: take measurements, find a board to fit within, cut it to size, screw it in place. To match the angles of the a-frame, I made a few extra cuts to angle the edges of the board with my circular saw so that it felt like it was there all along. And then, when all was said and done I was left with a very nice little shelf, that in no way matched the rest of the school house red of Pottery Barn. But don’t think I didn’t consider that off the bat:

The real test here was that I wanted to use chalk paint to refinish the chalkboard (ironic, right), and by chalk paint I don’t mean the gritty chalkboard paint, I mean the popular furniture refinishing chalk paint, a durable and easy to use paint made famous by Annie Sloan. The goal was to make it so that the new shelf would appear as though it was always there.

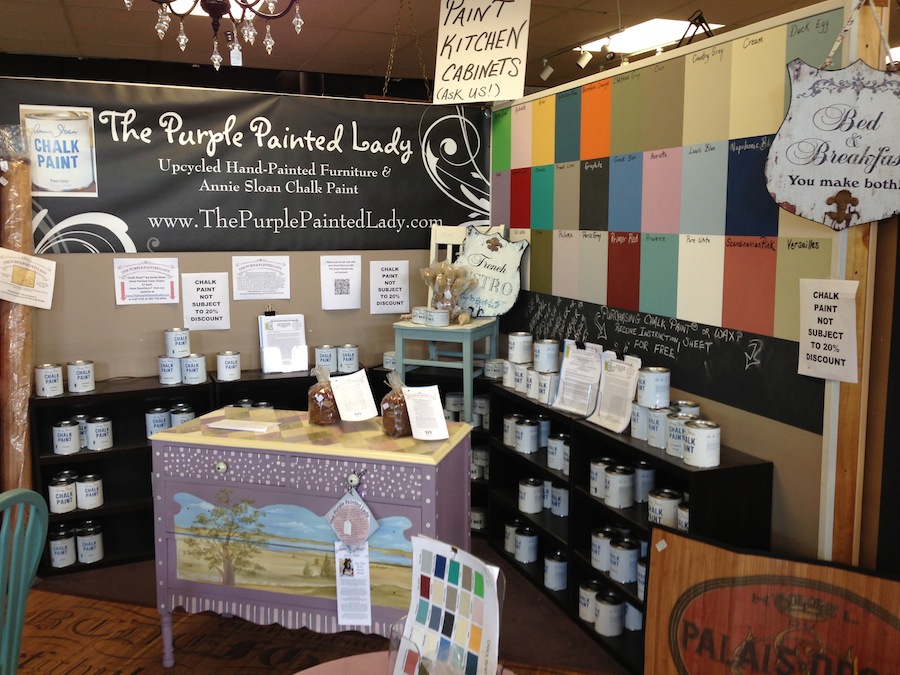
I found that the color palette was a little limited and a little softer than I usually gravitate towards, but I liked a yellow shade that I thought would suit my home’s palette, Arles, so bought it and a tin of clear wax from Rochester-based retailer Tricia of The Purple Painted Lady (she has a store in Palmyra, NY and also sells at a booth in The Shops On West Ridge).
There are many benefits to using the product (that’s probably why it’s so popular amongst crafters and hobbists), one of which being that you don’t need to much, if any, prep work to the surface you’re painting, whether it be plastic, wood, metal, whatever. The paint itself dries quickly too–literally before your eyes–and coats really well. There’s a wax that is applied over the finished paint that does amazing things too, making the surface feel very smooth and soft in a way that polyurethaning over latex or oil-based painted surfaces just doesn’t meet up to. I’ll say one thing to get it off my chest, the pamphlet I picked up with the products read “girls’ paint that boys can use too” which was enough to make me cringe with every brush stroke, but sales points aside, the product gave me really good results. I guess I finally used paint formulated for my gender, and it was OK.
The chalkboard we have had some damage (once again, a garage sale find), as well as some purposeful Pottery Barn-esque distressing, but most of all, it had a really nice, matte, smooth manufacturer’s paint coating that I knew I would lose if I were to go with a spray or latex-based product. I thought I had the best chance at retaining a smooth surface with chalk paint, after seeing/feeling/caressing other pieces of chalk painted furniture in person.
I disassembled the unit into two pieces before I got started, which made it easier to do a thorough job to both the A-frame and the chalkboard piece itself. The painting stage was scary. I had taped off the chalkboard itself, and I knew I would have to do more than one coat to cover the red, but I wasn’t prepared 1) for how streaky it would look at first and 2) how light the yellow would appear.

Deep breaths, keep on keeping on. Because the chalk paint dried so quickly (fully, in just about 30-minutes), I was able to do two more coats of paint in the same afternoon. I worked simultaneously to paint the a-frame and the new wooden shelf that would be installed beneath. The shelf itself was new lumber, untreated with primer, and because of that I wasn’t sure that it would accept the paint in the same way as the red finished surface. It did well, in fact, no differently than the chalkboard itself..

Still, I thought it would be too light, even though like most paints it dried slightly darker than it went on wet.

I was pleasantly surprised to find that the paint, by three coats, dried very flat and not streaky, and had amazing coverage. No red was peeping through anywhere, and the yellow coat was very even.
I followed both a written tutorial and this video to learn more about the application of the clear wax once the paint was dry. Because I didn’t have a special wax application brush, I found an old clean paintbrush and kind of wadded the bristles in my hand to make them more dense. It’s important that the wax get tapped onto the ends (not within the bristles) and this method kept application easy and under control.

Application itself was easy and within a few hours the finish was smooth like a soft polyurethane’s surface without any sign of tackiness to the touch.
Wham bam, pretty chalkboard ma’am. The finished color, as you can see, is a lot darker than the initial coats of paint presented. I think it was the wax that took it down another notch, darkening it ever so slightly. It’s not my favorite color, but I do think it plays off the olive-y walls nicely. Wow, our floor is dirty when you get down close to it.

Up close, the finish is smooth and matte.

The shelf beneath was a great addition, it provides so much added storage for our dust-collecting racks of craft goods, and looks like it has been there all along.

What furniture projects have you been taking on as we near spring? Anyone planning for a big project with Chalk Paint?


11 Comments
I was curious where to find chalk paint in Rochester! Whenever I ask, they always lead me to chalkboard paint. Thanks! Your project turned out great! …and that line about girls’ paint made me cringe a little too. :)
Owning a redesigned furniture store, I get the “do you use chalk paint?” question All. The. Time. Like you said, the palette is really limited (though I’ve heard people making custom mixed colors) and the price is ridiculous (though they say it goes pretty far). That being said, I’ve never actually used it – I just can’t seem to get on the bandwagon. I prefer Behr latex in 1 million colors! Lol. I’m glad to see an unbiased painter like yourself giving an honest opinion. But now what do you do with the rest of that can of yellow?! ;) -Jessica
Do you want to try it? I have 5/6 of the container of yellow left still, and about 2/3 of the wax. Both do go a long way. I was wondering what I was going to do with the rest because I don’t see using it immediately again, hoping that someone would want to try my leftovers rather than let them go to waste!
I would love to, but I’m in Ohio and not sure when we will be making another family trip to Rochester :( But thanks for the offer! I just wish they came in sample sizes like the ones at Home Depot!! :)
I second that! (If anyone local to Rochester, NY sees this and wants to try it for themselves, please email me, take my leftover paint!)
Holy cow, I don’t think I could have gotten past the limited palette or the “girls’ paint that boys can use too” comment! The chalkboard looks amazing, though, and I’m so glad you reviewed chalk paint! I have read a few other people’s reviews but as usual you have a sort of honesty that is hard to find elsewhere. (PS – Our floors look similar to yours when you get on that level.)
Thanks for the nice comment, Cait :) And for making me feel less super lame for the floor situation. Swept and steam cleaned the house today.
Thanks for sharing – project looks great. Got a piece of the boys (twin 5 year olds) furniture in mind to try chalk paint myself. If the Boys don’t mind “Girls Paint” — that is a little strange these days.
Awesome, Bill. I was thinking of refinishing one of Julia’s dressers too, knowing that the chalk paint held up well to bumps and bruises really well. I didn’t get around to it after doing this, but because the paint runs expensively, keep in mind that a little goes a long way, even if it’s a big piece of furniture! Enjoy!
Great makeover! And thanks for highlighting the ridiculousness of that gender-based marketing. That kind of line totally deserves all the mockery it gets!
Glad you enjoyed it, Michelle :)