Once upon a time, we did next to no DIY projects during the holiday season, and instead visited with family, slept in, ate lots of pancakes, and played.
I got an itch just after New Years to cross one more thing off my list before resuming a busy work schedule, and decided to assemble the old IKEA EXPEDIT that had always stood in the living room of our old house, but has remained disassembled since our move in 2013. The disassembly/reassembly of that monster is actually pretty easy (thanks to my efforts in flagging every single piece with painters tape and a strategic labeling structure), the real miracle was that I had actually retained the ragged out baggie of bolts right in my junk drawer in the kitchen. Considering that I can rarely find the scissors, this bode well.

The assembly took all of 15 minutes, and within minutes of getting it uprighted, I decided it would be a pretty awesome divider for the space we loosely referred to as “the art room.” The art room is really just a corner of the basement, the space directly beneath our living room with a second, lower fireplace, an out of the way area that we hadn’t consumed with too much crap. Oh, wait…

The table in the center of the room is something we purchased specifically for the space. It’s secondhand from an old office, the top needs to be re-laminated eventually, but as far as a heavy-duty table is concerned, we knew it would be perfect for anything from wrapping gifts to letting the kids paint like crazy upon.
The couch from the old house is down there too. It’s totally more comfortable than the one in our current living room, but getting pretty ragged out. In fact, if you’re looking around you’ll probably see lots of old house remnants, from extra wooden frames to side tables to trunks, rugs, dining table, hexagon headboard, you know. It’s kind of the place that “everything that didn’t go with our current decor” went to collect dust.
It was also adjacent to the furnace, with interrogation lighting. Real dreamy setup for any 9 year old .

Within an hour of putting up that IKEA “wall divider,” we had convinced ourselves that we should totally just frame out some walls and enclose the space permanently. Finishing part of the basement has been one of our longer term goals, but the immediate improvements we were considering would make it, almost instantly, a more comfortable space for our family and friends to spend time in.
And that’s how we went from zero to paneled walls in 12 short hours. We’re like one of those fast-paced reality home improvement shows with a crew. But instead of a crew, a fairly demanding toddler who wants more pasta, and definitely wants to tap all of the things with a rubber mallet.
One of the walls we assembled measures 12-feet long, and sits right where we had positioned the IKEA shelving.
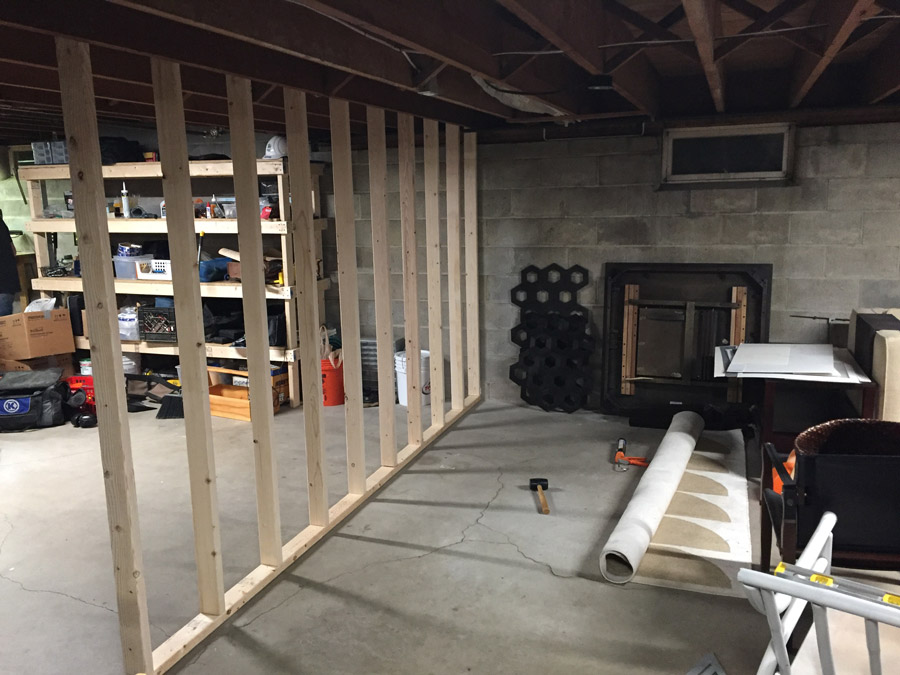
The other wall was designed to be 3/4 height, with a sole purpose of blocking off the furnace. We gave the furnace itself a ~30″ space between it and the wall, because we understand there are some safety guidelines that come into play and also because we needed some clearance in case either of us or any repairman needed access in a pinch.

If there’s anything I can say about the proximity to the furnace, is that the pipes leaving the furnace and running through the house across the basement ceiling helps the space stay pretty warm. Not pretty warm, downright enjoyable. The whole basement is consistently 68 to 70-degrees, and that’s whether it’s 95 or -10 outside, like a magic chamber of comfort. Even the cement floor is weirdly not cold.
I pushed pretty hard to paint the walls in the basement; I think Pete thought it would be excessive, but the cinderblock reads a little bit more jail cell than I preferred.

While Pete began to install paneling over the framed walls, I took it upon myself to apply a coat of primer to help seal the blocks. Because the blocks are dry and there’s no moisture or moisture damage in the basement, the paint store folks convinced me that I’d be fine with regular wall primer. I chose the Sherwin-Williams brand Harmony primer, which is great and has no odor and is from the same Zero-VOC line of products that I used to paint in the rest of our house. It’s a little pricy, but there aren’t any other Zero-VOC options locally that are attainable on a whim.


To finish the framed walls, we chose a really, really inexpensive paneling sold at the hardware store (it was one step prettier than the terrible cliche paneling, and cost ~$10 for each 4×8 sheet). This is my first and probably only venture into the world of sheet paneling, but for a space that we wanted done fast and inexpensively, it was a great fit. Drywall was an obvious choice too, but more expensive with a real deterrent, being the hours upon hours upon days of installing, taping, mudding, and finishing. Paneling in a pinch, it is!
The finish on the paneling is surprisingly nice, and is designed to look like a knotty whitewashed pine. It doesn’t go with the rest of our house at all but it sure does go with every single piece of decor that we no longer used and stashed in the basement! See how nicely that worked out? This little art studio might just be exactly like our old house when it’s said and done.

Like I said, this was zero to 60 and basically a wrap in less than 24-hours, so pat-on-back.

We let Julia pick the wall color; she opted for greens, and I delivered dozens of greens that 1) I knew she would like, 2) I knew we could tolerate, and 3) would go well with all of our existing furnishings. The verdict? Verdant from the Sherwin Williams palette, perfecto! A total family paint night, done right.


It took two coats (in 1.5 gallons of paint), but looks great, already a wonderful transformation.
You can tell here that we didn’t close off the space completely… there’s no real need for a door, but we did hang a really long curtain rod that I had bought in 2009 and always intended to use in my old house. For now, I put our old West Elm shower curtain on it (truly another opportunity to use everything we no longer had a use for – our shower here has a door, so no curtain necessary).

We cleared out the room for a week, during which time we cleaned and painted the cement floors as another way to make the room feel a little more finished. Of course, now it looks so nice that we totally want to spend $300 to paint the rest of the floor in the basement.
It’s basic porch paint, tinted to Rich Brown as shown in this Behr brochure, and it also required two gallons, two coats. I’m totally going to make you wait for the final reveal though – hopefully I’ll get around to some finishing details this weekend that help with organizing the space. Ready for it?


Leave A Reply