• Home
  • about emily
  • before + after
  • HGTV + DIY Network
  • good press
  • contact
  • Let’s Organize These Posts:

    • Art Attack
    • Backyard
    • Barn
    • Basement
    • Bathroom
    • Beach
    • Bedrooms
    • Being Thrifty
    • Business-y
    • Buying and Renting and Selling
    • Casual Celebrations
    • Closets
    • Curb Appeal
    • Dainty Details
    • Deck
    • Decor
    • Dining Room
    • DIY
    • Dog-Related
    • Entryway
    • Flooring
    • For the Kids
    • Garage
    • Gardening
    • Helping The Economy
    • HGTV + DIY Network Projects
    • Holiday-Related Projects
    • Home Safety
    • Kitchen
    • Lighting
    • Living Room
    • Merry Travels
    • Office Space
    • Organized
    • Other Pads
    • Outdoor Living
    • Scooter Fun
    • Stairwell
    • Sunroom
    • Supporting Sponsors
    • The Art Room
    • Tools
    • Uncategorizable
    • Wedding
    • Windows
    • Work-pads
  • Search

  • Hi, I’m Emily

    Emily Fazio

    I'm a home improvement enthusiast, living a very merry DIY lifestyle.

    You can find me writing for HGTV and DIY Network, follow me on facebook and instagram, or drop me a note if you'd like. I love notes.

    Thanks for visiting!

  • BROWSE POSTS BY CATEGORY:

    • Art Attack (7)
    • Backyard (92)
    • Barn (8)
    • Basement (27)
    • Bathroom (43)
    • Beach (13)
    • Bedrooms (73)
    • Being Thrifty (53)
    • Business-y (12)
    • Buying and Renting and Selling (23)
    • Casual Celebrations (36)
    • Closets (17)
    • Curb Appeal (44)
    • Dainty Details (8)
    • Deck (23)
    • Decor (286)
    • Dining Room (37)
    • DIY (577)
    • Dog-Related (24)
    • Entryway (59)
    • Flooring (58)
    • For the Kids (32)
    • Garage (17)
    • Gardening (70)
    • Helping The Economy (30)
    • HGTV + DIY Network Projects (283)
    • Holiday-Related Projects (80)
    • Home Safety (12)
    • Kitchen (83)
    • Lighting (31)
    • Living Room (77)
    • Merry Travels (21)
    • Office Space (21)
    • Organized (41)
    • Other Pads (14)
    • Outdoor Living (12)
    • Scooter Fun (8)
    • Stairwell (20)
    • Sunroom (22)
    • Supporting Sponsors (43)
    • The Art Room (3)
    • Tools (43)
    • Uncategorizable (1)
    • Wedding (28)
    • Windows (14)
    • Work-pads (10)
  • Search

  • Pages

    • blog
    • Good Press: Special Features, Freelance Projects, and Long-Term Clients
    • Privacy Policy
    • about emily
    • before + after
      • before + after – transforming my first home
      • before + after, our current home
    • contact me
    • choose a badge and share the merrypad.com love
  • Home
  • about emily
  • before + after
  • HGTV + DIY Network
  • good press
  • contact

Make This Modern, Upcycled Bird Feeder

February 2, 2016

This post was originally published on DIY Network’s blog Made + Remade in April 2015.

Enjoy this Earth Day upcycle for the birds!

Bird watching from your own home is a really special and educational experience. Create this DIY bird feeder using simple bowls, a threaded rod, and inexpensive hardware to make a custom piece. This bird feeder was designed to hang right outside our kitchen window, and promises draw quite a crowd every morning – bluebirds, robins, sparrows, you name it!

How to make a modern bird feeder using porcelain bowls.

Step 1:

Choose two bowls, and a third platter that is slightly wider than your larger bowl – for the platter, which will serve as a canopy to cover the bowls from weather and squirrels, wood, wicker (like I chose), or a coordinating plate are all options. This project is flexible enough that you can choose almost any materials that appeal to your style.

Porcelain, ceramic, glass or melamine will work equally well.


Materials to make a DIY bird feeder.

Step 2:

Gather the hardware and tools you need for the job:

1) 1/4″–20 threaded rod. A 3′ length cost only $2.25, and you will only need half of the length for this project.
Hack saw
(1) 3/8″ glass & tile drill bit. The packaging on my $10 bit specifically says that it’s good for ceramic and glass but not porcelain or stone, but I bore through porcelain bowls with it successfully (just pointing this out). Even though your threaded rod is 1/4″-diameter, the 1/4″ glass & tile bit won’t create a hole wide enough for the threads on the rod, which is why I went up a bit size to 3/8″.
A 1/4″ standard bit (used for drilling through my wicker platter, or if your canopy is made of wood)
Corded drill (powerful, and more consistently powerful than cordless tools)
(6) washers – $1
(6) 1/4″ hex nuts – $1
(1) 1/4″ coupling nut – $3
(1) 1/4″ x 4″ J-Bolt – $1

Materials to make a DIY bird feeder.

Step 3:

Use the 3/8″ glass & tile bit to bore through the bottom center of both bowls. To help prevent it from shattering, activate the drill slowly to avoid chatter, and line the inside of the bowl with a “X” of tape (whether it did a lot for me, I’m not sure, I’m just following logic to help prevent glass from shattering).

I can’t reiterate enough that this drilling process may take you hours or days – your hands will be cramped and may reverberate for hours. I’m sure it depends entirely on your material and tools, but my bit was brand new (sharp) and it still bore in an astonishingly slow way. In my experience, drilling through glass is considerably quicker.

Allow the weight of the drill to contribute to the pressure on the bit – don’t force it too hard with your own muscles, or you’ll risk shattering the bowl. It’s not quick, but keep with it and you will see gradual progress as the bit gets deeper through the material.

Drill through porcelain.

Step 4:

What I’m getting at is, when you bore through the bowl, you’re going to want to throw yourself a party.

The hole will eventually poke through the other side of the bowl, at which time it would be a good idea to remove the tape on the inside of the bowl, and continue to widen the opening by drilling through the opposite side.

Drill through porcelain.

Step 5:

The hole will need to be wide enough to fit your 1/4″ threaded rod.

Before you secure the bowl, take a minute with the hack saw to cut the 3′ rod in half. Note that the manufactured product has two “machined” ends which make threading a nut easy; when you saw through the center, you will find that it may be harder to twist a nut on the cut ends because the thread has been disrupted by the sawing. For this reason, you will want to fasten all components of this bird feeder so that the cut end rests at the bottom of the bird feeder (all nuts will have to be rotated slowly down the length of the rod).

One good thing to be said about this project is that the entire product is hand-tightened, therefore is easy to be hand-loosened if necessary.

Drill through porcelain.

Step 6:

Assemble the bird feeder by anchoring the larger bowl with a washer and a nut.

Assemble an upcycled bird feeder.

Step 7:

Add a washer and nut to the inside of the bowl as well; sandwiching the bowl between the nuts will help keep it tightly in place (not wobbly).

Assemble an upcycled bird feeder.

Step 8:

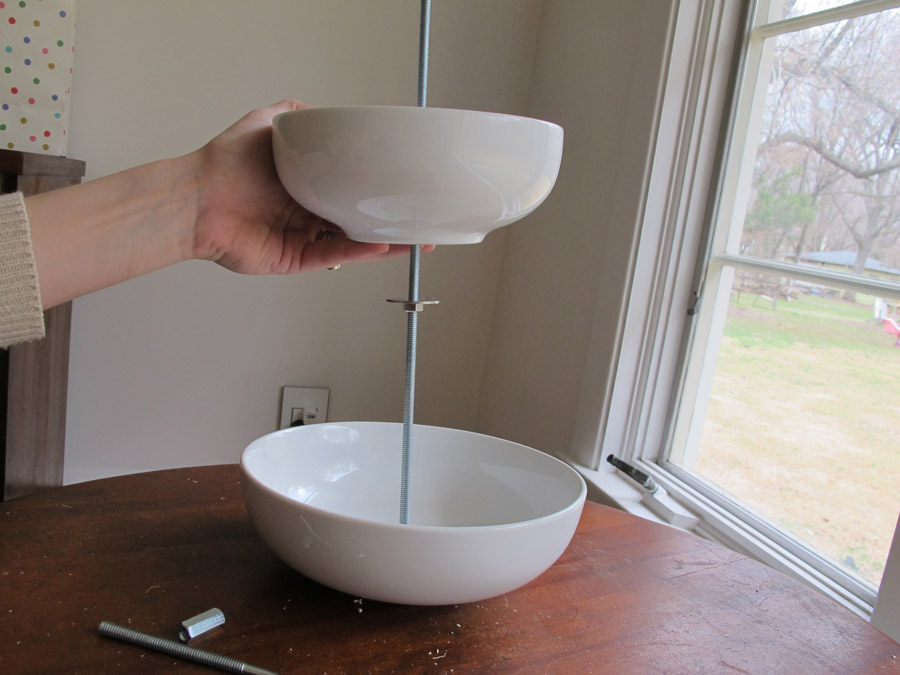
Thread on another nut and washer, twisting the nut to a spot on the rod where you want the second bowl to rest. Add the second, smaller bowl on top of that and anchor it in place.

Assemble an upcycled bird feeder.

Step 9:

Use the 1/4″ drill bit to create a hole in the center of your bird feeder canopy. The canopy serves two purposes – it helps to keep squirrels out, and it shelters the feeder to some degree from rain. I like the wicker tray because it’s really lightweight, but a wooden platter or simple upside down plate would be a great idea too.

Natural canopy for a modern bird feeder.

Step 10:

Use washers and nuts on either side of the canopy to lock it in place on the threaded rod.

Natural canopy for a modern bird feeder.

Step 11:

You should have a few inches available at the top of the rod. Thread the coupling halfway on to the tip, and then thread the J-Hook into the coupling until the connection is tight.

Assembling a hook for the modern bird feeder.

Step 12:

Hang your finished bird feeder outside to enjoy!

How to make a modern bird feeder using porcelain bowls.

(Note: It photographed easier at eye-level, but for our own pleasure and to help keep squirrels from paying it special attention, this will actually be hung on the house eave outside our kitchen window. The joy!)

Share

Backyard  / DIY  / HGTV + DIY Network Projects

Emily
I'm a home improvement enthusiast, living a very merry DIY lifestyle. I've been a freelancer writer for 10+ years and you can find my work on popular home and garden sites, like HGTV.com. Follow me on facebook and instagram, or drop me a note.

Leave A Reply


Leave a Reply Cancel reply

Your email address will not be published. Required fields are marked *

This site uses Akismet to reduce spam. Learn how your comment data is processed.

  • HI, I’m Emily

    Emily Fazio

    I'm a home improvement enthusiast, living a very merry DIY lifestyle. Follow me on facebook and instagram, or drop me a note if you'd like. I love notes.

    Thanks for visiting!

  • Instagram

    merrypad

    Merrypad by Emily Fazio
    Instagram post 17902304861708711 Instagram post 17902304861708711
    Highly recco mining those #herkimerdiamonds ✌️ Highly recco mining those #herkimerdiamonds ✌️
    Pt. 2: Well before Halloween, the last of the garl Pt. 2: Well before Halloween, the last of the garlic went into the home garden: 10 rows [L>R] 6 whole Nootka Rose as an experiment, 3x8 Mennonite-grown cloves from Aman’s, and 6x8 (and, I think, total 112? notes are cryptic) “normal.”
#gardennotes #growinggarlic #garden2023 #whatisnormal #merrypadathome
    Out of sight but [documented so it’s] not out of Out of sight but [documented so it’s] not out of mind! #garden2024 kicks off with my favorite biennial: elephant garlic! 15 cloves planted from small, to medium, to enormous. #gardennotes
    Annual garlic notes for #garden2023, pt. 1: this i Annual garlic notes for #garden2023, pt. 1: this is getting ooc, and I love it. 👩‍🌾🧑‍🌾

🧄 65% of the planting is in a new plot in the country. 🧄 Seeing if NR grows bigger with more sunlight. 🧄 Big @chasefarms cloves from 2021 were really productive in our home garden; can’t wait to see how they can show up next year in the new space. 🧄

Hand-turned a small bed, but big thanks to my sister, who rolled into town just in time to help me double its size (and did not complain once).
    One straggler from #garlic2021 debuted with 7 stal One straggler from #garlic2021 debuted with 7 stalks and 7 scapes, and I can’t wait to see this mammoth looks like when it’s pulled next month. #garlic2022 

Also, fierce springtime performance by parsley, chamomile, and self-seeded cilantro.
    Annual garlic notes #garden2022 ~315 cloves total Annual garlic notes #garden2022
~315 cloves total
50 in new, unfenced garden
Still need thick mulch on everything
Did a terrible job tracking varieties when I harvested, so it’s all a mix of hardneck now 😒
Added some big cloves from @chasefarms and look forward to adding some @fruition_seeds in #garden2023 when @porterfarmscsa delivers.
    Load More... follow emily: @merrypad


  • Like Us On Facebook

    Facebook Pagelike Widget


  • Popular Posts

    • How to fix an IKEA drawer. The Easy Fix For Broken IKEA Drawers 66.9k views
    • DIY sideboard rehab. 7 Steps for Restoring an Old Midcentury Sideboard Buffet 56.8k views
    • How to design and make a barn quilt. How to Make Your Own Barn Quilt 50k views
    • How to hang art on brick surfaces using specialty clips. The Easy Way to Hang Art on Brick or Stone 40.1k views
    • DIY driveway removal. How to Remove an Old Asphalt Driveway 35.1k views
    • Our DIY flagstone patio. Building a Flagstone Patio in One Day 32.8k views
    • Tips for dying pasta different colors, and a Halloween Recipe for the kids. How to Dye Pasta Different Colors (Halloween Recipe) 32.5k views
    • Fix an ikea dresser drawer. Life Support For An IKEA Dresser 29.7k views
    • Goodbye, gold fireplace covering. Less Is More: How to Remove a Fireplace Surround 29.5k views
    • After: Custom wooden garden fence. Designing a Durable Wooden Fence For Our Beautiful Backyard Garden 23k views


  • BROWSE POSTS BY CATEGORY:

    • Art Attack (7)
    • Backyard (92)
    • Barn (8)
    • Basement (27)
    • Bathroom (43)
    • Beach (13)
    • Bedrooms (73)
    • Being Thrifty (53)
    • Business-y (12)
    • Buying and Renting and Selling (23)
    • Casual Celebrations (36)
    • Closets (17)
    • Curb Appeal (44)
    • Dainty Details (8)
    • Deck (23)
    • Decor (286)
    • Dining Room (37)
    • DIY (577)
    • Dog-Related (24)
    • Entryway (59)
    • Flooring (58)
    • For the Kids (32)
    • Garage (17)
    • Gardening (70)
    • Helping The Economy (30)
    • HGTV + DIY Network Projects (283)
    • Holiday-Related Projects (80)
    • Home Safety (12)
    • Kitchen (83)
    • Lighting (31)
    • Living Room (77)
    • Merry Travels (21)
    • Office Space (21)
    • Organized (41)
    • Other Pads (14)
    • Outdoor Living (12)
    • Scooter Fun (8)
    • Stairwell (20)
    • Sunroom (22)
    • Supporting Sponsors (43)
    • The Art Room (3)
    • Tools (43)
    • Uncategorizable (1)
    • Wedding (28)
    • Windows (14)
    • Work-pads (10)


  • a little bit of everything, friends, DIY, and inspiration

    • Dadand.com < My husband and his BFF
    • HGTV
  • Some Legal

    Merrypad incorporates the occasional affiliate link to Amazon.com and Minted; we link to many other websites and products, but if it is in context of a paid sponsorship, it is always noted as such. Please review the privacy policy and contact me if you have any additional questions.

    Theme customized by Pete Fazio Creative, the guy from dadand.com.


© Copyright Merrypad