This post was originally published on DIY Network’s blog Made + Remade in February 2013.
I picked up a few new innocent houseplants in the gardening clearance section of our local Lowe’s. That’s right, did you know that the plant clearance section exists in some stores? These bad boys were marked down to $1.50/each, and they’re a little healthier than some of the other greens that were marked down similarly, so I have confidence that I’ll be able to nurse them back to health in a jiffy with some quality H2O and a little sunshine.

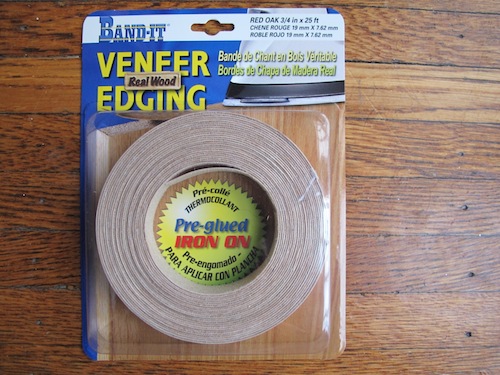
While I was at the store, I figured that I should get a few new planters to suit my new pals, but couldn’t find any that were especially what I was looking for, specifically something with a modern edge and clean lines, so I decided to make my own using a roll of real wood red oak veneer edging that I happened to have at home.
I think you’re going to be impressed with my ingenuity, my little planters came together in a half-hour and for less than $7 total. Keep on reading to see how.
The beautiful thing about veneer is that it’s easy to work with. I’ve never actually had the occasion to use veneer in its intended purpose, and I’ve never even tried to use it at craft time before, but I was inspired to try it (some people make amazing pendants, for example).
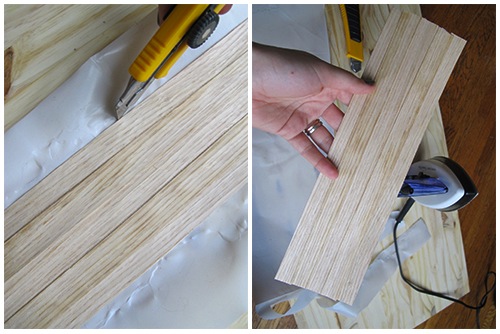
I started by measuring the circumference of the two potted plants I bought (11.5″) and then cut strips of the coiled veneer to length (12″ so there was a little overhang). The mini-pots measured 4″ tall, so I planned to stack 5 rows of veneering to cover the pot’s height completely.

My little planters, or, let’s be real, pot “surrounds” wouldn’t have a defined base, but I have a fix for that, keep reading.
I started by gathering a base to affix the veneer to; the five strips wouldn’t overlap well enough vertically to create a strong bond to one another, so I turned to another idea, attaching each piece to a piece of 6 MIL plastic sheeting, scraps of which I had in the basement from a drywalling project.

Veneer is meant to be ironed on (the adhesive on the back of it melts easily and bonds to almost anything) so I aligned my pieces of veneer and ran over it with the hot iron (our junky “craft” iron, not our clothing iron). Note that I left about a 1/2″ of adhesive overhanging the edge of the plastic–this overhanging section would need to carefully remain unheated so that it could be used as adhesive later in the project.

You won’t have to iron over it for long (and if you do, the veneer may start to discolor, a.k.a. burn). It cools in mere seconds, just as quickly as it melts and adheres in the first place, and once it did, I trimmed away the excess plastic sheeting with an utility knife.
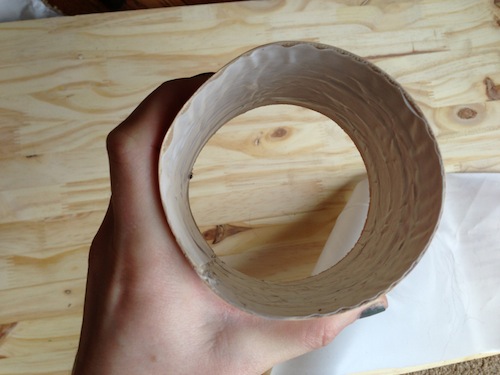
The wood was still pliable at this point, although as it cools it stiffens up quickly. I wrapped the two ends together to form a cylinder, overlapping the overhanging end of veneer (still not attached to the plastic). I brought in clamps as backup reinforcement, because I still only have two hands.
With the clamps holding the veneer securely, I carefully brought in the iron close enough to generate heat and weaken the adhesive, forming a bond between the wood strips.

It worked. Within a minute, I slipped off the clamps and the cylinder held securely. Oh so round.
The new little plants slipped right in. My little tip, if you have potted plants where drainage issues are a concern, is to wrap the base of the pot in a plastic baggie. You’ll want it loose because the water will still need to drain, but it’s an easy seal to protect whatever surface your planter might be sitting on.

They’re a pretty cute accent in our bathroom, the red oak almost disguising as a birch to match our light wood accents.

Another unique DIY planter is a paint can. See the gallery below for inspiration.


Leave A Reply