• Home
  • about emily
  • before + after
  • HGTV + DIY Network
  • good press
  • contact
  • Let’s Organize These Posts:

    • Art Attack
    • Backyard
    • Barn
    • Basement
    • Bathroom
    • Beach
    • Bedrooms
    • Being Thrifty
    • Business-y
    • Buying and Renting and Selling
    • Casual Celebrations
    • Closets
    • Curb Appeal
    • Dainty Details
    • Deck
    • Decor
    • Dining Room
    • DIY
    • Dog-Related
    • Entryway
    • Flooring
    • For the Kids
    • Garage
    • Gardening
    • Helping The Economy
    • HGTV + DIY Network Projects
    • Holiday-Related Projects
    • Home Safety
    • Kitchen
    • Lighting
    • Living Room
    • Merry Travels
    • Office Space
    • Organized
    • Other Pads
    • Outdoor Living
    • Scooter Fun
    • Stairwell
    • Sunroom
    • Supporting Sponsors
    • The Art Room
    • Tools
    • Uncategorizable
    • Wedding
    • Windows
    • Work-pads
  • Search

  • Hi, I’m Emily

    Emily Fazio

    I'm a home improvement enthusiast, living a very merry DIY lifestyle.

    You can find me writing for HGTV and DIY Network, follow me on facebook and instagram, or drop me a note if you'd like. I love notes.

    Thanks for visiting!

  • BROWSE POSTS BY CATEGORY:

    • Art Attack (7)
    • Backyard (92)
    • Barn (8)
    • Basement (27)
    • Bathroom (43)
    • Beach (13)
    • Bedrooms (73)
    • Being Thrifty (53)
    • Business-y (12)
    • Buying and Renting and Selling (23)
    • Casual Celebrations (36)
    • Closets (17)
    • Curb Appeal (44)
    • Dainty Details (8)
    • Deck (23)
    • Decor (286)
    • Dining Room (37)
    • DIY (577)
    • Dog-Related (24)
    • Entryway (59)
    • Flooring (58)
    • For the Kids (32)
    • Garage (17)
    • Gardening (70)
    • Helping The Economy (30)
    • HGTV + DIY Network Projects (283)
    • Holiday-Related Projects (80)
    • Home Safety (12)
    • Kitchen (83)
    • Lighting (31)
    • Living Room (77)
    • Merry Travels (21)
    • Office Space (21)
    • Organized (41)
    • Other Pads (14)
    • Outdoor Living (12)
    • Scooter Fun (8)
    • Stairwell (20)
    • Sunroom (22)
    • Supporting Sponsors (43)
    • The Art Room (3)
    • Tools (43)
    • Uncategorizable (1)
    • Wedding (28)
    • Windows (14)
    • Work-pads (10)
  • Search

  • Pages

    • blog
    • Merrypad Features
    • Privacy Policy
    • about emily
    • before + after
      • before + after, our current home
      • before + after, our first house
    • contact me
    • choose a badge and share the merrypad.com love
  • Home
  • about emily
  • before + after
  • HGTV + DIY Network
  • good press
  • contact

How to Make a Unique Stone Picture Frame

March 4, 2016

This post was originally published on DIY Network’s blog Made + Remade in March 2013.

I love it when my crafty little escapades leave me with a phenomenal product that I know I’ll have in my home for years to come. My personal aesthetic in home decor lends itself to be earthy and natural, and in today’s post I’ll show you how I made a picture frame using a very natural material in a creative application.

The finished piece was inexpensive too (think, <$5), and anyone could make their own interpretation of it with the right resources and inspiration.

How to make a shale or slate stone picture frame.

Keep on reading to learn more about how I made this stone picture frame!

Shale stones–the mothership of the more commonly known “slate”–are in abundance on our local Western New York beaches, and I’ve taken to collecting them over the years. Last spring, I even tiled the entryway of my home in these little black stones, and it’s one of my proudest projects (you can read about ithere and here).

I used a few very specific tools and materials for this project, most of which I fortunately had around the house:

  • Scrap wood to make a base picture frame
  • Four flat corner braces to assemble the light weight picture frame (this is where I spent the $5)
  • Thinset adhesive for wall and floor tile installation (I already had some from a previous project, but you can get a quart of it pre-mixed for about $6)
  • A wet saw with a diamond blade

I started by creating a simple frame to house a 5″x7″ pane of glass. For this, I used scrap wood, and more specifically, scrap shiplap from a previous project. The piece of scrap shiplap I had happened to be perfect because the rabbeted edge of the board easily serves as an inset area for the frame glass and picture that are being framed. (If you don’t have scrap shiplap laying around your basement, and I don’t expect you do, you can achieve the same inset effect by cutting the edge of a 1x board with a 1/2″ rabbet bit with a router.)

I used flat corner braces to assemble the frame securely (a small $5 investment for convenience). For frames heavier or larger, I usually put trust in biscuits or heavier duty mending strips, but this frame was small and lightweight.

Using mending strips to reinforce a DIY picture frame weighted by stone.

Once the frame was made, I selected a bunch of rocks from my stash. The thinner, larger stones worked best.

Use found stones to make a custom picture frame.

I wasn’t actually sure how well the wet saw would cut through irregular stones; I took a chance, set the saw to cut slivers measuring 1.5 cm wide, covered my eyes and ears and started trying. Cuts like butter.

Use found stones to make a custom picture frame.

Cutting stones with a wet saw in a cold basement on a 29 degree day wasn’t the coziest idea, but in a short hour I managed to get enough pieces trimmed to cover the whole front of the frame. I dry fit the pieces periodically to gauge how many I would need.

Use found stones to make a custom picture frame.

If you’ve never used a wet saw before, you should be forewarned that it’s always messy, and you usually end up looking like you soiled yourself heavily, but it’s easy to use once you get the hang of it, just like a table saw with a spraying fountain attached.

Use slate and shale to make a custom picture frame.

I digress. With the stones washed and air dried, I began attaching them to the wooden frame with leftover thinset adhesive, the same kind of adhesive used for installing floor and wall tiles. I used a trowel and buttered it on the frame liberally so that the stones would have something to grasp onto.

Use mortar to attach cut stones to a picture frame.

I really liked how in repetition, the pieces of cut shale on end looked a lot like stacked flagstone.

Use mortar to attach cut stones to a picture frame.

The frame itself was left to dry overnight before I inserted the glass panel on the back and a picture from our personal collection.

How to make a custom stone picture frame.

I attached a wire on the back using the flat brackets for convenience once again, and we’ve since been enjoying it in our home.

How to make a shale or slate stone picture frame.

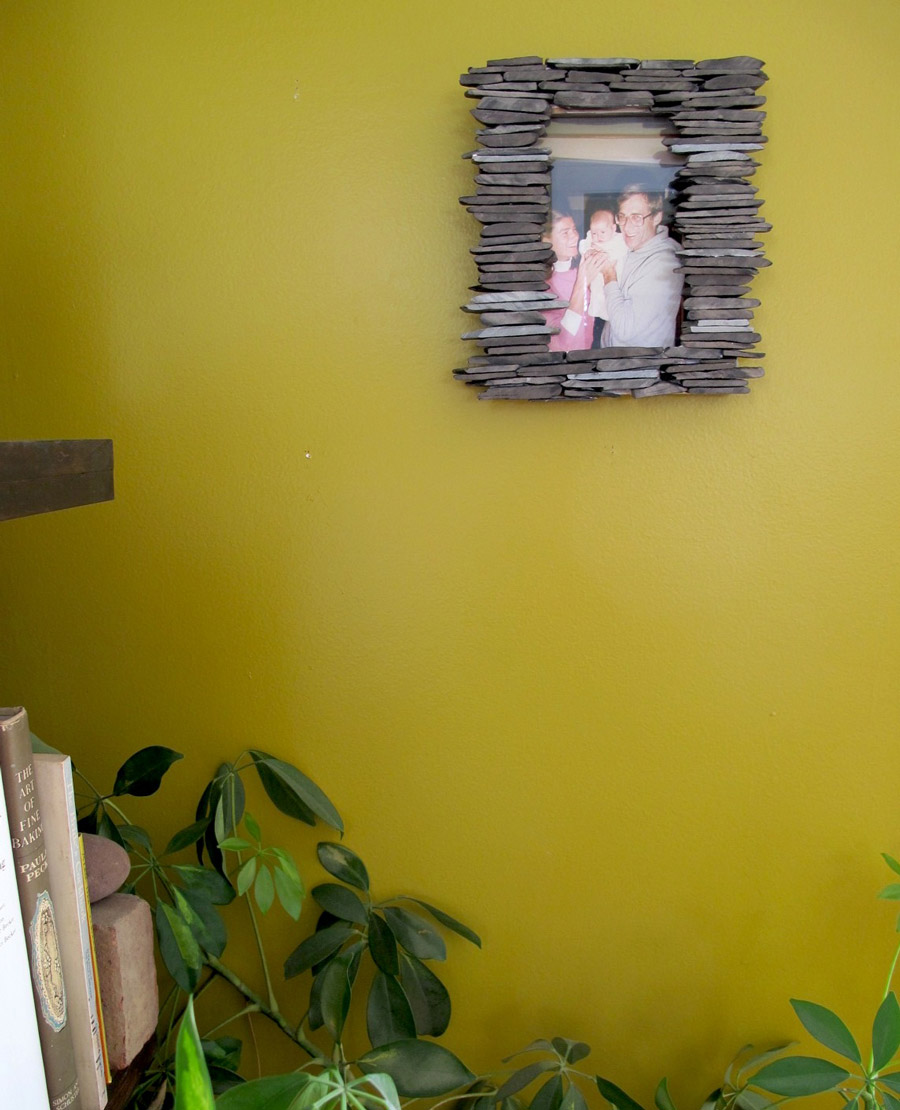
I thought it was appropriate that the frame contain me and my parents (circa 1980′s) since the stones were from their beach. We ordered some new 5×7′s from our recent honeymoon that can update the frame over time.

How to make a shale or slate stone picture frame.

Share

Decor  / DIY  / HGTV + DIY Network Projects

Emily
I'm a home improvement enthusiast, living a very merry DIY lifestyle. You can find me writing for HGTV and DIY Network, follow me on facebook and instagram, or drop me a note if you'd like. I love notes.

Comment


Dulce Resendiz
December 23, 2016 at 8:40 pm
Reply

Hi,
I was looking for a stone picture frame… I want to add the text “the A Team” to the frame. Is that something you could possibly do?


Leave a Reply Cancel reply

Your email address will not be published. Required fields are marked *

This site uses Akismet to reduce spam. Learn how your comment data is processed.

  • HI, I’m Emily

    Emily Fazio

    I'm a home improvement enthusiast, living a very merry DIY lifestyle. Follow me on facebook and instagram, or drop me a note if you'd like. I love notes.

    Thanks for visiting!

  • Instagram

    Can’t believe I ever bought dumpling wrappers. 🥟 Pulse a few cups of flour in the food processor drizzling in cold water until it forms dough. Roll smooth. Use a conveniently large cookie cutter, or just trim out squares. The end ❤️ #hny #dumplings
    Didn’t think I’d be making more masks, but her Didn’t think I’d be making more masks, but here we are (now feat. recycled t-shirt layer for added softness and bonus-layer protection). #diy #amateurseamstress #diymask
    Get out there ☀️ Get out there ☀️
    The gang finally showed up. 👻 The gang finally showed up. 👻
    A record 233 cloves + 10 shallots 🧛🏻‍♀️ 
#merrypadathome #garden2021 #garlic #gardennotes #whatisnormal
    ⭐️⭐️⭐️⭐️⭐️ ⭐️⭐️⭐️⭐️⭐️
    Immeasurably tall, lanky tomatillos. #garden2020 # Immeasurably tall, lanky tomatillos. #garden2020 #tomatillos #nofilter
    32 oz., reserved for the brave 🌶🌶 😍#homeg 32 oz., reserved for the brave 🌶🌶 😍#homegrown #tomatillos #harvest2020
    Nothing says “let’s stay home all fall, too” Nothing says “let’s stay home all fall, too” like a badass custom fireplace on our patio. 🔥 #chiminea #merrypadathome
    Load More... follow emily: @merrypad


  • Like Us On Facebook

    Facebook Pagelike Widget


  • Popular Posts

    • How to fix an IKEA drawer. Cheap IKEA Drawers (And The Quick Fix) 40.3k views
    • DIY sideboard rehab. Our Refinished Midcentury Buffet 39.9k views
    • How to design and make a barn quilt. How to Make Your Own Barn Quilt 33.4k views
    • DIY driveway removal. The Driveway Rocks 24.9k views
    • How to hang art on brick surfaces using specialty clips. The Easy Way to Hang Art on Brick or Stone 24.5k views
    • Goodbye, gold fireplace covering. Less Is More: How to Remove a Fireplace Surround 22.3k views
    • Our DIY flagstone patio. Building a Patio in One Day 17.6k views
    • Bedroom paint, freshened up with Snowbound paint. Painting Everything White: We Chose Snowbound, By Sherwin Williams 16.6k views
    • Tips for dying pasta different colors, and a Halloween Recipe for the kids. Tips for Dying Pasta Different Colors (+ A Special Halloween Recipe) 15.3k views
    • Fix an ikea dresser drawer. Life Support For An IKEA Dresser 14.3k views


  • BROWSE POSTS BY CATEGORY:

    • Art Attack (7)
    • Backyard (92)
    • Barn (8)
    • Basement (27)
    • Bathroom (43)
    • Beach (13)
    • Bedrooms (73)
    • Being Thrifty (53)
    • Business-y (12)
    • Buying and Renting and Selling (23)
    • Casual Celebrations (36)
    • Closets (17)
    • Curb Appeal (44)
    • Dainty Details (8)
    • Deck (23)
    • Decor (286)
    • Dining Room (37)
    • DIY (577)
    • Dog-Related (24)
    • Entryway (59)
    • Flooring (58)
    • For the Kids (32)
    • Garage (17)
    • Gardening (70)
    • Helping The Economy (30)
    • HGTV + DIY Network Projects (283)
    • Holiday-Related Projects (80)
    • Home Safety (12)
    • Kitchen (83)
    • Lighting (31)
    • Living Room (77)
    • Merry Travels (21)
    • Office Space (21)
    • Organized (41)
    • Other Pads (14)
    • Outdoor Living (12)
    • Scooter Fun (8)
    • Stairwell (20)
    • Sunroom (22)
    • Supporting Sponsors (43)
    • The Art Room (3)
    • Tools (43)
    • Uncategorizable (1)
    • Wedding (28)
    • Windows (14)
    • Work-pads (10)


  • a little bit of everything, friends, DIY, and inspiration

    • Dadand.com < My husband and his BFF
    • DIY Network
    • HGTV
  • Get Posts Via Email

  • Some Legal

    Merrypad incorporates the occasional affiliate link to Amazon.com and Minted; we link to many other websites and products, but if it is in context of a paid sponsorship, it is always noted as such. Please review the privacy policy and contact me if you have any additional questions.

    Theme customized by Pete Fazio Creative, the guy from dadand.com.


© Copyright Merrypad