This post was originally published on DIY Network’s blog Made + Remade in April 2012.
I’ve spent three full months juggling a bathroom renovation with everyday life, and I’m so happy to announce that the day of real before + after progress is here. (It’s here, it’s here, it’s here!)
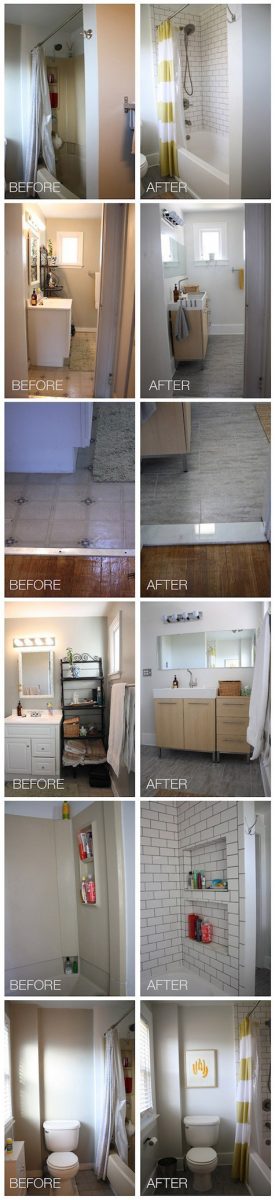
Forever documented over 16 posts, me and Pete spent countless hours working, taking hundreds of photos, and then recapping the progress of this DIY adventure with you guys. I can’t help but squeal a little bit; I want to dive right in:

Consider that a sneak peek of what’s to come. Keep on reading to see a little video, many more photos of the new space, as well as a much-anticipated breakdown of our budget.
It’s probably most fun for me to walk you through the bathroom, since that’s what I did originally when I was kicking off the project and showing you what I was going to be working with. To get some real-life perspective on how the bathroom looks today, see for yourself, but fair warning, it seems that I talk and flail about faster than a Flip cam can focus, so parts of the video are mighty blurred. But it’s unedited, pure, bathroom-tour-happiness, so I hope you enjoy:
It’s pretty great, we’re forever pleased with ourselves for tackling this project and learning tons in the process.
Can you believe what it looked like when we started?
I kept close tabs on my budget throughout the project. This wasn’t a tear-down-all-of-the-walls renovation, and we didn’t change anything about the footprint of the bathroom, so both of those decisions really helped to keep our budget under control and of modest proportions.
I cautiously estimated and guessed that I could come in at a budget of $1,200, with an extra cushion of $300 to cover unimaginable costs. Turns out that the cushion came in handy: much of our overage directly correlates back to the shower plumbing, which originally we didn’t think would require any reworking, but actually required a 100% overhaul to accommodate a new valve. A second identifiable place that I know I went over budget was in the moulding arena; it may be a small room, but anything that’s sold by the linear yard adds up in price more quickly than I imagined. Also, I bought new paint when I was planning on using the same gray that had been in there before, a small but still tallied cost incurred, bumping me over budget by another $25.00.
The only tool that I had to buy was a wet saw, and I think it’s already earned itself a gold star because it’s been used for at least 3 other projects since we finished the shower tile. Little project add-ons can accumulate fast, but I still think I worked efficiently and made good decisions.
For your enjoyment, the official bathroom renovation breakdown:

Other fun facts:
- Total Duration: 85 days (we work full-time jobs too, guys!)
- Days without a tub: 2
- Days without a toilet: 35
- Days to install subway tile: 4
- Days to install floor tile: 1
- Most trips in a single day to the hardware store for something plumbing related: 3
Thanks to everyone who commented and emailed during the series. Your positivity, thoughts, and encouragement kept us chugging along!


Comment
We recently started a home improvement company in New York and saw this article. We are seeing a lot of bathroom repairs and remodels. I never would have thought to take such detailed notes but it makes perfect sense. Should you ever want to do it again, help someone or hire someone to do it, you have it all written out. It has helped me with making the decision to be as detailed as possible. Thanks a ton.