• Home
  • about emily
  • before + after
  • HGTV + DIY Network
  • good press
  • contact
  • Let’s Organize These Posts:

    • Art Attack
    • Backyard
    • Barn
    • Basement
    • Bathroom
    • Beach
    • Bedrooms
    • Being Thrifty
    • Business-y
    • Buying and Renting and Selling
    • Casual Celebrations
    • Closets
    • Curb Appeal
    • Dainty Details
    • Deck
    • Decor
    • Dining Room
    • DIY
    • Dog-Related
    • Entryway
    • Flooring
    • For the Kids
    • Garage
    • Gardening
    • Helping The Economy
    • HGTV + DIY Network Projects
    • Holiday-Related Projects
    • Home Safety
    • Kitchen
    • Lighting
    • Living Room
    • Merry Travels
    • Office Space
    • Organized
    • Other Pads
    • Outdoor Living
    • Scooter Fun
    • Stairwell
    • Sunroom
    • Supporting Sponsors
    • The Art Room
    • Tools
    • Uncategorizable
    • Wedding
    • Windows
    • Work-pads
  • Search

  • Hi, I’m Emily

    Emily Fazio

    I'm a home improvement enthusiast, living a very merry DIY lifestyle.

    You can find me writing for Home Living Handbook, HGTV.com, and a handful of other websites. Follow me on facebook and instagram, or drop me a note if you'd like. I love notes.

    Thanks for visiting!

  • BROWSE POSTS BY CATEGORY:

    • Art Attack (7)
    • Backyard (92)
    • Barn (8)
    • Basement (27)
    • Bathroom (43)
    • Beach (13)
    • Bedrooms (73)
    • Being Thrifty (53)
    • Business-y (12)
    • Buying and Renting and Selling (23)
    • Casual Celebrations (36)
    • Closets (17)
    • Curb Appeal (44)
    • Dainty Details (8)
    • Deck (23)
    • Decor (286)
    • Dining Room (37)
    • DIY (578)
    • Dog-Related (24)
    • Entryway (59)
    • Flooring (58)
    • For the Kids (32)
    • Garage (17)
    • Gardening (70)
    • Helping The Economy (30)
    • HGTV + DIY Network Projects (283)
    • Holiday-Related Projects (80)
    • Home Safety (12)
    • Kitchen (87)
    • Lighting (31)
    • Living Room (77)
    • Merry Travels (21)
    • Office Space (21)
    • Organized (41)
    • Other Pads (14)
    • Outdoor Living (12)
    • Scooter Fun (8)
    • Stairwell (20)
    • Sunroom (22)
    • Supporting Sponsors (43)
    • The Art Room (3)
    • Tools (43)
    • Uncategorizable (1)
    • Wedding (28)
    • Windows (14)
    • Work-pads (10)
  • Search

  • Pages

    • blog
    • Good Press: Special Features, Freelance Projects, and Long-Term Clients
    • Privacy Policy
    • about emily
    • before + after
      • before + after – transforming my first home
      • before + after, our current home
    • contact me
    • choose a badge and share the merrypad.com love
merrypad website logo with acorn and text
  • Home
  • about emily
  • before + after
  • HGTV + DIY Network
  • good press
  • contact

Stripping The Kitchen (And 3 Little Oopsies)

November 2, 2012

I volunteered to remove our existing laminate countertops by hand. I’m not exactly sure how much money I actually was able to save by doing this myself, probably all of $20 (or four mochas, what’s up), but every little bit counts when you’re forking over $1,600 for the rest of the installation. Best case scenario, I’ll be able to make a few dollars back by selling the countertop, sink, and faucet on Craigslist, and second best case scenario, we’ll reuse the laminate myself in the basement as a new work surface.

I didn’t know what to expect when it came to removing this black spotted laminate countertop from my newly stained cabinets; would it be glued to the base? Would the backsplash be attached to the wall? Would the backsplash be attached to the surface or super flimsy? I’ve watched plenty of episodes of Renovation Realties and I know that homeowners often run into really stupid things when they’re trying to carefully demo a space, so I took my time at this one. Somehow, even in taking my time to do things correctly, I winded up with three minor/semi-major/potentially serious plumbing issues to layer on the cake of new countertop joy.

Right, the issues were plumbing related – not countertop-removal related. The laminate countertops were fortunately just screwed in place, not glued at all, not even to the wall behind the backsplash, and they were only attached from underneath in a couple of places on each panel which means that I had them loosened from the base cabinets with my drill in about 3 minutes flat. The two smaller pieces of countertop that flanked the stove came off very easily (each piece was only about 4 sq. ft. in size, very manageable). It was here that I found the picture of the little vampire that I showed in Wednesday’s post, a sweet little trip down Halloween Lane that showed me what my living room looked like 20+ years ago – it’s easy to forget that this little house has seen so much in its existence, including horrible wallpaper that lined the stairwell as recently as the early 90’s.
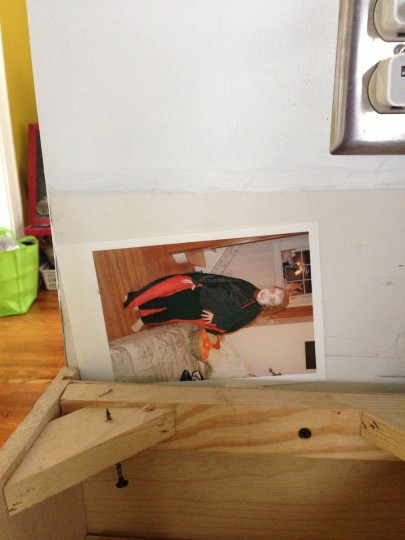
A little treasure in the countertop.

Disassembling the sink was assumed to be an easy task as well; I know enough in how to turn off the water and unhook the plumbing. I had hoped to save as much of the existing plumbing as I could, because we had ordered a nearly identical stainless double basin sink and expected to reinstall the same disposal (nothing that goes with the sink itself is included by the manufacturer, and I believe I saved us more money by offering to do the hookup myself and not ask the installers to take care of that for us). For the first 10 minutes or so, everything seemed to be going well. I had turned off the water beneath the cabinet and successfully disconnected the faucet, but it was then that I noticed that the cold water was starting to dribble back out of the pipe. Slowly, but noticeably. It all happened so fast that I don’t even have any photos of the plumbing “before”. I was never planning on writing about how to disconnect plumbing as part of this post, therefore I wasn’t much focused on taking pictures of the process.

“Turn the valve a little tighter,” common sense told me, and I was able to turn it another few millimeters, but when I did, the flow got worse, spilling water into the cabinet steadily – the valve was clearly broken, and for a short 5 minutes while we explored if there was a secondary turn-off valve in the basement that we could cut water flow at, the water soaked into multiple towels (I quickly padded the area enough to prevent any water from soaking into the cabinet itself, ever thankful that I pulled many old just-in-case towels from our linen closet). We eventually cut off water to the entire house (that’s the first time I’ve ever had to do that, BTW), and knowing that the valves would have to be replaced quickly, I cut the copper pipes with a tube cutter. Only the cold water on the left was busted, but it wasn’t an expensive upgrade to do both at the same time. DIY plumbing high-five.

It's dark under this sink. Also, a very tight spot to be cutting copper pipes in.

Fortunately, we dealt with this type of plumbing issue when we upgraded the bathroom last winter, so I knew that we needed a straight quarter turn stop that transitioned from 1/2″ (to fit the copper pipe) to 3/8″ (to fit the plumbing attached to the new Delta faucet. Because I also measured the plumbing that came with our new faucet before I ran out the door and screeched down to Home Depot, I knew I’d be safe if I picked up a few extenders (3/8″ on both ends) so that I had a little bit of flexibility in making the faucet hook up if I needed it. I was happy to find a valve that came with a SharkBite attachment, a little somethin’-somethin’ that promised to make installation onto the existing copper pope just that much easier. I’ve promised Pete that we can reward ourselves one of these days with a soldering set, but this was not the right job or timeline in which to be learning about all things solder-related.

All set to repair the valve and plumbing beneath the sink.

Whiz-bang, an hour later I was done. I told you this was an easy fix.

New quarter turn valve, new extender, we're set to install the sink when it arrives.

What didn’t end up being easy is that as soon as I had the new valves attached and the water turned back on (no leaks!) I disassembled the sink, first removing the disposal at the base of the sink, and then disconnecting the down pipe from second basin before unclipping the sink from underneath and lifting it out. Turns out that the existing plumbing was a little more frail than I would have ever imagined, and one wrong knock completely snapped off the plumbing at the drain. As in the drain that leads directly to the sewer.

You can see in the above picture that the straight up-and-down piece of that white pipe is clearly broken. Here’s what the rest of the situation looked like:
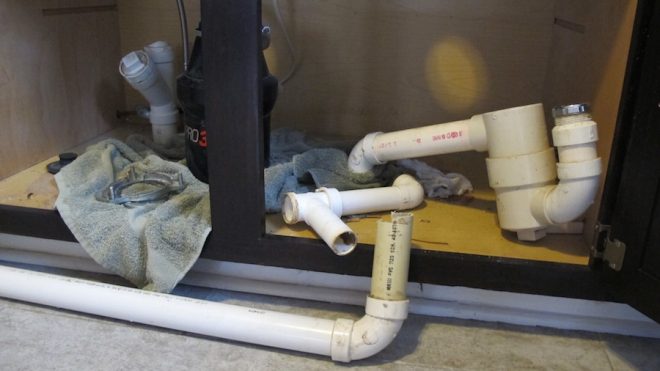
Uhhh, plumbing issue #2: Our drainage system has completely crumbled.

This whole plumbing issue-after-issue reminds me a lot of the situations we got ourselves into while renovating the bathroom. While demo’ing the bathroom, we found that the drain from the bathtub was no longer secured in place and within a very short distance of becoming disconnected entirely (which would have spilled bath water into our kitchen ceiling). Likewise, it was only a matter of time before the broken valve on the kitchen sink became an issue, and it’s a wonder that the drain didn’t break earlier on its own what with the natural reverberations of the garbage disposal and dishwasher on either side of it. Whatever I did to torque it and snap the PVC was minimal.

A third plumbing issue arose too, because all irritating plumbing problems happen in threes. When we turned off the water supply to the house, the toilet in our main (and only) bathroom suffered some pressure build up, and after the water was turned back on and the toilet was flushed, the toilet fill valve burst which sounds dramatic, but just means that the toilet doesn’t recognize the trigger to stop running. This too is replaceable (without having to replace the whole toilet), but it’s just another thing on the list of repair materials we need to pick up from the hardware store. It’s more than you need to know, but we’re back to using the cold basement commode for a few days and keeping the water turned off in to the toilet. Nothing can be easy, right?

I haven’t even gotten to the best part of this post. The part that involves me holding up a gigantic piece of heavy laminate countertop while Pete takes pictures of how ridiculous I look. Do I make it look light? It was not.

That's a big piece of laminate countertop. And right about here, we almost got it out of the kitchen in one piece.

We both thought we had a chance of getting the countertop sans sink out of the kitchen in one big L-shaped piece. How cool of a find would that be for someone renovating their own kitchen?

Starting to remove the kitchen countertop.

No matter how we wiggled, shifted, pulled, and twisted, it just wasn’t going to happen. And we couldn’t even break it at the seam that ran diagonally in the corner.
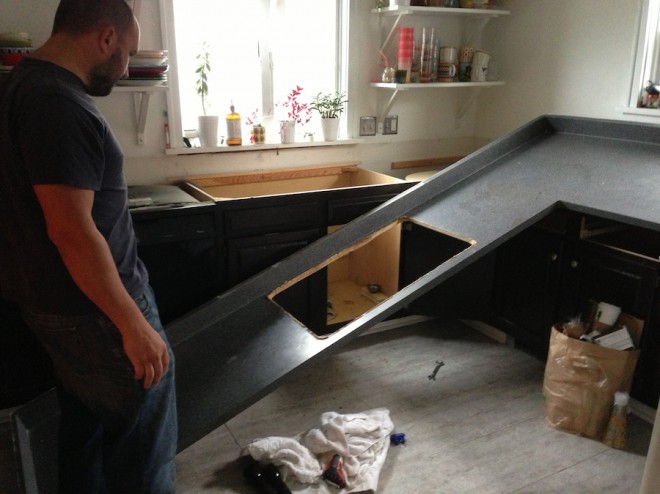
Riiiiight. Time to slice this baby.

We ended up sawing it just along the right side of the sink opening in an effort to preserve the  largest piece of countertop, and promptly pulled both pieces to the side of the room.
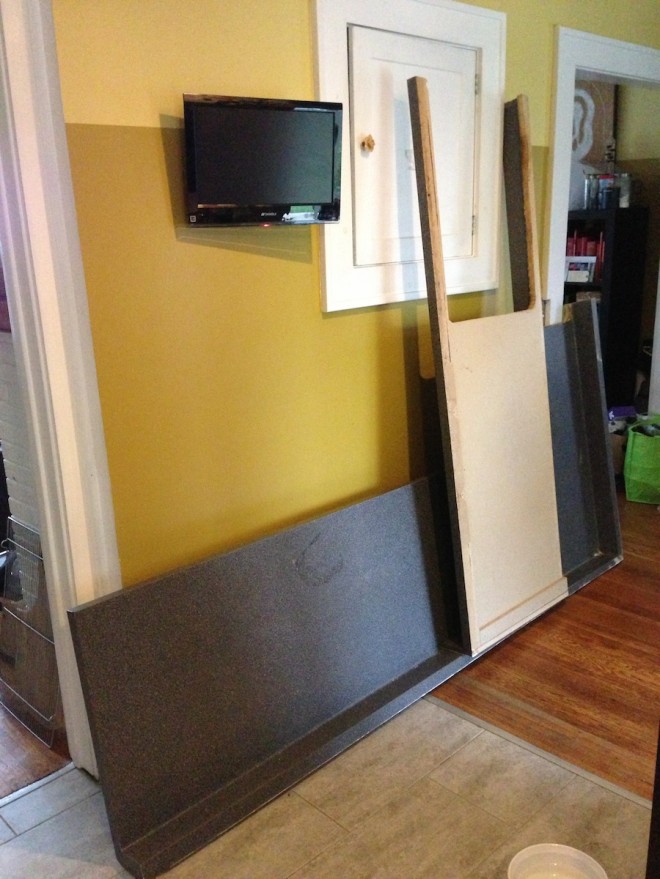
Getting ready to sell or recycle this laminate countertop.

We’re looking forward to having the install completed later today and all of the plumbing repairs made over the weekend, so I’ll be back next week with some (hopefully) great before + after photos!

Share

DIY  / Kitchen

Emily
I'm a home improvement enthusiast living a very merry, DIY-filled lifestyle. As a freelance writer, you can find my work on many popular home and garden sites, including HGTV.com, HomeLivingHandbook.com, and other outlets. Follow me on social, or drop me a note.

Comment


Tom Marks
November 2, 2012 at 10:06 am
Reply

In you kitchen ronovation you mentioned someday you will get a solder set for plumbing…. forget it, shark bites are the future. If you want a solder set I’ll give you mine… it is obsolete I’ll never use it and if I do need it someday I know who to call.


Leave a Reply Cancel reply

Your email address will not be published. Required fields are marked *

This site uses Akismet to reduce spam. Learn how your comment data is processed.

  • HI, I’m Emily

    Emily Fazio

    I'm a home improvement enthusiast, living a very merry DIY lifestyle. Follow me on facebook and instagram, or drop me a note if you'd like. I love notes.

    You can find me writing for Home Living Handbook, HGTV.com, and a handful of other websites.

    Thanks for visiting!

  • Instagram

    merrypad

    I’ll always say yes to a maker space experience, I’ll always say yes to a maker space experience, and The Shed at @timberland’s HQ did not disappoint ✌️🥾 @homelivinghandbook 

Final footwear design not shown 🙂

PS tagging some cute shoes they gifted from the Fall 2024 collection!
    I made the call and snapped off the elephant garli I made the call and snapped off the elephant garlic scapes yesterday evening. Who’s going to help us harvest and eat the next 1,000? 🧄🧄🧄🧄
    Hi! Boy, do I have things to share. 🎉 🫶 Fr Hi! Boy, do I have things to share. 🎉 

🫶 Friendly reminder to focus on balance and wellness: Pete and I lived abroad with our family for the entire month of August 2023. If you ever have the opportunity to work remotely, I promise it to be a worthwhile adventure that’ll change your POV in so many ways. And, If you need an in with an incredible AirBnB in Denmark, DM me. From new playgrounds and museums to the culture and design, making this trip a reality continues to be something we celebrate every day, and I wish everyone can experience it on some level.

💻 Friendly reminder to say yes to new (overwhelming) opportunities: The professional celebration happened upon our return. Last fall, I was approached to launch @homelivinghandbook, a new Pursuit channel for @mensjournal that highlights home improvement and DIY! It has been really fun to see it come to light, and truly one of the most exciting partnerships I’ve ever had. Timing couldn’t have been better, and I’m really happy to see how it grows over time. Please follow along — the team published 150 articles in two months, covering all kinds topics for home enthusiasts! So much more to come. #linkinbio #homelivinghandbook

✌️ the end, many thanks for your support!
    How much garlic is too much garlic? Maybe we’ll How much garlic is too much garlic? Maybe we’ll find out in 2024. Finished planting 1,005 cloves (and 19 shallots) in three new beds at the farm, and crossed one huge chore off my list 📝 #gardennotes #garden2024
    Instagram post 18003690670970980 Instagram post 18003690670970980
    We grew these fools. We grew these fools.
    pumpkin patch is doing great✌️#year1 #squashbl pumpkin patch is doing great✌️#year1 #squashblossoms #pumpkinpatch
    follow emily: @merrypad


  • Like Us On Facebook

    Facebook Pagelike Widget


  • Popular Posts

    • How to Dye Pasta Different Colors (Halloween Recipe) 41 views
    • Building a Flagstone Patio in One Day 24 views
    • The Easy Way to Hang Art on Brick or Stone 22 views
    • How to Make Halloween Tombstones 21 views
    • Designing a Durable Wooden Fence For Our Beautiful Backyard Garden 21 views
    • How to Build New Front Stairs and Railings 16 views
    • Less Is More: How to Remove a Fireplace Surround 13 views
    • Reasons We Recessed Our Induction Cooktop 12 views
    • The Easy Fix For Broken IKEA Drawers 11 views
    • A Modern Roofline and Other Practical Features on Our DIY Treehouse 11 views


  • BROWSE POSTS BY CATEGORY:

    • Art Attack (7)
    • Backyard (92)
    • Barn (8)
    • Basement (27)
    • Bathroom (43)
    • Beach (13)
    • Bedrooms (73)
    • Being Thrifty (53)
    • Business-y (12)
    • Buying and Renting and Selling (23)
    • Casual Celebrations (36)
    • Closets (17)
    • Curb Appeal (44)
    • Dainty Details (8)
    • Deck (23)
    • Decor (286)
    • Dining Room (37)
    • DIY (578)
    • Dog-Related (24)
    • Entryway (59)
    • Flooring (58)
    • For the Kids (32)
    • Garage (17)
    • Gardening (70)
    • Helping The Economy (30)
    • HGTV + DIY Network Projects (283)
    • Holiday-Related Projects (80)
    • Home Safety (12)
    • Kitchen (87)
    • Lighting (31)
    • Living Room (77)
    • Merry Travels (21)
    • Office Space (21)
    • Organized (41)
    • Other Pads (14)
    • Outdoor Living (12)
    • Scooter Fun (8)
    • Stairwell (20)
    • Sunroom (22)
    • Supporting Sponsors (43)
    • The Art Room (3)
    • Tools (43)
    • Uncategorizable (1)
    • Wedding (28)
    • Windows (14)
    • Work-pads (10)


  • a little bit of everything, friends, DIY, and inspiration

    • Dadand.com < My husband and his BFF
    • HGTV
    • Home Living Handbook, a Pursuit Channel for Men's Journal
  • Some Legal

    Merrypad incorporates the occasional affiliate link to Amazon.com and Minted; we link to many other websites and products, but if it is in context of a paid sponsorship, it is always noted as such. Please review the privacy policy and contact me if you have any additional questions.

    Theme customized by Pete Fazio Creative, the guy from dadand.com.


© Copyright Merrypad