• Home
  • about emily
  • before + after
  • HGTV + DIY Network
  • good press
  • contact
  • Let’s Organize These Posts:

    • Art Attack
    • Backyard
    • Barn
    • Basement
    • Bathroom
    • Beach
    • Bedrooms
    • Being Thrifty
    • Business-y
    • Buying and Renting and Selling
    • Casual Celebrations
    • Closets
    • Curb Appeal
    • Dainty Details
    • Deck
    • Decor
    • Dining Room
    • DIY
    • Dog-Related
    • Entryway
    • Flooring
    • For the Kids
    • Garage
    • Gardening
    • Helping The Economy
    • HGTV + DIY Network Projects
    • Holiday-Related Projects
    • Home Safety
    • Kitchen
    • Lighting
    • Living Room
    • Merry Travels
    • Office Space
    • Organized
    • Other Pads
    • Outdoor Living
    • Scooter Fun
    • Stairwell
    • Sunroom
    • Supporting Sponsors
    • The Art Room
    • Tools
    • Uncategorizable
    • Wedding
    • Windows
    • Work-pads
  • Search

  • Hi, I’m Emily

    Emily Fazio

    I'm a home improvement enthusiast, living a very merry DIY lifestyle.

    You can find me writing for HGTV and DIY Network, follow me on facebook and instagram, or drop me a note if you'd like. I love notes.

    Thanks for visiting!

  • BROWSE POSTS BY CATEGORY:

    • Art Attack (7)
    • Backyard (92)
    • Barn (8)
    • Basement (27)
    • Bathroom (43)
    • Beach (13)
    • Bedrooms (73)
    • Being Thrifty (53)
    • Business-y (12)
    • Buying and Renting and Selling (23)
    • Casual Celebrations (36)
    • Closets (17)
    • Curb Appeal (44)
    • Dainty Details (8)
    • Deck (23)
    • Decor (286)
    • Dining Room (37)
    • DIY (577)
    • Dog-Related (24)
    • Entryway (59)
    • Flooring (58)
    • For the Kids (32)
    • Garage (17)
    • Gardening (70)
    • Helping The Economy (30)
    • HGTV + DIY Network Projects (283)
    • Holiday-Related Projects (80)
    • Home Safety (12)
    • Kitchen (83)
    • Lighting (31)
    • Living Room (77)
    • Merry Travels (21)
    • Office Space (21)
    • Organized (41)
    • Other Pads (14)
    • Outdoor Living (12)
    • Scooter Fun (8)
    • Stairwell (20)
    • Sunroom (22)
    • Supporting Sponsors (43)
    • The Art Room (3)
    • Tools (43)
    • Uncategorizable (1)
    • Wedding (28)
    • Windows (14)
    • Work-pads (10)
  • Search

  • Pages

    • blog
    • Merrypad Features
    • Privacy Policy
    • about emily
    • before + after
      • before + after, our current home
      • before + after, our first house
    • contact me
    • choose a badge and share the merrypad.com love
  • Home
  • about emily
  • before + after
  • HGTV + DIY Network
  • good press
  • contact

Planning and Installing Shiplap as a Bedroom Accent Wall

August 31, 2011

If you missed yesterday’s post on headboard inspiration and planning, know that I’ve leaned away from having a formal headboard in our master bedroom, instead pushing towards overhauling the whole wall to add texture and interest.

With a goal of anchoring the bed that currently sits off-center beneath the small window, a horizontal line treatment felt like it would be achievable, and more favorable than vertical boards, like run-of-the-mill wainscoting. Laser beam demonstration, anyone?

Zoom, zip, zoom. Laser beams help to demonstrate where we're going with this headboard overhaul.

I also thought it’d help to make the room feel wider (it already felt taller by dropping the boxspring and mattress down to floor level). It’s the kind of thing you see done often with paint stripes, and as much as I love painted stripes (you’ve seen my living room, right?), I wanted something a little more dimensional.

Yesterday, I prodded you to consider how easy it is to find reclaimed clapboard siding. Siding? In a bedroom? Radical.

This was going to be a piece of cake. Right?

1) Go buy 100 sq. ft of reclaimed siding at 15-50 cents a linear foot.
2) Be happy that I only spent $15-50 and go through the Starbucks drive-through on the way home. Hope that the boards extending out of the Jeep don’t clip another car when I go around the tight curve.
3) Sand and install boards on the wall of the bedroom easily, in an afternoon or maybe two, while catching up on DVR’ed Holmes Inspection episodes.

It didn’t go quite that easily. Maybe you’re not surprised, but I am. And here’s why:

My favorite salvage shop reported that they had two clapboards earlier in the week (only two!) but rarely have them in stock, and never in any sizable quantity. Go figure that clapboards, ancient or not, are difficult to remove intact and are essentially worthless to resellers. Most everyone told me to just go and buy new cedar, even if it was a lower grade variety for a few dollars per sq. ft. Few dollars, ha.

Zoink. For a sweet $300-400 I could have a full-wall headboard made of brand-spankin’ new cedar clapboard… or… I could devise a new plan.

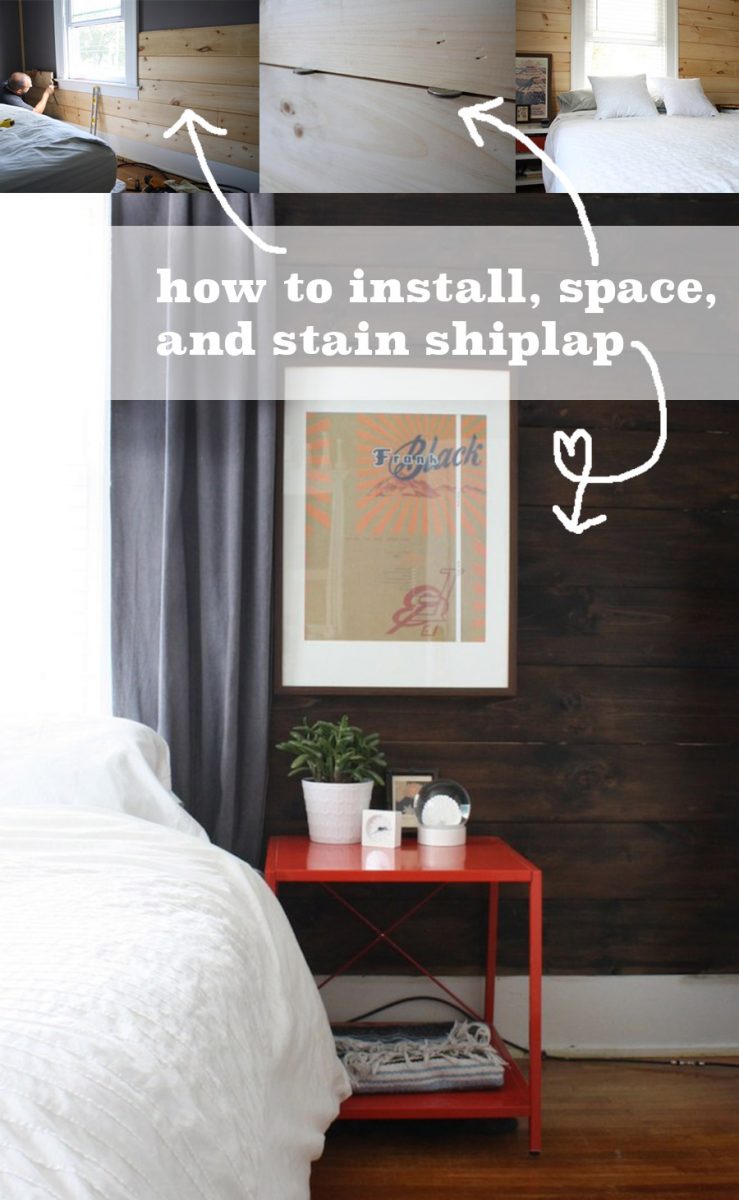
Ding, ding, ding. That new plan involved shiplap paneling.

Shiplap happiness.

Say what? Shiplap is that lumber in the back corner of your favorite big box store with rabbeted edges, usually right next to the wainscoting and assorted paneling options. It’s more frequently used as an exterior material for sheds and barns in colder climates (since the rabbet allows for a good, weatherproof seal), but I was inspired to use it inside after having seen it used successfully in a bathroom treatment. This photo’s a total sneak peek of a fantastic beach house in town; here’s a link to a fantastic tour.

Shiplap bathroom: sneak peek!

But yessir, I brought home 22 1″x8″x8″ boards (which may or may not be enough for my job). At $7.97 each with a handsome 10% discount, plan B set me back just under $160.00. More expensive than reclaimed could have been, less expensive than cedar clapboard.

Shiplap. And some other lumber. And the mother of all framing nail guns.

The mother of all framing nail guns sneaked into my trunk too. That’s Pete’s new pride and joy, so you’ll probably be reading about it on Dadand.com one of these days. All I can say is that it’s beautiful, lightweight, and a lovely shade of sea foam green. But anyways…

When installed horizontally, the seam in the shiplap allows for a  shadowing effect and therefore, an awesome-yet-subtle texture to accent the wall and serve as a soon-to-be-neat headboard treatment.

Shiplap overlap.

I learned a lot while installing the shiplap, so keep reading to learn how it’s done. I also had a lot of trials during my first attempt at staining shiplap (read about that here). Best advice I can give you? Stain it BEFORE you install (the nail holes will be hardly visible).

And jump ahead to see the finished bedroom here.

If this post is helpful, please grab the below image for Pinterest!

How to install shiplap boards.

Have you worked with this lumber for interior application before? If yes, I’d love to see some examples of your work!

Share

Bedrooms  / DIY

Emily
I'm a home improvement enthusiast, living a very merry DIY lifestyle. I've been a freelancer writer for 10+ years and you can find my work on popular home and garden sites, like HGTV.com. Follow me on facebook and instagram, or drop me a note.

20 Comments


Cait @ Hernando House
August 31, 2011 at 9:38 am
Reply

I can’t wait to see it all come together! And that bathroom is amazing!


    Emily
    August 31, 2011 at 10:13 am

    Wait until you see the rest of the house, Cait. I’m headed over this afternoon to take a few final photos and will post the whole transformation tomorrow!

    Cait @ Hernando House
    August 31, 2011 at 11:51 am

    Can’t wait! I already pinned that bathroom to look back on if we are ever able to add a half bath near our living room & back porch.

Sharon Harper
August 31, 2011 at 9:40 am
Reply

Just when we think you’ve done it all, you come up with yet another great–and thrifty–idea to update the home! At this rate you’re gonna need another one to play with soon with all the amazing transformations. Keep it up and thanks for sharing :)


    Emily
    August 31, 2011 at 10:15 am

    Thanks Sharon :) I just pulled the nail gun upstairs to start putting the boards into place, so we’ll see how it looks after a little TLC. It could definitely end up going awry.

Holyoke Home
August 31, 2011 at 12:32 pm
Reply

Mr. Man just BROKE one of his (our) toys. our Malita Rechargable drill. He’s in trouble.


    Emily
    August 31, 2011 at 1:31 pm

    Rut roh. But shopping for a new one might be fun, right? We like Makita just fine, and aren’t brand loyalists when it comes to tools so much, but with that said we like our impact driver by Craftsman as an amped-up cordless alternative to a more basic cordless :) Impact = awesome.

amy
March 2, 2015 at 10:42 pm
Reply

HI… I love this bathroom. what’s the paint color on the walls please?


    Emily
    March 2, 2015 at 10:44 pm

    Unknown… sorry!

Sharon Duvall
March 3, 2015 at 5:46 pm
Reply

I am wanting to install the ship lap in an entry hall that has a cedar beamed ceiling. Im not handy with wood at all but was gonna see if I could get somebody else to install it. Did you do it all with a staple gun? I have to convince my husband that it will look great when its finished! lol Also, was your wood just pine planks? I looked at our big box store and the guy I talked to showed me some that had 6 pieces in a pkg? It looked like what you had though.
Thanks for any help!
Sharon


    Emily
    March 9, 2015 at 2:30 pm

    Nail gun is preferable – you’ll want nails that are at least 1.5-2″ to penetrate both the wood and the drywall. Longer is better. My boards were just plain pine shiplap boards (each 8′ length) and I do recommend staining/painting before installing because it makes it easier all around.

Amy
March 6, 2015 at 5:19 pm
Reply

What lumber store did you purchase these shiplap boards from?


    Emily
    March 9, 2015 at 2:28 pm

    Lowe’s :)

Carole
May 8, 2015 at 2:26 am
Reply

Hi
What color is the blue in your bathroom? it’s lovely


    Emily
    May 8, 2015 at 8:44 am

    That’s not my bathroom, just an inspiration photo from a friend’s home. It’s a light gray – sorry that I don’t know the name!

denise Moore
July 27, 2015 at 8:54 pm
Reply

Emily love this post. I just shared a link on my blog to your project. (Hope that’s ok).
Denise


Perla
September 26, 2015 at 12:28 am
Reply

Hi! That’s exactly the type of shiplap I am looking for. I’ve been looking all day for it! Went to Lowe’s too and they only have the v-joint type…which is the beveled edge…not the straight up and down edge like in your picture. Do you have any recommendations?
Thanks!
Perla


Chad
October 1, 2015 at 1:45 am
Reply

i can’t find that style shiplap either. Do u have the scew # from the ends in the picture? Lowes in my area only has v groove shiplap. Lumber store wants a fortune to make boards with that flat groove. Help…


Debbie
November 3, 2016 at 2:47 pm
Reply

Do you have to somehow seal shiplap if it is in a bathroom wont moisture be a problem????????


    Emily
    November 3, 2016 at 2:55 pm

    I don’t think you’d have to seal it; it would just be like ordinary wooden paneling. A matte coat wouldn’t hurt I imagine…

Leave a Reply Cancel reply

Your email address will not be published. Required fields are marked *

This site uses Akismet to reduce spam. Learn how your comment data is processed.

  • HI, I’m Emily

    Emily Fazio

    I'm a home improvement enthusiast, living a very merry DIY lifestyle. Follow me on facebook and instagram, or drop me a note if you'd like. I love notes.

    Thanks for visiting!

  • Instagram

    merrypad

    Merrypad by Emily Fazio
    Instagram post 17902304861708711 Instagram post 17902304861708711
    Highly recco mining those #herkimerdiamonds ✌️ Highly recco mining those #herkimerdiamonds ✌️
    Pt. 2: Well before Halloween, the last of the garl Pt. 2: Well before Halloween, the last of the garlic went into the home garden: 10 rows [L>R] 6 whole Nootka Rose as an experiment, 3x8 Mennonite-grown cloves from Aman’s, and 6x8 (and, I think, total 112? notes are cryptic) “normal.”
#gardennotes #growinggarlic #garden2023 #whatisnormal #merrypadathome
    Out of sight but [documented so it’s] not out of Out of sight but [documented so it’s] not out of mind! #garden2024 kicks off with my favorite biennial: elephant garlic! 15 cloves planted from small, to medium, to enormous. #gardennotes
    Annual garlic notes for #garden2023, pt. 1: this i Annual garlic notes for #garden2023, pt. 1: this is getting ooc, and I love it. 👩‍🌾🧑‍🌾

🧄 65% of the planting is in a new plot in the country. 🧄 Seeing if NR grows bigger with more sunlight. 🧄 Big @chasefarms cloves from 2021 were really productive in our home garden; can’t wait to see how they can show up next year in the new space. 🧄

Hand-turned a small bed, but big thanks to my sister, who rolled into town just in time to help me double its size (and did not complain once).
    One straggler from #garlic2021 debuted with 7 stal One straggler from #garlic2021 debuted with 7 stalks and 7 scapes, and I can’t wait to see this mammoth looks like when it’s pulled next month. #garlic2022 

Also, fierce springtime performance by parsley, chamomile, and self-seeded cilantro.
    Annual garlic notes #garden2022 ~315 cloves total Annual garlic notes #garden2022
~315 cloves total
50 in new, unfenced garden
Still need thick mulch on everything
Did a terrible job tracking varieties when I harvested, so it’s all a mix of hardneck now 😒
Added some big cloves from @chasefarms and look forward to adding some @fruition_seeds in #garden2023 when @porterfarmscsa delivers.
    Load More... follow emily: @merrypad


  • Like Us On Facebook

    Facebook Pagelike Widget


  • Popular Posts

    • How to fix an IKEA drawer. The Easy Fix For Broken IKEA Drawers 66.7k views
    • DIY sideboard rehab. 7 Steps for Restoring an Old Midcentury Sideboard Buffet 56.6k views
    • How to design and make a barn quilt. How to Make Your Own Barn Quilt 49.9k views
    • How to hang art on brick surfaces using specialty clips. The Easy Way to Hang Art on Brick or Stone 39.9k views
    • DIY driveway removal. The Driveway Rocks 35k views
    • Our DIY flagstone patio. Building a Flagstone Patio in One Day 32.7k views
    • Tips for dying pasta different colors, and a Halloween Recipe for the kids. How to Dye Pasta Different Colors (Halloween Recipe) 32.5k views
    • Goodbye, gold fireplace covering. Less Is More: How to Remove a Fireplace Surround 29.5k views
    • Fix an ikea dresser drawer. Life Support For An IKEA Dresser 29.4k views
    • After: Custom wooden garden fence. Designing a Durable Wooden Fence For Our Beautiful Backyard Garden 22.9k views


  • BROWSE POSTS BY CATEGORY:

    • Art Attack (7)
    • Backyard (92)
    • Barn (8)
    • Basement (27)
    • Bathroom (43)
    • Beach (13)
    • Bedrooms (73)
    • Being Thrifty (53)
    • Business-y (12)
    • Buying and Renting and Selling (23)
    • Casual Celebrations (36)
    • Closets (17)
    • Curb Appeal (44)
    • Dainty Details (8)
    • Deck (23)
    • Decor (286)
    • Dining Room (37)
    • DIY (577)
    • Dog-Related (24)
    • Entryway (59)
    • Flooring (58)
    • For the Kids (32)
    • Garage (17)
    • Gardening (70)
    • Helping The Economy (30)
    • HGTV + DIY Network Projects (283)
    • Holiday-Related Projects (80)
    • Home Safety (12)
    • Kitchen (83)
    • Lighting (31)
    • Living Room (77)
    • Merry Travels (21)
    • Office Space (21)
    • Organized (41)
    • Other Pads (14)
    • Outdoor Living (12)
    • Scooter Fun (8)
    • Stairwell (20)
    • Sunroom (22)
    • Supporting Sponsors (43)
    • The Art Room (3)
    • Tools (43)
    • Uncategorizable (1)
    • Wedding (28)
    • Windows (14)
    • Work-pads (10)


  • a little bit of everything, friends, DIY, and inspiration

    • Dadand.com < My husband and his BFF
    • DIY Network
    • HGTV
  • Some Legal

    Merrypad incorporates the occasional affiliate link to Amazon.com and Minted; we link to many other websites and products, but if it is in context of a paid sponsorship, it is always noted as such. Please review the privacy policy and contact me if you have any additional questions.

    Theme customized by Pete Fazio Creative, the guy from dadand.com.


© Copyright Merrypad