We produced, addressed, and mailed our wedding invites this week, which means that I completed what was a hugely time-consuming and looming task on my list of things to do. After saving a lot of money printing our Save The Date cards at Fedex Office for $14, we were a little less frugal with our formal invites, and outsourced it to a small business specializing in letterpress printing in Rochester, the one and only Fly Rabbit Press. We had never met Chris Charles, the owner/designer, but she had a booth set up at an art festival that we went to in the spring (May Day at Village Gate, locals). On a whim I had grabbed her card and kept her in mind for future projects. She had great work displayed, and once we contacted her about printing our invites and whether she took on custom jobs like ours (Pete’s design), we found that she was very willing to work with us and our pre-purchased 100-pound paper stock.
When it comes right down to it, I think there’s a misconception that having custom designed and printed invites will break the bank or be complicated to orchestrate. To proactively convince you otherwise, I’ll transparently share some of our budget details upfront and will get into the how-to later on in this post: We spent $225 for custom letterpress printing, used 1/4 of our amazon.com paper supply ($31), and spent $36 in postage to have the cards mailed. That’s a total wedding invite budget of about $292.00 or about $3.65/household. Not so bad, all things considered.
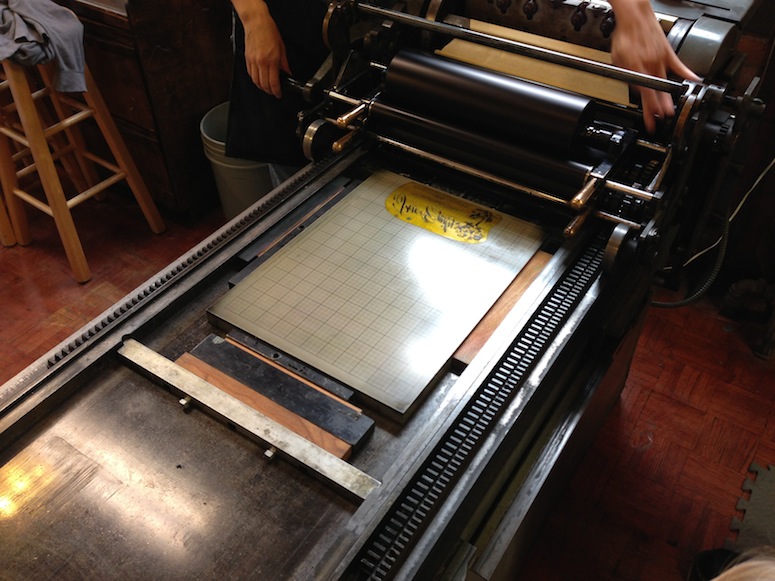
Working with a smaller business made the process easier and more intimate for us; that isn’t to say that you can’t have a personal experience with a rep at a bigger shop, but last Saturday Chris invited us to the shared studio she rents and offered to run the first few invites with us to confirm the look, adjust the depth of the letterpress impression, and she even let us (Julia included) test out the press ourselves. It was fascinating, fun, and enough of a tease to make me want to sign up for beginner’s classes.

As you can see in this next photo and as I reported on in this post on DIY Network, we retained a lot of the same fonts and elements as we used on the original save-the-date cards, but also introduced a new font more reminiscent of custom calligraphy (it’s called Mardian, if you want to buy it yourself). Pete changed up the orientation of the invite to a landscape design, and included more specific details pertaining to our wedding day including location, time, and RSVP instructions.
The finished invites arrived to us a day later in a vintage cigar box with a pretty bow. It was so divine that we left it fully wrapped and just started at it from above like this for about 48 hours.

Having the invites produced by a professional was a whole different way of approaching the task of invite production; if you’ve never needed to work with printers or lettershops or anything other than your desktop laserjet, there’s really no reason to not consider a professional printer in your DIY invite project. They’re not scary, they’re pros and they’re there to offer the best solution for your job. Moreover, there’s a big difference in production value between your HP LaserJet P1102w and the output of a high-capacity Xerox iGen Digital Printer, especially if you’re incorporating colors into your design and hoping for flawless results (FYI, ours was 100% black on 100# kraft paper so our decision wasn’t color-oriented, and no, I’m not and never was a Xerox rep).
If you’re going to explore the route of hiring a designer or printer, I thought it might be helpful to outline a few tips to make the process easier for both you, and your vendor.
In no particular order:
Be honest about your budget.
It’s the same idea as working with your realtor or contractor – in order for the vendor to give you a recommendation on paper stock and a timeline, it’s in your favor to let them know your budget upfront, and what you expect to get from it. (i.e. You know when Jonathan and Drew of Property Brothers get pisssssed when their clients decide last minute that they need granite countertops but don’t want to concede in other parts of the renovation to save money? Channel that emotion, and know what you want to spend upfront so that the designer and printer don’t offer something above and beyond what you can afford without going homeless.)
Get a contract.
It’s just good business sense. If your vendor doesn’t do formal estimates, ask for an email confirming the costs. You’ll sleep better at night and they probably will too. Fact: Chris and I just exchanged emails after meeting once in person to introduce ourselves and review the paper that I had.
Share visuals.
Pete has designed all of our invites so far (save the date cards, wedding invites, and shower invites – more to come on those) but even so, he found it helpful for me to collect samples of designs that I liked to narrow down aspects of the design from stock options, creative elements, typefaces, and actual invite content. Copy for the invites was among the most challenging components of our materials, just because there are so many different ways the message can be presented, and the way its presented sets the tone for the event. Yeah, it took us a week or so of noodling to get it feeling right. In ours, for example, we tried to keep copy light and simple, forgoing the more formal “The parents of so and so invite you to bear witness of…” text, and specified that children were welcome too, because it’ll be a big day for Julia as well, and we wanted that to be clear through and through.
The same goes if you’re hiring out to have an artist design your invite. You’re hiring that person because you’re anticipating their unique creativity on the assignment, but you still do want to make sure you get what you want. Sure, asking an artist to copy an invite would be one thing (don’t do that) but there’s nothing wrong with gathering eye candy to make sure you’re directing your artist well – chances are that they’ll feel more prepared too.
And dear god, make sure that your artist knows how big your envelopes are if you’ve pre-purchased them.
The cost has a lot to do with the paper.
Often times, the stock ends up being half of the cost of the production job – of course that depends a lot on quantity and the fanciness of the paper, but even our 100# cardstock might have cost nearly $500 if ordered by the printer. I’ve said it before and I’ll say it again, if you find some paper you like yourself, run it by your printer to make sure they’re equipped to work with it, and then buy it yourself to save a few dollars (we saved upwards of $375).
If you can’t find any paper that you like yourself, work with the artist or your printer to find the perfect stock. Fact is, most designers will also make stock recommendations to complement their design. Make sure that you communicate upfront (at the same time that you’re talking budget) what kind of paper you’re imagining. If you’re paying them to find you the magic paper, you’ll want to help them get it right on the first try. In any case, ask for samples so that you can feel the weight of the paper in-hand. You likely have a sense of how heavy you want your invite to be, and you’ll know pretty decisively if a sample is too heavy or too light or the wrong color or texture.
Get a proofreader.
It doesn’t have to be a professional (that would only add on dollars), just someone you consider to be smart. Someone who writes their facebook posts in complete sentences is probably fine, and at least should help to narrow down your resources a lot. Or ask your parents and future in-laws. They’re bound to want to make sure everyone’s names are spelled right. If you designed and wrote your own invite, chances are that you’re too close to it and will be more apt to miss typos and grammatical errors. Take it from me.
Price Shop.
You wouldn’t get one quote if you were having your siding redone or your deck built; the same goes for this. Ask around and find someone that 1. you’re comfortable with, and 2. you can afford. And then sometimes you work with the only person who writes you back. Fact: I reached out to 3 companies for letterpress; one big company never wrote me back, one small company never wrote me back, and Chris wrote me back quickly and was of great help right off the bat. I already knew I liked her work, and I considered it a win.
Press Check.
It was special to be able to work the letterpress for our wedding invites and actually see them come to life, because in the case of smaller jobs it isn’t always an option. Ask anyways, whether you’re working with a big or small company, and given the opportunity make your schedule flexible so you can be available to see the operation in progress. It’s worth it, and you’re the bride/groom and this is the fun part of wedding planning.


Leave A Reply