• Home
  • about emily
  • before + after
  • HGTV + DIY Network
  • good press
  • contact
  • Let’s Organize These Posts:

    • Art Attack
    • Backyard
    • Barn
    • Basement
    • Bathroom
    • Beach
    • Bedrooms
    • Being Thrifty
    • Business-y
    • Buying and Renting and Selling
    • Casual Celebrations
    • Closets
    • Curb Appeal
    • Dainty Details
    • Deck
    • Decor
    • Dining Room
    • DIY
    • Dog-Related
    • Entryway
    • Flooring
    • For the Kids
    • Garage
    • Gardening
    • Helping The Economy
    • HGTV + DIY Network Projects
    • Holiday-Related Projects
    • Home Safety
    • Kitchen
    • Lighting
    • Living Room
    • Merry Travels
    • Office Space
    • Organized
    • Other Pads
    • Outdoor Living
    • Scooter Fun
    • Stairwell
    • Sunroom
    • Supporting Sponsors
    • The Art Room
    • Tools
    • Uncategorizable
    • Wedding
    • Windows
    • Work-pads
  • Search

  • Hi, I’m Emily

    Emily Fazio

    I'm a home improvement enthusiast, living a very merry DIY lifestyle.

    You can find me writing for HGTV and DIY Network, follow me on facebook and instagram, or drop me a note if you'd like. I love notes.

    Thanks for visiting!

  • BROWSE POSTS BY CATEGORY:

    • Art Attack (7)
    • Backyard (92)
    • Barn (8)
    • Basement (27)
    • Bathroom (43)
    • Beach (13)
    • Bedrooms (73)
    • Being Thrifty (53)
    • Business-y (12)
    • Buying and Renting and Selling (23)
    • Casual Celebrations (36)
    • Closets (17)
    • Curb Appeal (44)
    • Dainty Details (8)
    • Deck (23)
    • Decor (286)
    • Dining Room (37)
    • DIY (577)
    • Dog-Related (24)
    • Entryway (59)
    • Flooring (58)
    • For the Kids (32)
    • Garage (17)
    • Gardening (70)
    • Helping The Economy (30)
    • HGTV + DIY Network Projects (283)
    • Holiday-Related Projects (80)
    • Home Safety (12)
    • Kitchen (83)
    • Lighting (31)
    • Living Room (77)
    • Merry Travels (21)
    • Office Space (21)
    • Organized (41)
    • Other Pads (14)
    • Outdoor Living (12)
    • Scooter Fun (8)
    • Stairwell (20)
    • Sunroom (22)
    • Supporting Sponsors (43)
    • The Art Room (3)
    • Tools (43)
    • Uncategorizable (1)
    • Wedding (28)
    • Windows (14)
    • Work-pads (10)
  • Search

  • Pages

    • blog
    • Merrypad Features
    • Privacy Policy
    • about emily
    • before + after
      • before + after, our current home
      • before + after, our first house
    • contact me
    • choose a badge and share the merrypad.com love
  • Home
  • about emily
  • before + after
  • HGTV + DIY Network
  • good press
  • contact

Make Your Own Pinecone Wreath

April 27, 2016

This post was originally published on DIY Network’s blog Made + Remade in November 2012.

Wreath-craft can take any number of forms, I think that’s what’s so great about it. No one’s entryway has to look quite the same when you take time to create your own design.

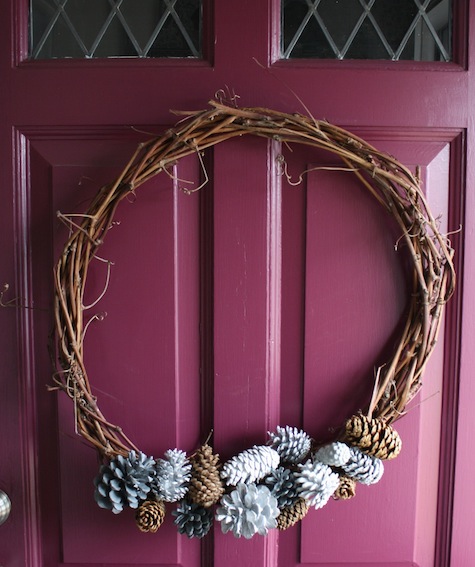
One of my favorite wreaths from holiday past is this one, a grape vine wreath ornamented with painted pine cones. I made it myself with minimal expense, and you can too.

Decorate a wintery wreath with painted pinecones.

I made this project easy on myself by using many materials that I already had on hand. Ironically, the only thing I had to buy new were the pine cones, but I’d hedge a quick bet that many of you could find them for free in your own backyard:

  • A grapevine wreath (mine was handmade and handed down by my parents, whose property is graced with massive grape vines)
  • Leftover paint, or inexpensive paint samples
  • Pine cones (I bought a pack at the craft store for $5)
  • Fine gauge wire

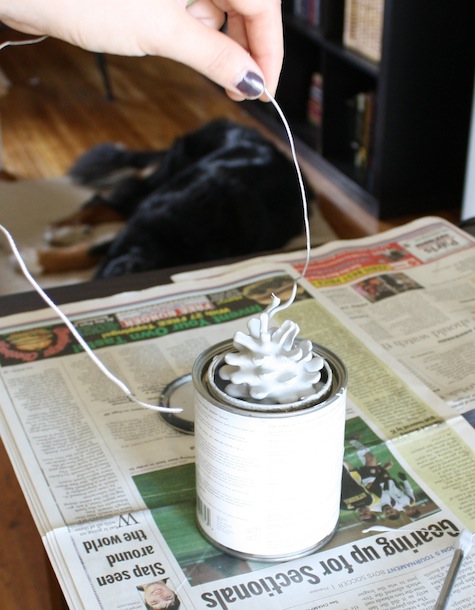
The act of dipping pine cones into a vat of paint took a little getting used to, but was much more thorough and quick than attempting to paint by hand. Think of your pine cones as easter eggs, and come up with a solution for controllably dropping them into the paint and also pulling them out. For me, a thin piece of wire seemed to work best, just make sure that it’s tied or bound tightly, because the pine cone ends up being pretty weighted down when it’s fully coated in paint.

How to paint pinecones completely.

I found that oil-based paints were easier to use because the paint had a tendency to coat well and still drip off quickly. I chose dark gray and silver oil-based paints from my own arsenal for most of my cones, but tested white latex paint on a few as well. The latex cones were noticeably thicker and heavier, and took longer to completely dry. You’re going to want to make sure you’re in a well-ventilated area if you’re using any kind of VOC paint, but make note that if you’re using oil-based paints, they’re especially vile on the senses.

Using the wire as a dipping mechanism also served well in that it gave me a way to hang dry the pine cones that were still attached to it.

How to paint pinecones completely.

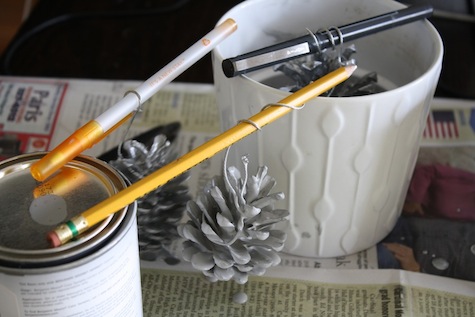
I let these pine cones ventilate and dry for several days, but when they were done, they looked fantastic.

Using the same exact wire, I was able to wrap the pine cones one-by-one to the grape vine wreath. I bundled them tightly into one area for a weighted look, but go ahead, tie them where ever you want (even consider adding some regular, unpainted pine cones like I did, or evergreen branches, trimmings of holly, or spray-on snow for a lush effect).

The finished piece hung so nicely on my door for all of the winter months.

Decorate a wintery wreath with painted pinecones.

Share

Decor  / DIY  / HGTV + DIY Network Projects

Emily
I'm a home improvement enthusiast, living a very merry DIY lifestyle. You can find me writing for HGTV and DIY Network, follow me on facebook and instagram, or drop me a note if you'd like. I love notes.

Leave A Reply


Leave a Reply Cancel reply

Your email address will not be published. Required fields are marked *

This site uses Akismet to reduce spam. Learn how your comment data is processed.

  • HI, I’m Emily

    Emily Fazio

    I'm a home improvement enthusiast, living a very merry DIY lifestyle. Follow me on facebook and instagram, or drop me a note if you'd like. I love notes.

    Thanks for visiting!

  • Instagram

    Can’t believe I ever bought dumpling wrappers. 🥟 Pulse a few cups of flour in the food processor drizzling in cold water until it forms dough. Roll smooth. Use a conveniently large cookie cutter, or just trim out squares. The end ❤️ #hny #dumplings
    Didn’t think I’d be making more masks, but her Didn’t think I’d be making more masks, but here we are (now feat. recycled t-shirt layer for added softness and bonus-layer protection). #diy #amateurseamstress #diymask
    Get out there ☀️ Get out there ☀️
    The gang finally showed up. 👻 The gang finally showed up. 👻
    A record 233 cloves + 10 shallots 🧛🏻‍♀️ 
#merrypadathome #garden2021 #garlic #gardennotes #whatisnormal
    ⭐️⭐️⭐️⭐️⭐️ ⭐️⭐️⭐️⭐️⭐️
    Immeasurably tall, lanky tomatillos. #garden2020 # Immeasurably tall, lanky tomatillos. #garden2020 #tomatillos #nofilter
    32 oz., reserved for the brave 🌶🌶 😍#homeg 32 oz., reserved for the brave 🌶🌶 😍#homegrown #tomatillos #harvest2020
    Nothing says “let’s stay home all fall, too” Nothing says “let’s stay home all fall, too” like a badass custom fireplace on our patio. 🔥 #chiminea #merrypadathome
    Load More... follow emily: @merrypad


  • Like Us On Facebook

    Facebook Pagelike Widget


  • Popular Posts

    • How to fix an IKEA drawer. Cheap IKEA Drawers (And The Quick Fix) 40.3k views
    • DIY sideboard rehab. Our Refinished Midcentury Buffet 39.9k views
    • How to design and make a barn quilt. How to Make Your Own Barn Quilt 33.4k views
    • DIY driveway removal. The Driveway Rocks 24.9k views
    • How to hang art on brick surfaces using specialty clips. The Easy Way to Hang Art on Brick or Stone 24.5k views
    • Goodbye, gold fireplace covering. Less Is More: How to Remove a Fireplace Surround 22.3k views
    • Our DIY flagstone patio. Building a Patio in One Day 17.6k views
    • Bedroom paint, freshened up with Snowbound paint. Painting Everything White: We Chose Snowbound, By Sherwin Williams 16.6k views
    • Tips for dying pasta different colors, and a Halloween Recipe for the kids. Tips for Dying Pasta Different Colors (+ A Special Halloween Recipe) 15.4k views
    • Fix an ikea dresser drawer. Life Support For An IKEA Dresser 14.3k views


  • BROWSE POSTS BY CATEGORY:

    • Art Attack (7)
    • Backyard (92)
    • Barn (8)
    • Basement (27)
    • Bathroom (43)
    • Beach (13)
    • Bedrooms (73)
    • Being Thrifty (53)
    • Business-y (12)
    • Buying and Renting and Selling (23)
    • Casual Celebrations (36)
    • Closets (17)
    • Curb Appeal (44)
    • Dainty Details (8)
    • Deck (23)
    • Decor (286)
    • Dining Room (37)
    • DIY (577)
    • Dog-Related (24)
    • Entryway (59)
    • Flooring (58)
    • For the Kids (32)
    • Garage (17)
    • Gardening (70)
    • Helping The Economy (30)
    • HGTV + DIY Network Projects (283)
    • Holiday-Related Projects (80)
    • Home Safety (12)
    • Kitchen (83)
    • Lighting (31)
    • Living Room (77)
    • Merry Travels (21)
    • Office Space (21)
    • Organized (41)
    • Other Pads (14)
    • Outdoor Living (12)
    • Scooter Fun (8)
    • Stairwell (20)
    • Sunroom (22)
    • Supporting Sponsors (43)
    • The Art Room (3)
    • Tools (43)
    • Uncategorizable (1)
    • Wedding (28)
    • Windows (14)
    • Work-pads (10)


  • a little bit of everything, friends, DIY, and inspiration

    • Dadand.com < My husband and his BFF
    • DIY Network
    • HGTV
  • Get Posts Via Email

  • Some Legal

    Merrypad incorporates the occasional affiliate link to Amazon.com and Minted; we link to many other websites and products, but if it is in context of a paid sponsorship, it is always noted as such. Please review the privacy policy and contact me if you have any additional questions.

    Theme customized by Pete Fazio Creative, the guy from dadand.com.


© Copyright Merrypad