• Home
  • about emily
  • before + after
  • HGTV + DIY Network
  • good press
  • contact
  • Let’s Organize These Posts:

    • Art Attack
    • Backyard
    • Barn
    • Basement
    • Bathroom
    • Beach
    • Bedrooms
    • Being Thrifty
    • Business-y
    • Buying and Renting and Selling
    • Casual Celebrations
    • Closets
    • Curb Appeal
    • Dainty Details
    • Deck
    • Decor
    • Dining Room
    • DIY
    • Dog-Related
    • Entryway
    • Flooring
    • For the Kids
    • Garage
    • Gardening
    • Helping The Economy
    • HGTV + DIY Network Projects
    • Holiday-Related Projects
    • Home Safety
    • Kitchen
    • Lighting
    • Living Room
    • Merry Travels
    • Office Space
    • Organized
    • Other Pads
    • Outdoor Living
    • Scooter Fun
    • Stairwell
    • Sunroom
    • Supporting Sponsors
    • The Art Room
    • Tools
    • Uncategorizable
    • Wedding
    • Windows
    • Work-pads
  • Search

  • Hi, I’m Emily

    Emily Fazio

    I'm a home improvement enthusiast, living a very merry DIY lifestyle.

    You can find me writing for Home Living Handbook, HGTV.com, and a handful of other websites. Follow me on facebook and instagram, or drop me a note if you'd like. I love notes.

    Thanks for visiting!

  • BROWSE POSTS BY CATEGORY:

    • Art Attack (7)
    • Backyard (92)
    • Barn (8)
    • Basement (27)
    • Bathroom (43)
    • Beach (13)
    • Bedrooms (73)
    • Being Thrifty (53)
    • Business-y (12)
    • Buying and Renting and Selling (23)
    • Casual Celebrations (36)
    • Closets (17)
    • Curb Appeal (44)
    • Dainty Details (8)
    • Deck (23)
    • Decor (286)
    • Dining Room (37)
    • DIY (578)
    • Dog-Related (24)
    • Entryway (59)
    • Flooring (58)
    • For the Kids (32)
    • Garage (17)
    • Gardening (70)
    • Helping The Economy (30)
    • HGTV + DIY Network Projects (283)
    • Holiday-Related Projects (80)
    • Home Safety (12)
    • Kitchen (87)
    • Lighting (31)
    • Living Room (77)
    • Merry Travels (21)
    • Office Space (21)
    • Organized (41)
    • Other Pads (14)
    • Outdoor Living (12)
    • Scooter Fun (8)
    • Stairwell (20)
    • Sunroom (22)
    • Supporting Sponsors (43)
    • The Art Room (3)
    • Tools (43)
    • Uncategorizable (1)
    • Wedding (28)
    • Windows (14)
    • Work-pads (10)
  • Search

  • Pages

    • blog
    • Good Press: Special Features, Freelance Projects, and Long-Term Clients
    • Privacy Policy
    • about emily
    • before + after
      • before + after – transforming my first home
      • before + after, our current home
    • contact me
    • choose a badge and share the merrypad.com love
merrypad website logo with acorn and text
  • Home
  • about emily
  • before + after
  • HGTV + DIY Network
  • good press
  • contact

DIY Doorbell Faceplates: A Loser And A Winner

July 13, 2011

Doorbell drama. Really not a bad kind of drama to have, unless, you know, someone touches the wires that you left dangling beside the doorknob for 2 months and sues you. This kind of turned into a long-winded post about a tiny, tiny part of my house, so here’s the executive summary:

I DIY’ed two doorbell encasements. One was a failure, the other was the shizz. Continue on if you’re interested in lots of pictures, driftwood, and Frank Lloyd Wright.

Anyways, fortunately for my insurance policy, no one was zapped by the dangling doorbell, but it has taunted me daily since the entryway storm door was replaced. How did I leave this doorbell in such lousy condition for months?

Not sure. Well, that’s a lie. I was just suffering from a case of the indecisives + anti-conformities, both of which I’m sure are not medically traceable conditions, but effect me often.

Old discolored doorbell, unattached.

I had disconnected the doorbell encasement when I had needed to paint the trim of the front door before re-installing the all-glass storm door. The existing discolored rectangular doorbell was just due for an update, and I had full intent to update within a day or two. Read: Not within a month or two. I did shop around, the trouble was, I didn’t like most of them. Or, any of them. They were a little blah, lookin’ cheap, way too expensive, or in the shape of a lizard. Overall, most were just too “expected” or just not me.

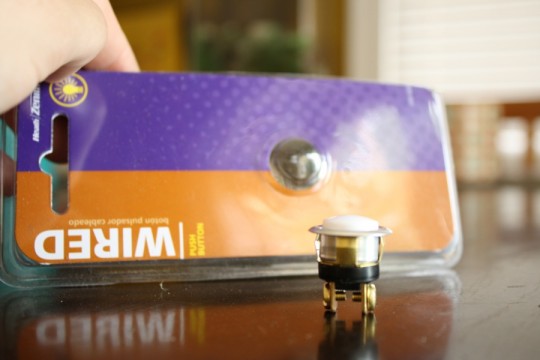
Instead of cave and buy something that didn’t ring my bell (little pun there, did you catch it? Wink.), I paid $3.50 for a simple round button that would have to be inset into the door trim or a separately sold doorbell encasement (like, the lizard, or its friends the seahorse or cow).

The new store-bought doorbell unit.

I never did find a separately sold encasement that I was excited about, despite online, in-store, and Pinterest searches for everything related to “bell,” “doorbell,” “entryway,” and “front door”. So after those few months of searching, I got crafty. My first doorbell encasement effort involved upcycling regular old paint stirrers from Home Depot, cutting them into 45-degree and 90-degree angles, and piecing the puzzle together into a pattern resembling a herringbone or, actually and accidentally, a Frank Lloyd Wright-esque pattern. You know how much I like both the herringbone and the FLW.

Doorbell encasement loosely assembled (out of paint stirrer pieces)

By wood-gluing a few leftover pieces of paint stirrer to the back of the concept, I was able to both thicken the future doorbell plate and keep all the pieces reinforced in place. Voila! It was sanded down, smooth, lightweight, and really pretty cool.

Back panels used to attach the pieces together securely with wood glue.

I even got as far as to cut the necessary 5/8″ hole into it for the doorbell to sit within. I was about to paint/stain/poly it in preparation for install, and then realized I had a problem – the two layers of paint stirrer weren’t thick enough to let the doorbell sit flush against the wall. Whomp, whomp. See, this is where I started to see the project as a failure, as happy as I was with the concept overall.

The FLW doorbell cover. See how shallow the hole is?

I did consider two options:

  • Drill into the trim with a 5/8″ bit so that the wired end of the doorbell backs inside the trim just a little. (But would I accidentally drill through the existing wiring? That’s what I was afraid of.)
  • Make the FLW/herringbone faceplate thicker. (That decidely would take away from the flat, flush look I had been considering with a plate of that size).

Shame on me for not being totally aware of the thickness of the button before I got started on this first effort. In any case, it was totally freebie thanks to the free paint stirrers and my imagination.

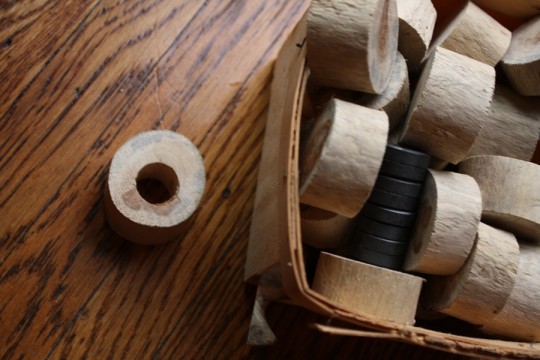
Effort #2, and the winning solution came to mind when I was thinking up other wood encasements that might be DIYable. I considered drilling a hole into a piece of premium pine scrap that I had on hand, but then I realized I had lots of extra pieces of driftwood bits from the driftwood magnet project I had so ambitiously worked on, and those might work for a more rugged and authentic concept. I drilled a piece quickly with the 5/8″ bit to see how it’d look:

Extra pieces of driftwood, and the drilled doorbell encasement.

The pieces of wood were thick enough to conceal the doorbell without having to make extra holes into the trim, and I really liked the idea of a round encasement to complement the round bell button. The natural driftwood material was an added bonus, and as much as I say I don’t have a beach themed house, this might push me a little closer. Push. As in push a doorbell. Another pun. Sorry, I don’t know what’s gotten into me.

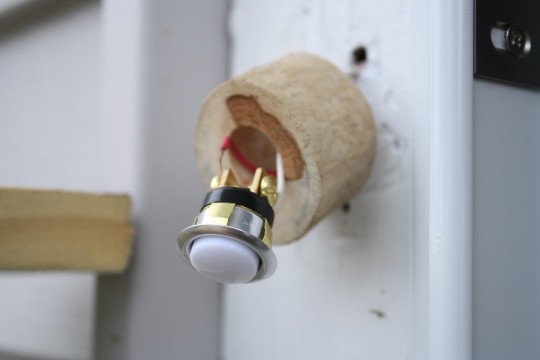
Wired doorbell in place. And it worked on the first try.

And to affix the whole encasement to the wall, I threaded the leftover wires into the trim and used a few dabs of wood glue; it wasn’t a heavy unit, and I didn’t want to disrupt the cleanliness of it with wood screws, although in terms of cleanliness, I do have some touchup work to do regarding the old doorbell holes you see in the picture. The glue seems to be doing just fine. I should also note that the entryway is very sheltered from the various eaves and doesn’t take a beating from the weather.

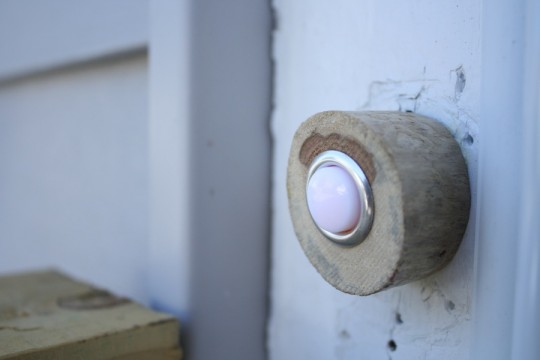
Completed and attached doorbell.

Crafty doorbell #2 was an overall success, and something I’m really happy with. Now that it’s done and I’m happy, I’ll be doing a matching one on the side entryway, which is also due for a doorbell update. Best of all, the only expense was $3.50 for the bell itself; how’s that for savings?

Share

DIY  / Entryway

Emily
I'm a home improvement enthusiast living a very merry, DIY-filled lifestyle. As a freelance writer, you can find my work on many popular home and garden sites, including HGTV.com, HomeLivingHandbook.com, and other outlets. Follow me on social, or drop me a note.

4 Comments


Cait @ Hernando House
July 13, 2011 at 10:13 am
Reply

What a great solution! I love it!

I have been wanting to change out our doorbell since pretty much Day 1. And getting a new new mailbox sort of intensified that. Unfortunately I’m in the same boat as far as suffering from a case of the indecisives & anti-conformities. (And what the heck is up with all of the lizard doorbells?!) Maybe the doorbell will be one of the next things on my list, since we are doing a bit of a front porch mini makeover.


    Emily
    July 13, 2011 at 10:22 am

    Woohoo! Doorbells can apparently be a surprisingly exciting update. I think you’ll also see in most establishments that next to all of the lizard doorbell encasements are a whole bunch of hummingbird and dog paw door knockers, all of which are highly adorable and despite being a little corny, I still want. How many door knockers is too many? That’s a thought for another post.

    Cait @ Hernando House
    July 13, 2011 at 7:14 pm

    Hahaha that is a good question!

Kate
July 13, 2011 at 11:48 am
Reply

Bummer that your first try didn’t work out, but it looks great to me. We don’t have a door bell at all (people have to knock!) but I’ve seen those wireless doorbells that seem neat. I just can’t decide if they’re worth it or not.


Leave a Reply Cancel reply

Your email address will not be published. Required fields are marked *

This site uses Akismet to reduce spam. Learn how your comment data is processed.

  • HI, I’m Emily

    Emily Fazio

    I'm a home improvement enthusiast, living a very merry DIY lifestyle. Follow me on facebook and instagram, or drop me a note if you'd like. I love notes.

    You can find me writing for Home Living Handbook, HGTV.com, and a handful of other websites.

    Thanks for visiting!

  • Instagram

    merrypad

    I’ll always say yes to a maker space experience, I’ll always say yes to a maker space experience, and The Shed at @timberland’s HQ did not disappoint ✌️🥾 @homelivinghandbook 

Final footwear design not shown 🙂

PS tagging some cute shoes they gifted from the Fall 2024 collection!
    I made the call and snapped off the elephant garli I made the call and snapped off the elephant garlic scapes yesterday evening. Who’s going to help us harvest and eat the next 1,000? 🧄🧄🧄🧄
    Hi! Boy, do I have things to share. 🎉 🫶 Fr Hi! Boy, do I have things to share. 🎉 

🫶 Friendly reminder to focus on balance and wellness: Pete and I lived abroad with our family for the entire month of August 2023. If you ever have the opportunity to work remotely, I promise it to be a worthwhile adventure that’ll change your POV in so many ways. And, If you need an in with an incredible AirBnB in Denmark, DM me. From new playgrounds and museums to the culture and design, making this trip a reality continues to be something we celebrate every day, and I wish everyone can experience it on some level.

💻 Friendly reminder to say yes to new (overwhelming) opportunities: The professional celebration happened upon our return. Last fall, I was approached to launch @homelivinghandbook, a new Pursuit channel for @mensjournal that highlights home improvement and DIY! It has been really fun to see it come to light, and truly one of the most exciting partnerships I’ve ever had. Timing couldn’t have been better, and I’m really happy to see how it grows over time. Please follow along — the team published 150 articles in two months, covering all kinds topics for home enthusiasts! So much more to come. #linkinbio #homelivinghandbook

✌️ the end, many thanks for your support!
    How much garlic is too much garlic? Maybe we’ll How much garlic is too much garlic? Maybe we’ll find out in 2024. Finished planting 1,005 cloves (and 19 shallots) in three new beds at the farm, and crossed one huge chore off my list 📝 #gardennotes #garden2024
    Instagram post 18003690670970980 Instagram post 18003690670970980
    We grew these fools. We grew these fools.
    pumpkin patch is doing great✌️#year1 #squashbl pumpkin patch is doing great✌️#year1 #squashblossoms #pumpkinpatch
    follow emily: @merrypad


  • Like Us On Facebook

    Facebook Pagelike Widget


  • Popular Posts

    • The Easy Way to Hang Art on Brick or Stone 28 views
    • Designing a Durable Wooden Fence For Our Beautiful Backyard Garden 22 views
    • How to Reverse an Unwanted Pet Door and Make Repairs 17 views
    • Make This Awesome Oversized, Outdoor Star Decoration 16 views
    • How to Build New Front Stairs and Railings 15 views
    • Retiring NuTone, Replacing with Atomic 13 views
    • Honestly, This Is the West Elm Tillary Sectional Sofa 12 views
    • Less Is More: How to Remove a Fireplace Surround 11 views
    • Free Ornament Storage Solutions That Last For Years 11 views
    • Baseboard Heating Upgrade Made Easy and Inexpensive with Enamel Spraypaint 10 views


  • BROWSE POSTS BY CATEGORY:

    • Art Attack (7)
    • Backyard (92)
    • Barn (8)
    • Basement (27)
    • Bathroom (43)
    • Beach (13)
    • Bedrooms (73)
    • Being Thrifty (53)
    • Business-y (12)
    • Buying and Renting and Selling (23)
    • Casual Celebrations (36)
    • Closets (17)
    • Curb Appeal (44)
    • Dainty Details (8)
    • Deck (23)
    • Decor (286)
    • Dining Room (37)
    • DIY (578)
    • Dog-Related (24)
    • Entryway (59)
    • Flooring (58)
    • For the Kids (32)
    • Garage (17)
    • Gardening (70)
    • Helping The Economy (30)
    • HGTV + DIY Network Projects (283)
    • Holiday-Related Projects (80)
    • Home Safety (12)
    • Kitchen (87)
    • Lighting (31)
    • Living Room (77)
    • Merry Travels (21)
    • Office Space (21)
    • Organized (41)
    • Other Pads (14)
    • Outdoor Living (12)
    • Scooter Fun (8)
    • Stairwell (20)
    • Sunroom (22)
    • Supporting Sponsors (43)
    • The Art Room (3)
    • Tools (43)
    • Uncategorizable (1)
    • Wedding (28)
    • Windows (14)
    • Work-pads (10)


  • a little bit of everything, friends, DIY, and inspiration

    • Dadand.com < My husband and his BFF
    • HGTV
    • Home Living Handbook, a Pursuit Channel for Men's Journal
  • Some Legal

    Merrypad incorporates the occasional affiliate link to Amazon.com and Minted; we link to many other websites and products, but if it is in context of a paid sponsorship, it is always noted as such. Please review the privacy policy and contact me if you have any additional questions.

    Theme customized by Pete Fazio Creative, the guy from dadand.com.


© Copyright Merrypad