• Home
  • about emily
  • before + after
  • HGTV + DIY Network
  • good press
  • contact
  • Let’s Organize These Posts:

    • Art Attack
    • Backyard
    • Barn
    • Basement
    • Bathroom
    • Beach
    • Bedrooms
    • Being Thrifty
    • Business-y
    • Buying and Renting and Selling
    • Casual Celebrations
    • Closets
    • Curb Appeal
    • Dainty Details
    • Deck
    • Decor
    • Dining Room
    • DIY
    • Dog-Related
    • Entryway
    • Flooring
    • For the Kids
    • Garage
    • Gardening
    • Helping The Economy
    • HGTV + DIY Network Projects
    • Holiday-Related Projects
    • Home Safety
    • Kitchen
    • Lighting
    • Living Room
    • Merry Travels
    • Office Space
    • Organized
    • Other Pads
    • Outdoor Living
    • Scooter Fun
    • Stairwell
    • Sunroom
    • Supporting Sponsors
    • The Art Room
    • Tools
    • Uncategorizable
    • Wedding
    • Windows
    • Work-pads
  • Search

  • Hi, I’m Emily

    Emily Fazio

    I'm a home improvement enthusiast, living a very merry DIY lifestyle.

    You can find me writing for Home Living Handbook, HGTV.com, and a handful of other websites. Follow me on facebook and instagram, or drop me a note if you'd like. I love notes.

    Thanks for visiting!

  • BROWSE POSTS BY CATEGORY:

    • Art Attack (7)
    • Backyard (92)
    • Barn (8)
    • Basement (27)
    • Bathroom (43)
    • Beach (13)
    • Bedrooms (73)
    • Being Thrifty (53)
    • Business-y (12)
    • Buying and Renting and Selling (22)
    • Casual Celebrations (35)
    • Closets (17)
    • Curb Appeal (44)
    • Dainty Details (7)
    • Deck (23)
    • Decor (286)
    • Dining Room (37)
    • DIY (578)
    • Dog-Related (24)
    • Entryway (59)
    • Flooring (58)
    • For the Kids (32)
    • Garage (17)
    • Gardening (70)
    • Helping The Economy (30)
    • HGTV + DIY Network Projects (283)
    • Holiday-Related Projects (80)
    • Home Safety (12)
    • Kitchen (87)
    • Lighting (31)
    • Living Room (77)
    • Merry Travels (21)
    • Office Space (21)
    • Organized (41)
    • Other Pads (14)
    • Outdoor Living (12)
    • Scooter Fun (8)
    • Stairwell (20)
    • Sunroom (22)
    • Supporting Sponsors (43)
    • The Art Room (3)
    • Tools (43)
    • Uncategorizable (1)
    • Wedding (28)
    • Windows (14)
    • Work-pads (10)
  • Search

  • Pages

    • blog
    • Good Press: Special Features, Freelance Projects, and Long-Term Clients
    • Privacy Policy
    • about emily
    • before + after
      • before + after – transforming my first home
      • before + after, our current home
    • contact me
    • choose a badge and share the merrypad.com love
merrypad website logo with acorn and text
  • Home
  • about emily
  • before + after
  • HGTV + DIY Network
  • good press
  • contact

Real Life: I Demo’ed My Only Bathroom

December 29, 2011

This week… we demo’ed the bathroom. Everything functional about it is gone-zo. Cleared out. Sayonara. The old bathtub sits in the driveway, the toilet in the basement, and the sink in my living room. This has left me brushing my teeth in the kitchen sink, using the cold basement toilet, and, um, not showering (we can borrow other people’s bathrooms of course, but without a doubt, there’s a major effort taking place to get our new bathtub installed ASAP). Self-imposed inconveniences aside, gutting a room can be great fun.

Bathroom demo happiness!

Like any previous demolition either of us has undertaken, there are always bound to be snags in the plan. Abundant snags (we’re still working to find some solutions, too).

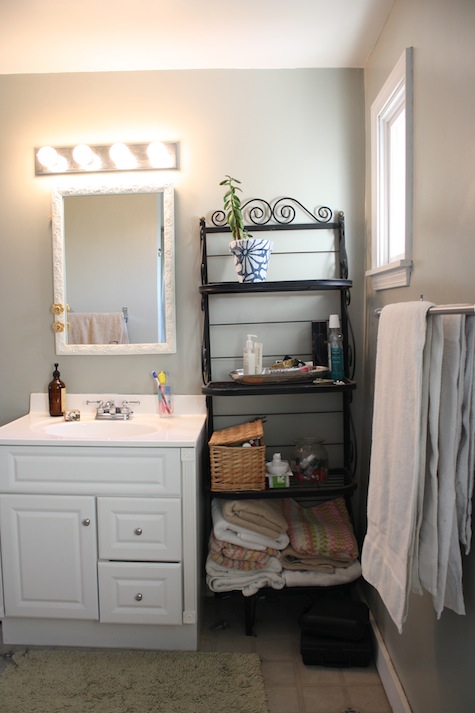
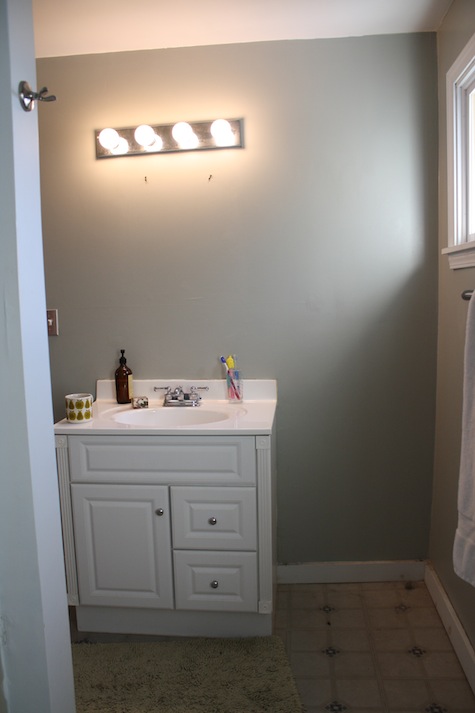
To remind you what the bathroom looked like before we got to tearing the room apart, here are some photos:

Taupe fiberglass tub and enclosure:

Preparing to demo a bathroom that needs a lot of help.

Economy-style vanity and sink. And an awkward storage unit that tilts to the left. And amazingly inexpensive and poorly constructed baseboard and window trim.

Preparing to demo a bathroom that needs a lot of help.

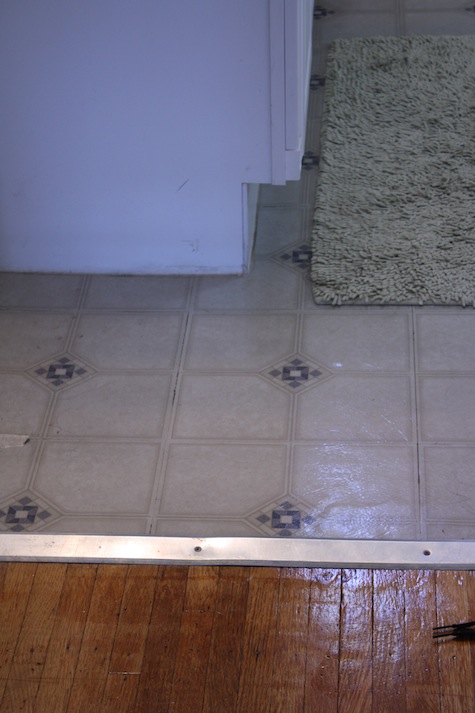
Worn out vinyl tiles:

Worn vinyl tiles about to be removed during a DIY bathroom renovation.

It goes without saying, I was eager to start smashing things with a hammer… after I removed the fiberglass shower, of course. The goal was to work on this renovation at a good steady clip so we didn’t have to borrow showers for too long. Fortunately, there’s a spare toilet in the basement that we fixed up last winter. Clearing the belongings out of the bathroom made it look more like it did when I moved in originally, very stark and bare, except gray and not teal.

Removing the mirror and beginning to clear out for the bathroom remodel.

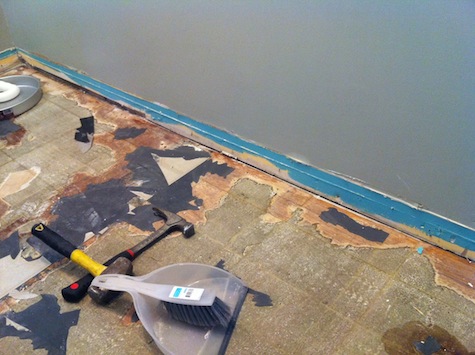
First, I removed the baseboards and shower enclosure.

How to remove a vinyl plastic shower surround during a DIY bathroom remodel.

How to remove a vinyl plastic shower surround during a DIY bathroom remodel.

Not surprisingly (based on the other questionable construction decisions made in the bathroom), the tub was attached to the studs with 2 nails on the right end and 5 screws in the other, so it came apart quite easily. I spared nothing at the opportunity to tear it to shreds while I blasted music and let the dog watch on. (If it was remotely salvageable, I definitely would have been more careful and donated it, but this thing was gunky and junky.)

How to remove a vinyl plastic shower surround during a DIY bathroom remodel.

A few surprising finds from the tub demo:

The old lath and plaster walls that were used in the old tub surround were never removed when the room was last renovated. In the blue of this photo, you can see how with the original construction, the plaster was stamped to look like tiles mocked in position for the tub surround.

Original plaster and the original bathtub surround found during our DIY bathroom renovation.

The undisturbed original house walls were still full of insulation (1 wall is an outside wall, 1 wall faces a gold attic space). No need to install new insulation (the room has held it’s temperature nicely during the demo to-date).

There was NO MOLD. I would have lost big if I were a gamblin’ girl. A little bit of water damage, yes, but nothing severe, and considering there were cracks like this next one I photographed, I’m quite surprised.

Cracked vinyl shower surround - mold??

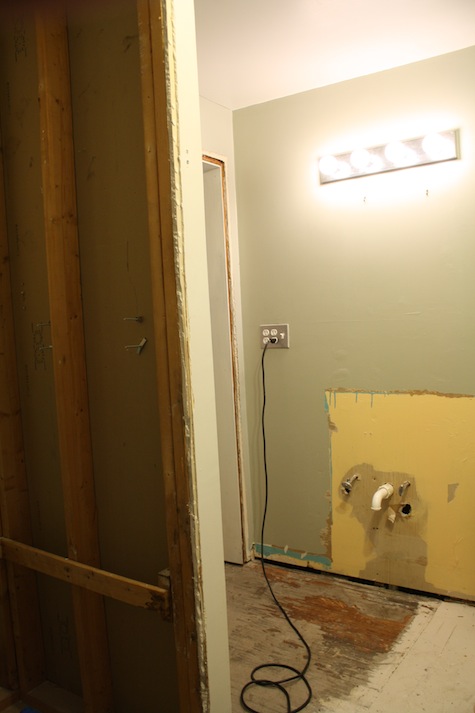
The vanity came out easily once the plumbing was disconnected, and hopefully, I’ll be able to sell it online (if not, donate pile!) because it’s still in reusable condition. The wall behind the vanity, however, not nice. But it’s nice to be starting fresh.

Removing a vanity during a DIY bathroom remodel.

The floors in the bathroom always seemed a little wonky (hence the leaning tower of towels on the rack in a previous picture). As we began to pull up tiles and underlayment, we began to see why it was like that. It seems that the sink vanity used to be hooked up in a different location, and when it was moved the floor wasn’t correctly evened back out (and according to our level, it was a 7/8″ dip over 4-feet!).

Removing tile and subfloor during a bathroom remodel.

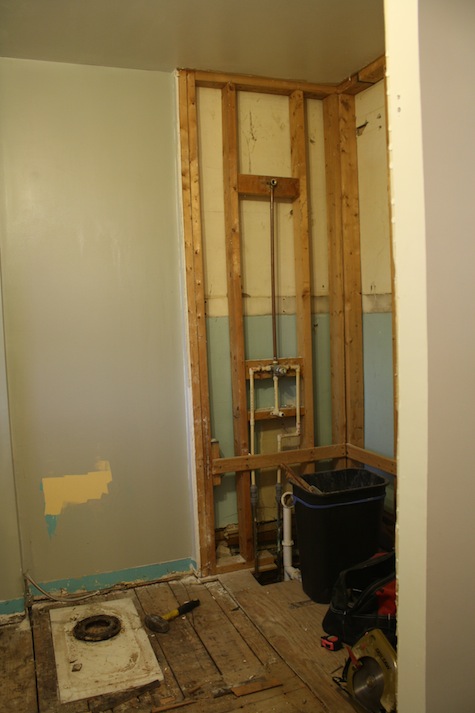
I’m hopeful that we can leave the floor closed up because perhaps the most exciting find of demo day happened while we were busily prying underlayment beneath the tiles was the original hardwood floor, continuing in from the hallway.

Found original oak hardwoods beneath our bathroom tiles during our bathroom remodel.

The hardwoods were nice when the house was new, I suspect (the 1940s) but over the decades, it has been affected by layers of tile, adhesives, and hack jobs. This made us change our plans a little bit – instead of trying to find the original joists beneath the bathroom and level the floor, we stopped at the hardwoods and left them intact.

Me, sad face, wish I could have a hardwood bathroom floor (though it doesn’t seem practical).

Clean-up entailed a lot of staple pulling, but we managed to get the floor in good shape on Day 1. It’s ready for a new layer of underlayment and new tile.

Found original oak hardwoods beneath our bathroom tiles during our bathroom remodel.

Side note: I was aware where electrical lines and plumbing ran inn the walls, and because we didn’t end up pulling up the floor entirely, there was little concern about accidentally breaking a pipe. Be careful when you demo. 

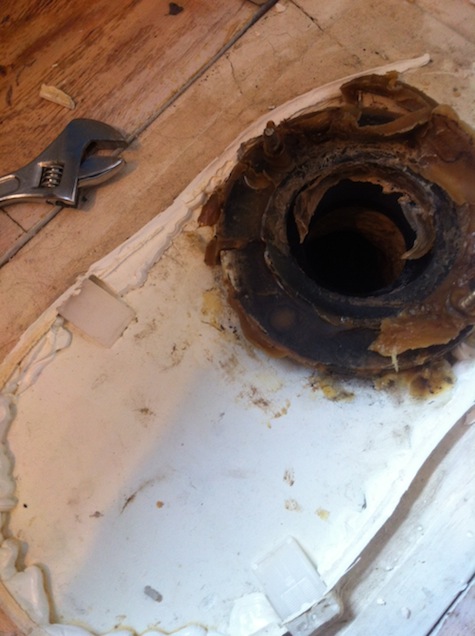
The only totally unexpected event of Demo Day was that we removed the toilet. I hadn’t planned on replacing it, but the marble block that the toilet was well-caulked to has really seen its day, so we decided that we’d try and cover up that marble with underlayment and tile up to the base, meaning we had to remove the toilet to get access, and it was easier to remove the toilet and clean up that part of the room in step with the rest of the floor.

Marble base beneath a toilet flange.

So, this is what we’re stuck with right now: A gutted, barren bathroom (the only full bath in the house, too).

Removing the vanity during a DIY bathroom renovation.

Removing the vinyl bathtub and surround during a DIY bathroom renovation.

Removing the vanity and floor during a DIY bathroom renovation.

Wish me luck as I continue on my first bathroom renovation journey.

To read more stories about this renovation:

Shopping for materials

Share

Bathroom  / DIY  / HGTV + DIY Network Projects

Emily
I'm a home improvement enthusiast living a very merry, DIY-filled lifestyle. As a freelance writer, you can find my work on many popular home and garden sites, including HGTV.com, HomeLivingHandbook.com, and other outlets. Follow me on social, or drop me a note.

3 Comments


Fern
December 29, 2011 at 4:15 pm
Reply

you make it look so easy…and fun…and realistic.

we’ve been gutting our one tiny bathroom since 2009!
focus.
that’s what I am learning here.

thank you.


Ashley @ DesignBuildLove
January 4, 2012 at 3:46 pm
Reply

your nuts! (in a good way!!!) Can’t wait to see the end result!


    Emily
    January 4, 2012 at 4:50 pm

    Haha, thanks Ashley :)

Leave a Reply Cancel reply

Your email address will not be published. Required fields are marked *

This site uses Akismet to reduce spam. Learn how your comment data is processed.

  • HI, I’m Emily

    Emily Fazio

    I'm a home improvement enthusiast, living a very merry DIY lifestyle. Follow me on facebook and instagram, or drop me a note if you'd like. I love notes.

    You can find me writing for Home Living Handbook, HGTV.com, and a handful of other websites.

    Thanks for visiting!

  • Instagram

    merrypad

    I’ll always say yes to a maker space experience, a I’ll always say yes to a maker space experience, and The Shed at @timberland’s HQ did not disappoint ✌️🥾 @homelivinghandbook 

Final footwear design not shown 🙂

PS tagging some cute shoes they gifted from the Fall 2024 collection!
    I made the call and snapped off the elephant garli I made the call and snapped off the elephant garlic scapes yesterday evening. Who’s going to help us harvest and eat the next 1,000? 🧄🧄🧄🧄
    Hi! Boy, do I have things to share. 🎉 🫶 Friendly Hi! Boy, do I have things to share. 🎉 

🫶 Friendly reminder to focus on balance and wellness: Pete and I lived abroad with our family for the entire month of August 2023. If you ever have the opportunity to work remotely, I promise it to be a worthwhile adventure that’ll change your POV in so many ways. And, If you need an in with an incredible AirBnB in Denmark, DM me. From new playgrounds and museums to the culture and design, making this trip a reality continues to be something we celebrate every day, and I wish everyone can experience it on some level.

💻 Friendly reminder to say yes to new (overwhelming) opportunities: The professional celebration happened upon our return. Last fall, I was approached to launch @homelivinghandbook, a new Pursuit channel for @mensjournal that highlights home improvement and DIY! It has been really fun to see it come to light, and truly one of the most exciting partnerships I’ve ever had. Timing couldn’t have been better, and I’m really happy to see how it grows over time. Please follow along — the team published 150 articles in two months, covering all kinds topics for home enthusiasts! So much more to come. #linkinbio #homelivinghandbook

✌️ the end, many thanks for your support!
    How much garlic is too much garlic? Maybe we’ll fi How much garlic is too much garlic? Maybe we’ll find out in 2024. Finished planting 1,005 cloves (and 19 shallots) in three new beds at the farm, and crossed one huge chore off my list 📝 #gardennotes #garden2024
    Instagram post 18003690670970980 Instagram post 18003690670970980
    We grew these fools. We grew these fools.
    pumpkin patch is doing great✌️#year1 #squashblosso pumpkin patch is doing great✌️#year1 #squashblossoms #pumpkinpatch
    follow emily: @merrypad


  • Like Us On Facebook

    Facebook Pagelike Widget


  • Popular Posts

    • Designing a Durable Wooden Fence For Our Beautiful Backyard Garden 17 views
    • The Easy Fix For Broken IKEA Drawers 15 views
    • The Easy Way to Hang Art on Brick or Stone 15 views
    • Retiring NuTone, Replacing with Atomic 14 views
    • How to Make Your Own Barn Quilt 14 views
    • 7 Steps for Restoring an Old Midcentury Sideboard Buffet 11 views
    • Reasons We Recessed Our Induction Cooktop 10 views
    • The Farmhouse Wedding Table Smackdown 10 views
    • Using Counter-Snap Screws to Fix Squeaky Floors 10 views
    • Because Who Doesn’t Like A Good Knob Story 9 views


  • BROWSE POSTS BY CATEGORY:

    • Art Attack (7)
    • Backyard (92)
    • Barn (8)
    • Basement (27)
    • Bathroom (43)
    • Beach (13)
    • Bedrooms (73)
    • Being Thrifty (53)
    • Business-y (12)
    • Buying and Renting and Selling (22)
    • Casual Celebrations (35)
    • Closets (17)
    • Curb Appeal (44)
    • Dainty Details (7)
    • Deck (23)
    • Decor (286)
    • Dining Room (37)
    • DIY (578)
    • Dog-Related (24)
    • Entryway (59)
    • Flooring (58)
    • For the Kids (32)
    • Garage (17)
    • Gardening (70)
    • Helping The Economy (30)
    • HGTV + DIY Network Projects (283)
    • Holiday-Related Projects (80)
    • Home Safety (12)
    • Kitchen (87)
    • Lighting (31)
    • Living Room (77)
    • Merry Travels (21)
    • Office Space (21)
    • Organized (41)
    • Other Pads (14)
    • Outdoor Living (12)
    • Scooter Fun (8)
    • Stairwell (20)
    • Sunroom (22)
    • Supporting Sponsors (43)
    • The Art Room (3)
    • Tools (43)
    • Uncategorizable (1)
    • Wedding (28)
    • Windows (14)
    • Work-pads (10)


  • a little bit of everything, friends, DIY, and inspiration

    • Dadand.com – A little bit of everything, friends, DIY, and inspiration
    • HGTV
    • Home Living Handbook – Helpful hints & meaningful how-tos for every home.
  • Some Legal

    Merrypad incorporates the occasional affiliate link to Amazon.com and Minted; we link to many other websites and products, but if it is in context of a paid sponsorship, it is always noted as such. Please review the privacy policy and contact me if you have any additional questions.

    Theme customized by Pete Fazio Creative, the guy from dadand.com.


© Copyright Merrypad