• Home
  • about emily
  • before + after
  • HGTV + DIY Network
  • good press
  • contact
  • Let’s Organize These Posts:

    • Art Attack
    • Backyard
    • Barn
    • Basement
    • Bathroom
    • Beach
    • Bedrooms
    • Being Thrifty
    • Business-y
    • Buying and Renting and Selling
    • Casual Celebrations
    • Closets
    • Curb Appeal
    • Dainty Details
    • Deck
    • Decor
    • Dining Room
    • DIY
    • Dog-Related
    • Entryway
    • Flooring
    • For the Kids
    • Garage
    • Gardening
    • Helping The Economy
    • HGTV + DIY Network Projects
    • Holiday-Related Projects
    • Home Safety
    • Kitchen
    • Lighting
    • Living Room
    • Merry Travels
    • Office Space
    • Organized
    • Other Pads
    • Outdoor Living
    • Scooter Fun
    • Stairwell
    • Sunroom
    • Supporting Sponsors
    • The Art Room
    • Tools
    • Uncategorizable
    • Wedding
    • Windows
    • Work-pads
  • Search

  • Hi, I’m Emily

    Emily Fazio

    I'm a home improvement enthusiast, living a very merry DIY lifestyle.

    You can find me writing for Home Living Handbook, HGTV.com, and a handful of other websites. Follow me on facebook and instagram, or drop me a note if you'd like. I love notes.

    Thanks for visiting!

  • BROWSE POSTS BY CATEGORY:

    • Art Attack (7)
    • Backyard (92)
    • Barn (8)
    • Basement (27)
    • Bathroom (43)
    • Beach (13)
    • Bedrooms (73)
    • Being Thrifty (53)
    • Business-y (12)
    • Buying and Renting and Selling (22)
    • Casual Celebrations (35)
    • Closets (17)
    • Curb Appeal (44)
    • Dainty Details (7)
    • Deck (23)
    • Decor (286)
    • Dining Room (37)
    • DIY (578)
    • Dog-Related (24)
    • Entryway (59)
    • Flooring (58)
    • For the Kids (32)
    • Garage (17)
    • Gardening (70)
    • Helping The Economy (30)
    • HGTV + DIY Network Projects (283)
    • Holiday-Related Projects (80)
    • Home Safety (12)
    • Kitchen (87)
    • Lighting (31)
    • Living Room (77)
    • Merry Travels (21)
    • Office Space (21)
    • Organized (41)
    • Other Pads (14)
    • Outdoor Living (12)
    • Scooter Fun (8)
    • Stairwell (20)
    • Sunroom (22)
    • Supporting Sponsors (43)
    • The Art Room (3)
    • Tools (43)
    • Uncategorizable (1)
    • Wedding (28)
    • Windows (14)
    • Work-pads (10)
  • Search

  • Pages

    • blog
    • Good Press: Special Features, Freelance Projects, and Long-Term Clients
    • Privacy Policy
    • about emily
    • before + after
      • before + after – transforming my first home
      • before + after, our current home
    • contact me
    • choose a badge and share the merrypad.com love
merrypad website logo with acorn and text
  • Home
  • about emily
  • before + after
  • HGTV + DIY Network
  • good press
  • contact

How To Refinish Vintage Metal Cabinets

February 24, 2015

A well-organized home is a happy home, and adding more storage is among the easiest things you can do to make it more functional. Whether you’re installing built-in shelves, assembling a new bookshelf, or buying products with hidden storage features, there are lots of ways to improve home storage in a functional way.

If you’re considering the recycled route, lone kitchen cabinets and cabinetry sets are plentiful at secondhand and salvage shops, and like most good salvage finds, if it’s not broken, you can find new life in it. Upcycle these materials to improve any space in your home.

Metal vintage kitchen cabinets found at the salvage shop ReHouse in Rochester, NY.
Check your local salvage shops for old cabinets!

Not only is there a handsome economic benefit to purchasing and installing recycled cabinets, but they’re also a great product to tap into if you’re desiring a custom look for your home. You can paint, re-stain, and install them wherever it makes the most sense.

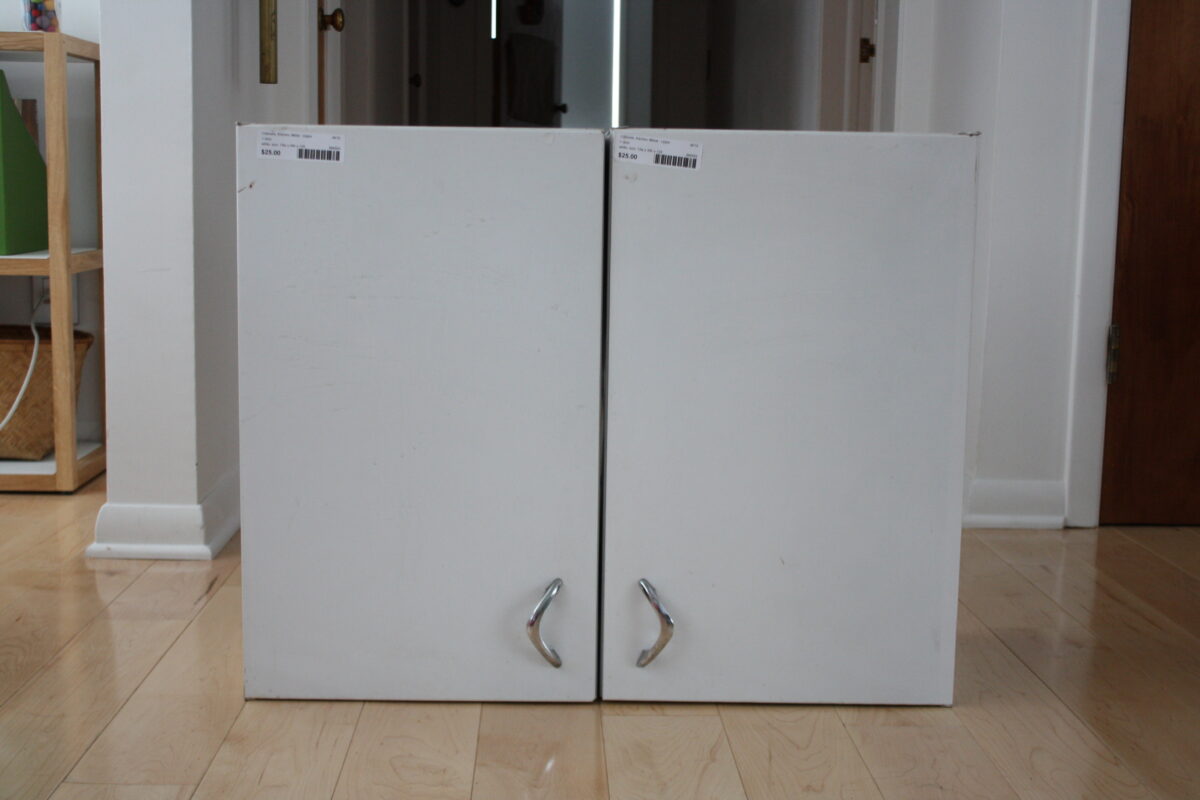
The two metal cabinets that I bought at Rochester, NY’s ReHouse cost $25/each. They had been upper cabinets in an old kitchen set. Their size (24″ high x 15″ wide x 12″ deep) made them a great candidate for the small entryway in my home. Rather than installing them high on the wall, I set out to use them as sideboard-height floating cabinets.

But first, I had to refinish them.

Though these vintage metal cabinets were in great shape with no dents, they did have surface scratches and a little rust – not really surprising. Years of wear and tear could have left them in much worse shape.

Scratches in the paint on a metal kitchen cabinet.
Scratches in the surface need to be repaired.

To refinish old metal cabinets, you only need a few things:

  • warm water
  • dish soap
  • cotton cloth
  • fine sandpaper (300+ grit)
  • microfiber cloth
  • epoxy spray paint (appliance-grade)
  • clear gloss spray paint (optional – I used it to blend in some hot spots from the epoxy)

Now, the below tutorial reviews how to refinish metal cabinets. The easiest way to refinish metal cabinets is with a coat of epoxy spray paint. If you’re refinishing old wood or veneered cabinets, you might want to consider Gel Stain. I used it when refinishing my kitchen cabinets, and always recommend the product.

1. Clean the Metal Cabinet Surface

Prepping your cabinet surface begins with cleaning it well. Use warm water mixed with a few drops of dish soap to create a solution that can cut through grease and residue that may remain on your cabinets. Kitchen cabinets are more likely to have layers of grease on the surface, even if they weren’t over the stove, so this cleaning step is important. Wash it down, and dry it off (or let it air dry).

2. Sand the Cabinet

Once dry, use a fine sandpaper to break through the original enamel finish. Sanding very lightly will roughen the surface just enough for new coat of paint to adhere well. Pay attention to exposed raised rusty spots, and sand them down to be smooth.

Fine grade sandpaper used to scratch a metal cabinet before painting.
Use a 300 grit sandpaper (or higher).

3. Remove Dust

Sanding the surface will create some dust. Use a microfiber cloth to clean the surface so it’s dust-free.

4. Apply Epoxy Spray Paint to the Cabinet

When it comes time to paint, work in a well-ventilated and clear area. This part of your project is likely to take several days, and you won’t want to risk carrying the cabinets around while it cures. You’ll just end up smudging the finish or leaving fingerprints in your fresh coat of epoxy.

For the metal cabinets, as shown above, white appliance spray paint is my product of choice. Epoxy cures harder than ordinary spray paint and stands up to washing too. It’s good as a base coat, and its glossy finish makes for a good top coat too.

Rust-Oleum Appliance Epoxy provides a durable coat for metal surfaces.
Epoxy spray paint is more durable than ordinary spray paint.

Applying spray paint is an art. Light coats are a must to prevent dripping and pooling, and sanding in between each coat helps to eliminate any splatters (no matter how pro you are at this, spray paint splatters happen to the best of us).

I allowed the cabinet to dry for a day between coats so that I could pass over the surface with a fine sandpaper in between coats. After 3 coats, the problem areas were well-covered.

5. Apply a High-Gloss Top Coat

At this point, even though coverage was great, I was still seeing some glossy “hot spots” where the spray paint had landed on one spot more than another spot. (This was a consequence of me not moving the paint can consistently enough, or overlapping an already painted area). High-gloss products are a little more susceptible to this than others. Matte finishes are easier to apply.

To even out some of the “blotchy” gloss areas, I passed over the entire cabinet surface with two coats of clear gloss spray paint. Applying this extra gloss layer worked perfectly, and the finished surface looks as good as new. It’s as close to a professionally powder-coated cabinet as I believe I could achieve.

Metal cabinets upcycled and wall-mounted in an entryway.
Three coats of appliance-grade epoxy and one coat of high-gloss clear spray paint transform old metal kitchen cabinets.

Once dry, I installed the cabinets, created new leather handles, and made a maple countertop. This floating cabinet is a great place for our family to store hats, mittens, and other wintertime accessories.

A floating wall cabinet that uses upcycled metal kitchen cabinets and a piece of maple on top.
Vintage metal kitchen cabinets get new life as a wall-mounted sideboard in our entryway.

P.S. Yes, the wallpaper you see in the entryway is a vinyl adhesive product! It’s been there for nearly 10 years, and has held up perfectly well.

Share

Kitchen

Emily
I'm a home improvement enthusiast living a very merry, DIY-filled lifestyle. As a freelance writer, you can find my work on many popular home and garden sites, including HGTV.com, HomeLivingHandbook.com, and other outlets. Follow me on social, or drop me a note.

Leave A Reply


Leave a Reply Cancel reply

Your email address will not be published. Required fields are marked *

This site uses Akismet to reduce spam. Learn how your comment data is processed.

  • HI, I’m Emily

    Emily Fazio

    I'm a home improvement enthusiast, living a very merry DIY lifestyle. Follow me on facebook and instagram, or drop me a note if you'd like. I love notes.

    You can find me writing for Home Living Handbook, HGTV.com, and a handful of other websites.

    Thanks for visiting!

  • Instagram

    merrypad

    I’ll always say yes to a maker space experience, a I’ll always say yes to a maker space experience, and The Shed at @timberland’s HQ did not disappoint ✌️🥾 @homelivinghandbook 

Final footwear design not shown 🙂

PS tagging some cute shoes they gifted from the Fall 2024 collection!
    I made the call and snapped off the elephant garli I made the call and snapped off the elephant garlic scapes yesterday evening. Who’s going to help us harvest and eat the next 1,000? 🧄🧄🧄🧄
    Hi! Boy, do I have things to share. 🎉 🫶 Friendly Hi! Boy, do I have things to share. 🎉 

🫶 Friendly reminder to focus on balance and wellness: Pete and I lived abroad with our family for the entire month of August 2023. If you ever have the opportunity to work remotely, I promise it to be a worthwhile adventure that’ll change your POV in so many ways. And, If you need an in with an incredible AirBnB in Denmark, DM me. From new playgrounds and museums to the culture and design, making this trip a reality continues to be something we celebrate every day, and I wish everyone can experience it on some level.

💻 Friendly reminder to say yes to new (overwhelming) opportunities: The professional celebration happened upon our return. Last fall, I was approached to launch @homelivinghandbook, a new Pursuit channel for @mensjournal that highlights home improvement and DIY! It has been really fun to see it come to light, and truly one of the most exciting partnerships I’ve ever had. Timing couldn’t have been better, and I’m really happy to see how it grows over time. Please follow along — the team published 150 articles in two months, covering all kinds topics for home enthusiasts! So much more to come. #linkinbio #homelivinghandbook

✌️ the end, many thanks for your support!
    How much garlic is too much garlic? Maybe we’ll fi How much garlic is too much garlic? Maybe we’ll find out in 2024. Finished planting 1,005 cloves (and 19 shallots) in three new beds at the farm, and crossed one huge chore off my list 📝 #gardennotes #garden2024
    Instagram post 18003690670970980 Instagram post 18003690670970980
    We grew these fools. We grew these fools.
    pumpkin patch is doing great✌️#year1 #squashblosso pumpkin patch is doing great✌️#year1 #squashblossoms #pumpkinpatch
    follow emily: @merrypad


  • Like Us On Facebook

    Facebook Pagelike Widget


  • Popular Posts

    • The Easy Way to Hang Art on Brick or Stone 22 views
    • Designing a Durable Wooden Fence For Our Beautiful Backyard Garden 21 views
    • Less Is More: How to Remove a Fireplace Surround 20 views
    • Free Ornament Storage Solutions That Last For Years 20 views
    • Using Counter-Snap Screws to Fix Squeaky Floors 17 views
    • Honestly, This Is the West Elm Tillary Sectional Sofa 13 views
    • Retiring NuTone, Replacing with Atomic 12 views
    • The Easy Fix For Broken IKEA Drawers 11 views
    • Reasons We Recessed Our Induction Cooktop 11 views
    • How to Make Your Own Barn Quilt 10 views


  • BROWSE POSTS BY CATEGORY:

    • Art Attack (7)
    • Backyard (92)
    • Barn (8)
    • Basement (27)
    • Bathroom (43)
    • Beach (13)
    • Bedrooms (73)
    • Being Thrifty (53)
    • Business-y (12)
    • Buying and Renting and Selling (22)
    • Casual Celebrations (35)
    • Closets (17)
    • Curb Appeal (44)
    • Dainty Details (7)
    • Deck (23)
    • Decor (286)
    • Dining Room (37)
    • DIY (578)
    • Dog-Related (24)
    • Entryway (59)
    • Flooring (58)
    • For the Kids (32)
    • Garage (17)
    • Gardening (70)
    • Helping The Economy (30)
    • HGTV + DIY Network Projects (283)
    • Holiday-Related Projects (80)
    • Home Safety (12)
    • Kitchen (87)
    • Lighting (31)
    • Living Room (77)
    • Merry Travels (21)
    • Office Space (21)
    • Organized (41)
    • Other Pads (14)
    • Outdoor Living (12)
    • Scooter Fun (8)
    • Stairwell (20)
    • Sunroom (22)
    • Supporting Sponsors (43)
    • The Art Room (3)
    • Tools (43)
    • Uncategorizable (1)
    • Wedding (28)
    • Windows (14)
    • Work-pads (10)


  • a little bit of everything, friends, DIY, and inspiration

    • Dadand.com – A little bit of everything, friends, DIY, and inspiration
    • HGTV
    • Home Living Handbook – Helpful hints & meaningful how-tos for every home.
  • Some Legal

    Merrypad incorporates the occasional affiliate link to Amazon.com and Minted; we link to many other websites and products, but if it is in context of a paid sponsorship, it is always noted as such. Please review the privacy policy and contact me if you have any additional questions.

    Theme customized by Pete Fazio Creative, the guy from dadand.com.


© Copyright Merrypad