
I was invited to participate in this challenge that required me to make anything using a single board, and I said yes because there was one project that came to mind: the beautiful Kulma framing shelf by Martina Carpelan.

Martina’s shelf is €95 and undeniably flawless, and you should check out her shop if you just want to buy. Thumbs up.
A few years ago, back when I was making and selling rustic picture frames as an Etsy side-biz, I became pretty proficient at planning measurements to make the most of the reclaimed boards I had inventoried. When the boards are consistent front and back (same finish, same texture), it’s easy to use this method to plan for mitered cuts. Measuring for mitered cuts is a little more complex than it would be if you were slicing straight cuts with the chop saw (if you’re not careful it lends to more waste), but nice joints have a certain appeal and look more professional. I do most of this planning as a sketch on paper–or on a paint stirrer–to visualize how to simplify the cuts and minimize waste.

The notes on the stick you see above served as my cut list for this shelving with mitered inner corners. I cut the pieces from a single 1x8x8 poplar board. If you’re not into the complexity of mitering, you can execute a similar piece with butt joints (forming the right angle by butting two flat-ended pieces to create an “L”). I suggest cutting the following pieces from your board to construct with a butt joint:
- (2) 24″ boards
- (2) 9″ boards
- (2) 8″ boards
You might wonder why I didn’t miter all of the joints (notice above that the vertical pieces are just butted); I know from previous experience (making this couch arm wrap) that strong compound joinery is really hard if you’re not a pro at splining, which I’m not (yet). I used metal brackets for that project to make that project secure (namely because they would be hidden), but for this project I didn’t want any exposed hardware that would detract from the clean lines and natural wood construct.
Desire to avoid using metal brackets and screws means that this shelf was assembled with biscuit joinery (no nails, no nail gun, just wooden tendons, wood glue, and clamps).
The tool/material list:
- Miter saw
- Biscuit joiner
- #20 Biscuits (12 total, 2 at each joint)
- Palm router
- Keyhole bit
- Wall anchors
- Screwdriver
- Painter’s Tape
- Sandpaper / palm sander
- Stain

Make the cuts as outlined above, paying special attention to the mitered angles. When the mitered edges are cut and line up perfectly, trim the straight end of the boards at the same time so they are perfectly even in length.

My palm router is one of my favorite tools, and testing a new bit is like Christmas morning. The keyhole bit is one that I hadn’t tested yet, so I clamped a piece of scrap to maneuver the palm router at least a dozen times while I got comfortable with the motions. For the most part, it was pretty easy, and I’m glad I know how to do this because it would make installing all kinds of floating shelving and heavy items a lot easier. Of course, as it would go, the holes plunged into the finished cut boards were way wonkier than I would have liked because I’m human and I probably got too confident after having carved 10 perfect holes in a row in my scrap and the universe had to re-ground me, but they are still plenty strong, just not as pretty.

The strongest biscuits in my workshop are #20 (2-5/8″ x 1″, adequate for the heaviest projects that will be under greater stress). I used the joiner to cut in spaces for two at each joint. Consistency is key when you’re cutting joints that need to line up vertically and horizontally. My technique–lining of the joint, using a pencil line to mark perpendicularly over the joint where I want the biscuit to be embedded, and then lining up the joiner at a measured and locked depth to bore in at those pencil marks– has been foolproof.

Less is more when it comes to wood glue; I dripped a small dab into each cut biscuit space, and a precise “finger smudged layer” of glue along the edge of the board itself before plugging in the biscuits and forcing the pieces together until death do them part. The fit in this case was pretty RIGHT ON on the first attempt, and it really didn’t require much clamping, just enough to keep the two boards level while the glue dried.

Connections aren’t always so smooth, and I’m sure that has a lot to do with my own skill set, and because the board sometimes has an ever so slight natural curvature to it, even when you spend twice as much buying it from a millwork where it had just been planed to perfection. Woodworking is a beautiful thing, but I’m not a pro, and sometimes a rubber mallet comes into play to get those joint to conform to my expectations. Whack. Put a little piece of scrap between the black mallet and your good board to avoid black smudgies, and to distribute the force of the blow.

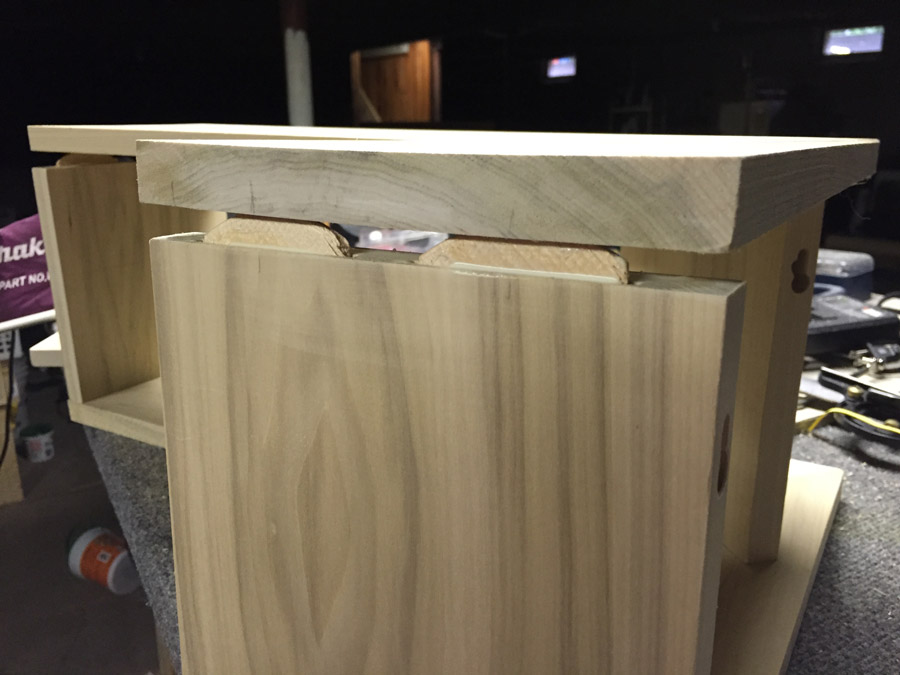
You can catch a peek at one of the wonky keyholes from this angle, and better see how the biscuits fit into position to join the shelf pieces together without screws. Do what you will, just make sure it’s all clamped together tight, and square, while the glue dries to lock the biscuits in place.
Most of our “good clamps” are missing, which is probably because our basement workshop just got reorganized and I didn’t make a key and map of where I put everything… so I got creative.

Once the glue had dried, I went over every joint and edge with a palm sander, which corrected any places where you could feel and see if a board was a half-a-millimeter out of position.
I tested a few stains to determine which finish I liked best for my finished shelf. “Natural” won out; not too yellow, not dark, and brought out a lot of the beauty of the poplar’s coloring.

As I said, it was my first time using the keyhole bit and also my first time trying to hang something using a keyhole, and it worked quite well. The way in which the hole was bore plays a big part in the overall positioning of the screws in your wall, and to mark exactly where the screw would sit, I flagged with a very direct arrow made of tape.

Heavy-duty wall anchors are a must-have if you’re not going into a stud, and these babies hold 50-lbs each. When you think about using these anchors for other projects, the screw usually goes through the item (a bracket, for instance) and then into the anchor, so I knew that if the screw protruded out by 1/4″, I could hook the screw into the keyhole on the shelf, and expect it to remain rigid and strong.

I really hate messing up when it involves putting holes in my wall, and putting unnecessary holes in flawless wallpaper in my entryway would bring out a whole new level of rage. For planning purposes, I began by leveling the shelf in the corner, marking where the holes would need to be for both screws, and tapped two tiny brad nails into the wall to double-check the positioning and level. Smart move; the left side was a hair off, and I was able to correct it before installing the heavy-duty anchors.

It’s a pretty good feeling seeing the shelf hung on the wall, looking and fitting so well. Note that you may need to tighten the screws into the anchors a little bit more based on how deep the screw fits into the keyhole. Remove the shelf, tighten up a half/full twist, and try again.

As an entryway feature, the shelf gives us a place to drop our keys; extra space is being used for our stash of thank you notes and stamps.


Check out more projects from this One Board Challenge – here’s everyone who participated:


4 Comments
I am impressed!!
As always, great job!
This is so cool, and I love the choice of joinery. Beautiful!
Emily, your shelf is so creative! I love the wraparound style. Nice job.