• Home
  • about emily
  • before + after
  • HGTV + DIY Network
  • good press
  • contact
  • Let’s Organize These Posts:

    • Art Attack
    • Backyard
    • Barn
    • Basement
    • Bathroom
    • Beach
    • Bedrooms
    • Being Thrifty
    • Business-y
    • Buying and Renting and Selling
    • Casual Celebrations
    • Closets
    • Curb Appeal
    • Dainty Details
    • Deck
    • Decor
    • Dining Room
    • DIY
    • Dog-Related
    • Entryway
    • Flooring
    • For the Kids
    • Garage
    • Gardening
    • Helping The Economy
    • HGTV + DIY Network Projects
    • Holiday-Related Projects
    • Home Safety
    • Kitchen
    • Lighting
    • Living Room
    • Merry Travels
    • Office Space
    • Organized
    • Other Pads
    • Outdoor Living
    • Scooter Fun
    • Stairwell
    • Sunroom
    • Supporting Sponsors
    • The Art Room
    • Tools
    • Uncategorizable
    • Wedding
    • Windows
    • Work-pads
  • Search

  • Hi, I’m Emily

    Emily Fazio

    I'm a home improvement enthusiast, living a very merry DIY lifestyle.

    You can find me writing for Home Living Handbook, HGTV.com, and a handful of other websites. Follow me on facebook and instagram, or drop me a note if you'd like. I love notes.

    Thanks for visiting!

  • BROWSE POSTS BY CATEGORY:

    • Art Attack (7)
    • Backyard (92)
    • Barn (8)
    • Basement (27)
    • Bathroom (43)
    • Beach (13)
    • Bedrooms (73)
    • Being Thrifty (53)
    • Business-y (12)
    • Buying and Renting and Selling (23)
    • Casual Celebrations (36)
    • Closets (17)
    • Curb Appeal (44)
    • Dainty Details (8)
    • Deck (23)
    • Decor (286)
    • Dining Room (37)
    • DIY (578)
    • Dog-Related (24)
    • Entryway (59)
    • Flooring (58)
    • For the Kids (32)
    • Garage (17)
    • Gardening (70)
    • Helping The Economy (30)
    • HGTV + DIY Network Projects (283)
    • Holiday-Related Projects (80)
    • Home Safety (12)
    • Kitchen (87)
    • Lighting (31)
    • Living Room (77)
    • Merry Travels (21)
    • Office Space (21)
    • Organized (41)
    • Other Pads (14)
    • Outdoor Living (12)
    • Scooter Fun (8)
    • Stairwell (20)
    • Sunroom (22)
    • Supporting Sponsors (43)
    • The Art Room (3)
    • Tools (43)
    • Uncategorizable (1)
    • Wedding (28)
    • Windows (14)
    • Work-pads (10)
  • Search

  • Pages

    • blog
    • Good Press: Special Features, Freelance Projects, and Long-Term Clients
    • Privacy Policy
    • about emily
    • before + after
      • before + after – transforming my first home
      • before + after, our current home
    • contact me
    • choose a badge and share the merrypad.com love
merrypad website logo with acorn and text
  • Home
  • about emily
  • before + after
  • HGTV + DIY Network
  • good press
  • contact

Create a Unique Spider Web Pumpkin

October 11, 2021

While I’m always here for a traditional jack-o-lantern, this year I decided to spearhead a different approach. Come to find, it’s really easy to hand-stitch a spider web using simple black yarn. These pumpkins interspersed alongside DIY pumpkin flower planters in our seasonal displays add a unique whimsy and appeal.

They’re easy enough to make – perhaps easier than carving a jack-o-lantern. It just involves weaving black yarn through holes drilled into your hollow pumpkin. Learn how to make your own spider web pumpkin in the below tutorial.

Pumpkins with yarn spiderwebs sewn onto the surface.
Spiderweb-covered pumpkins.

You’ll need:

  • serrated knife
  • jigsaw
  • spoon
  • cordless drill with 1/8″ bit
  • pumpkins
  • black yarn
  • fine-gauge wire
  • plastic spiders

1. Clean Seeds Out of Pumpkin

Use a knife or jigsaw to cut away the top of the pumpkin. Remove the seeds and guts from the pumpkin.

A spoon scooping seeds and guts out of a pumpkin.
Remove seeds and guts.

2. Drill Holes for Web

Use a 1/8″ drill bit to make holes through which to sew your spider web. Spider webs are naturally irregular and unique, but to create a uniform circular web shape, mark a center point on the pumpkin and drill through it. From that point, drill evenly spaced points on the same plane upwards and outwards in various directions. Keep each hole on the same plane 1” apart. Think of it as if you were plotting points for a dot-to-dot asterisk.

Making holes in a pumpkin using a cordless drill.
Use a cordless drill to make holes.

Once you’ve created all of the holes, clean the surface of the pumpkin so that the holes are more easily visible.
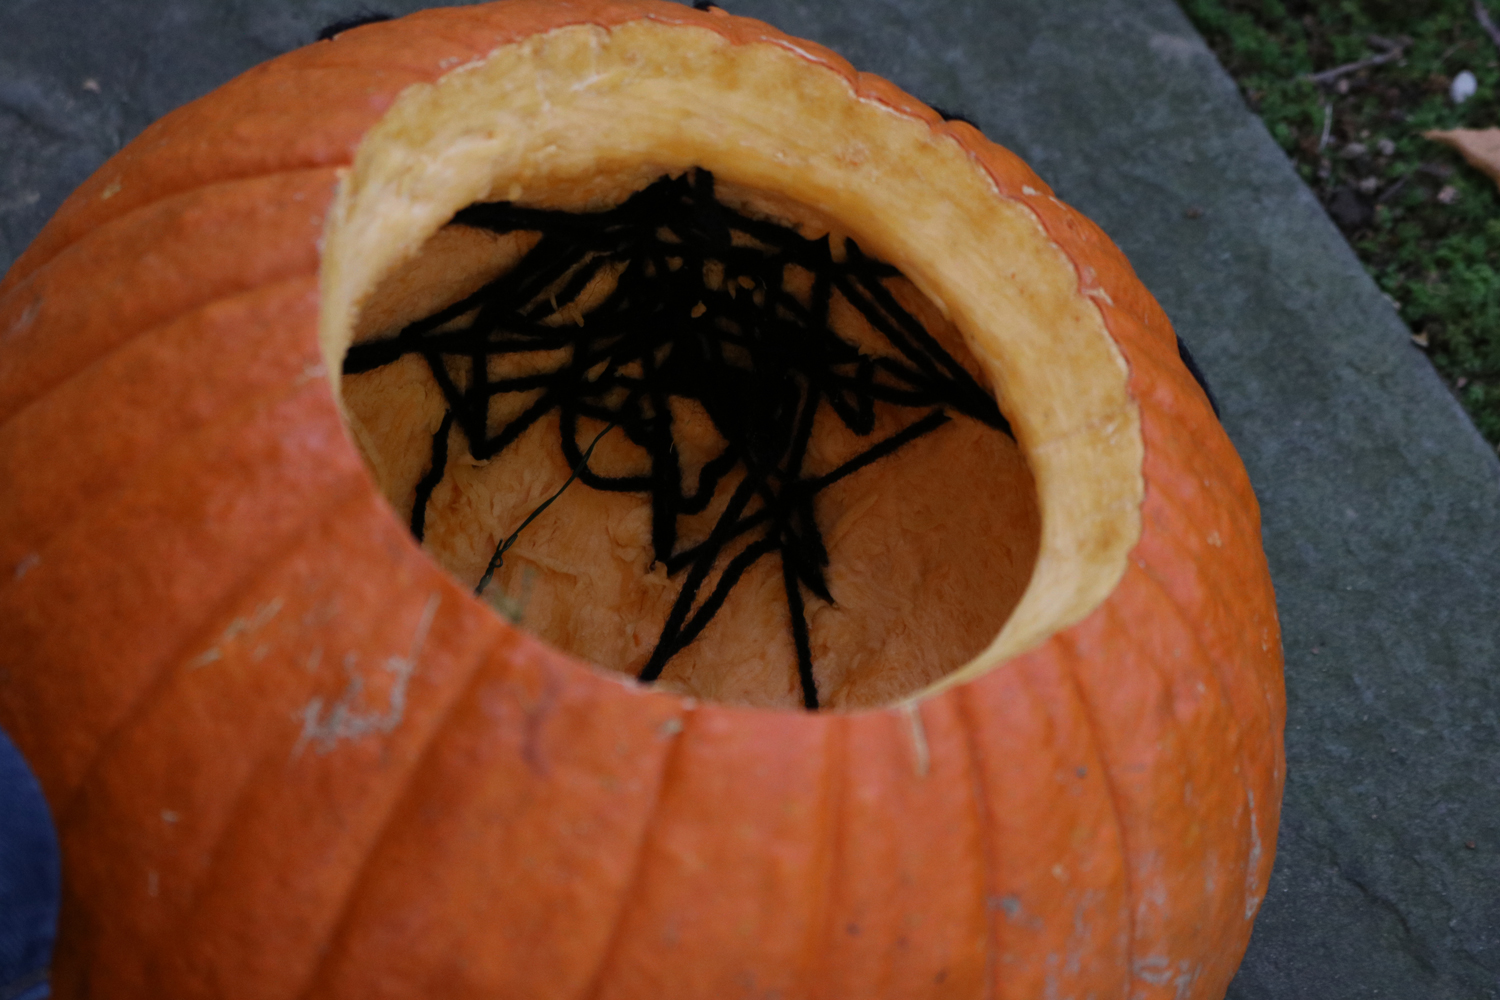
Cleaning guts off the surface of the pumpkin after drilling holes.
Clean the surface.

3. Stitch Circles

Tie a 3- to 4-foot piece of black yarn to a piece of wire (it’s easier than trying to thread yarn through the end of a needle).

Loop the yarn in and out of the holes you made in the pumpkin in a backstitching pattern to create the circles that form the spider web.

Stitching yarn through holes in a pumpkin.
Create round circles using a piece of wire and yarn.

Remember, it doesn’t matter what the inside of the pumpkin looks like. Weave the yarn around until your line runs short, and then cut a new 3- to 4-foot piece and continue. The inside will look quite tangled as you work, even though the exterior stitching looks neat and organized.

A messy tangle of yarn inside a carved pumpkin.
Ignore what the inside looks like. It doesn’t matter.

4. Stitch Straight Lines

Backstitch more lengths of yarn in straight lines to visually connect the circles. Selectively extend several lines beyond the circles to emulate the irregular appearance of a real spider web.

A black spiderweb stitched onto the front of a pumpkin using yarn.
Add lines from the middle towards the edges to connect the circles.

5. Attach Plastic Spiders

Attach plastic spiders to the web. You can use a dab of hot glue if they don’t easily snag into the fibers.

Spider attached to a yarn spiderweb on an orange pumpkin.
Add spiders!

Top off the finished pumpkins with their lids and a few fake spiders then show off your crafty pumpkins.

Pumpkins with yarn spiderwebs sewn onto the surface.
Spiderweb-covered pumpkins.

More Halloween Projects You’ll Love:

  • Make it look like your windows have been shattered
  • DIY Halloween tombstones
  • Make black noodles for Halloween Mac & Cheese
  • Create backlit, creepy eyeballs in your windows
  • Make a DIY Halloween Totem Pole

This project was originally created for DIYNetwork.com.

Share

Kitchen

Emily
I'm a home improvement enthusiast living a very merry, DIY-filled lifestyle. As a freelance writer, you can find my work on many popular home and garden sites, including HGTV.com, HomeLivingHandbook.com, and other outlets. Follow me on social, or drop me a note.

Leave A Reply


Leave a Reply Cancel reply

Your email address will not be published. Required fields are marked *

This site uses Akismet to reduce spam. Learn how your comment data is processed.

  • HI, I’m Emily

    Emily Fazio

    I'm a home improvement enthusiast, living a very merry DIY lifestyle. Follow me on facebook and instagram, or drop me a note if you'd like. I love notes.

    You can find me writing for Home Living Handbook, HGTV.com, and a handful of other websites.

    Thanks for visiting!

  • Instagram

    merrypad

    I’ll always say yes to a maker space experience, I’ll always say yes to a maker space experience, and The Shed at @timberland’s HQ did not disappoint ✌️🥾 @homelivinghandbook 

Final footwear design not shown 🙂

PS tagging some cute shoes they gifted from the Fall 2024 collection!
    I made the call and snapped off the elephant garli I made the call and snapped off the elephant garlic scapes yesterday evening. Who’s going to help us harvest and eat the next 1,000? 🧄🧄🧄🧄
    Hi! Boy, do I have things to share. 🎉 🫶 Fr Hi! Boy, do I have things to share. 🎉 

🫶 Friendly reminder to focus on balance and wellness: Pete and I lived abroad with our family for the entire month of August 2023. If you ever have the opportunity to work remotely, I promise it to be a worthwhile adventure that’ll change your POV in so many ways. And, If you need an in with an incredible AirBnB in Denmark, DM me. From new playgrounds and museums to the culture and design, making this trip a reality continues to be something we celebrate every day, and I wish everyone can experience it on some level.

💻 Friendly reminder to say yes to new (overwhelming) opportunities: The professional celebration happened upon our return. Last fall, I was approached to launch @homelivinghandbook, a new Pursuit channel for @mensjournal that highlights home improvement and DIY! It has been really fun to see it come to light, and truly one of the most exciting partnerships I’ve ever had. Timing couldn’t have been better, and I’m really happy to see how it grows over time. Please follow along — the team published 150 articles in two months, covering all kinds topics for home enthusiasts! So much more to come. #linkinbio #homelivinghandbook

✌️ the end, many thanks for your support!
    How much garlic is too much garlic? Maybe we’ll How much garlic is too much garlic? Maybe we’ll find out in 2024. Finished planting 1,005 cloves (and 19 shallots) in three new beds at the farm, and crossed one huge chore off my list 📝 #gardennotes #garden2024
    Instagram post 18003690670970980 Instagram post 18003690670970980
    We grew these fools. We grew these fools.
    pumpkin patch is doing great✌️#year1 #squashbl pumpkin patch is doing great✌️#year1 #squashblossoms #pumpkinpatch
    follow emily: @merrypad


  • Like Us On Facebook

    Facebook Pagelike Widget


  • Popular Posts

    • The Easy Way to Hang Art on Brick or Stone 25 views
    • How to Make Your Own Barn Quilt 25 views
    • How to Build New Front Stairs and Railings 23 views
    • Designing a Durable Wooden Fence For Our Beautiful Backyard Garden 23 views
    • Reasons We Recessed Our Induction Cooktop 21 views
    • Building a Flagstone Patio in One Day 19 views
    • Less Is More: How to Remove a Fireplace Surround 14 views
    • How to Hang a Frameless Mirror (Without Adhesive) 14 views
    • Using Counter-Snap Screws to Fix Squeaky Floors 13 views
    • Honestly, This Is the West Elm Tillary Sectional Sofa 11 views


  • BROWSE POSTS BY CATEGORY:

    • Art Attack (7)
    • Backyard (92)
    • Barn (8)
    • Basement (27)
    • Bathroom (43)
    • Beach (13)
    • Bedrooms (73)
    • Being Thrifty (53)
    • Business-y (12)
    • Buying and Renting and Selling (23)
    • Casual Celebrations (36)
    • Closets (17)
    • Curb Appeal (44)
    • Dainty Details (8)
    • Deck (23)
    • Decor (286)
    • Dining Room (37)
    • DIY (578)
    • Dog-Related (24)
    • Entryway (59)
    • Flooring (58)
    • For the Kids (32)
    • Garage (17)
    • Gardening (70)
    • Helping The Economy (30)
    • HGTV + DIY Network Projects (283)
    • Holiday-Related Projects (80)
    • Home Safety (12)
    • Kitchen (87)
    • Lighting (31)
    • Living Room (77)
    • Merry Travels (21)
    • Office Space (21)
    • Organized (41)
    • Other Pads (14)
    • Outdoor Living (12)
    • Scooter Fun (8)
    • Stairwell (20)
    • Sunroom (22)
    • Supporting Sponsors (43)
    • The Art Room (3)
    • Tools (43)
    • Uncategorizable (1)
    • Wedding (28)
    • Windows (14)
    • Work-pads (10)


  • a little bit of everything, friends, DIY, and inspiration

    • Dadand.com < My husband and his BFF
    • HGTV
    • Home Living Handbook, a Pursuit Channel for Men's Journal
  • Some Legal

    Merrypad incorporates the occasional affiliate link to Amazon.com and Minted; we link to many other websites and products, but if it is in context of a paid sponsorship, it is always noted as such. Please review the privacy policy and contact me if you have any additional questions.

    Theme customized by Pete Fazio Creative, the guy from dadand.com.


© Copyright Merrypad