• Home
  • about emily
  • before + after
  • HGTV + DIY Network
  • good press
  • contact
  • Let’s Organize These Posts:

    • Art Attack
    • Backyard
    • Barn
    • Basement
    • Bathroom
    • Beach
    • Bedrooms
    • Being Thrifty
    • Business-y
    • Buying and Renting and Selling
    • Casual Celebrations
    • Closets
    • Curb Appeal
    • Dainty Details
    • Deck
    • Decor
    • Dining Room
    • DIY
    • Dog-Related
    • Entryway
    • Flooring
    • For the Kids
    • Garage
    • Gardening
    • Helping The Economy
    • HGTV + DIY Network Projects
    • Holiday-Related Projects
    • Home Safety
    • Kitchen
    • Lighting
    • Living Room
    • Merry Travels
    • Office Space
    • Organized
    • Other Pads
    • Outdoor Living
    • Scooter Fun
    • Stairwell
    • Sunroom
    • Supporting Sponsors
    • The Art Room
    • Tools
    • Uncategorizable
    • Wedding
    • Windows
    • Work-pads
  • Search

  • Hi, I’m Emily

    Emily Fazio

    I'm a home improvement enthusiast, living a very merry DIY lifestyle.

    You can find me writing for Home Living Handbook, HGTV.com, and a handful of other websites. Follow me on facebook and instagram, or drop me a note if you'd like. I love notes.

    Thanks for visiting!

  • BROWSE POSTS BY CATEGORY:

    • Art Attack (7)
    • Backyard (92)
    • Barn (8)
    • Basement (27)
    • Bathroom (43)
    • Beach (13)
    • Bedrooms (73)
    • Being Thrifty (53)
    • Business-y (12)
    • Buying and Renting and Selling (23)
    • Casual Celebrations (36)
    • Closets (17)
    • Curb Appeal (44)
    • Dainty Details (8)
    • Deck (23)
    • Decor (286)
    • Dining Room (37)
    • DIY (578)
    • Dog-Related (24)
    • Entryway (59)
    • Flooring (58)
    • For the Kids (32)
    • Garage (17)
    • Gardening (70)
    • Helping The Economy (30)
    • HGTV + DIY Network Projects (283)
    • Holiday-Related Projects (80)
    • Home Safety (12)
    • Kitchen (87)
    • Lighting (31)
    • Living Room (77)
    • Merry Travels (21)
    • Office Space (21)
    • Organized (41)
    • Other Pads (14)
    • Outdoor Living (12)
    • Scooter Fun (8)
    • Stairwell (20)
    • Sunroom (22)
    • Supporting Sponsors (43)
    • The Art Room (3)
    • Tools (43)
    • Uncategorizable (1)
    • Wedding (28)
    • Windows (14)
    • Work-pads (10)
  • Search

  • Pages

    • blog
    • Good Press: Special Features, Freelance Projects, and Long-Term Clients
    • Privacy Policy
    • about emily
    • before + after
      • before + after – transforming my first home
      • before + after, our current home
    • contact me
    • choose a badge and share the merrypad.com love
merrypad website logo with acorn and text
  • Home
  • about emily
  • before + after
  • HGTV + DIY Network
  • good press
  • contact

How to Hang a Frameless Mirror (Without Adhesive)

March 8, 2012

If you’ve ever wanted to hang a mirror without a frame, I can help. Here’s a tutorial on how to install a frameless mirror to any wall, and securely at that.

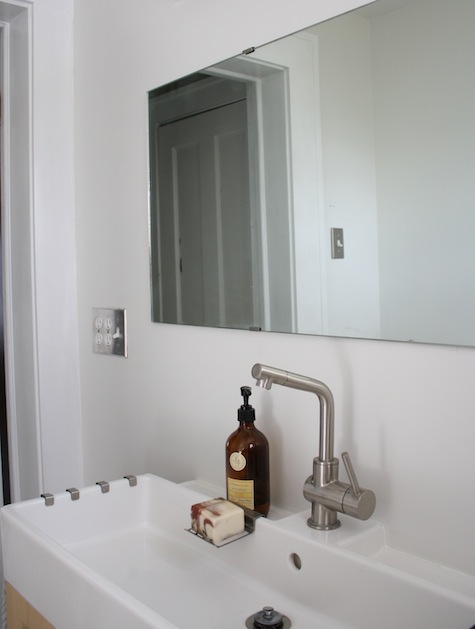
Fun fact: This mirror was f-r-e-e, pulled from the garbage and impressively large at 68″x20″. It would have made for a great full-length mirror in my bedroom, but I really saw it bringing light and utility to our updated bathroom, and light and utility, it has. The bathroom is now bright, and the mirror reflects the entire length of the room making it feel remarkably large. Spacial-enlarging tricks FTW.

Frameless mirror installed over my bathroom sink.

How to install a mirror without a frame.

My old mirror? It was small in comparison, just something I picked up at a yard sale not long after I bought my house. It was originally a cabinet door of some sort, but it had a pretty floral frame. I painted it white and made it work. This simple upgrade was, at the time, much larger than the medicine cabinet mirror that was installed over the sink.

Old bathroom mirror, which was a recycled door from a mirrored cabinet.

The old bathroom mirror was merely a mirrored cabinet door.

Learn how to hang a heavy, frameless mirror of any size following these simple steps.

You’ll need:

  • Mirror
  • Tape measure
  • Painter’s tape
  • Frameless mirror mounting clips
  • Stud finder
  • Toggle bolts
  • Drill and drill bits
  • Power drill
  • Level

1. Plan Where You Want to Hang Your Rimless Mirror

A DIY mirror install does require a bit of planning and know-how but anyone should be able to tackle it themselves. Unless, of course, the mirror is too heavy, large, or fragile to lift alone. If you suspect so, recruit a friend to help. I started planning my new mirror placement on the same day that I installed the vanity, and taped out where I wanted the mirror to fit on the wall using a tape measure and painter’s tape.

Planning where to hang a mirror in a bathroom using tape to mark the corners.

Planning where to hang a mirror in a bathroom.

I left the tape there for several days. There’s only one thing worse than a too-small mirror–no mirror–but it was important to me to try and visualize the placement and make sure it was right. What I realized during this time is that I actually did want to make the mirror shorter in length. I took it to a glass cutting shop to have 1-foot cut off the end so the final mirror measures 56″ x 20″. If you know how to cut glass you could certainly cut the mirror the DIY way, but this was very thick glass, and I wasn’t willing to try it myself.

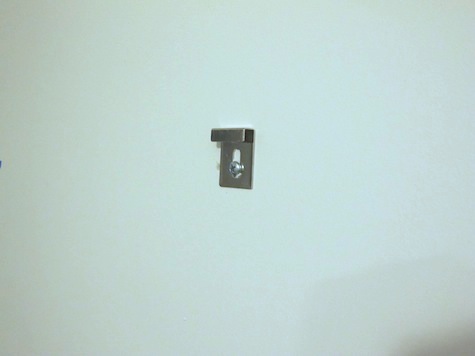
2. Purchase Mirror Mounting Clips

To install a mirror without a frame, I bought a set of metal mirror clips.

Metal mirror clips to install an unframed mirror.

Mirror holders with screws and anchors are metal clips that make it easy to hang a mirror without a frame.

I favored the metal style more than the plastic clip variety because they rest flush with the mirror. They are so slim, in fact, that you could even add a frame atop the clips if you wanted.

3. Find the Studs or Measure For Anchors

Using a stud finder, I marked each stud along the wall and learned that I would be able to install my clips directly into studs. It’s important to make sure your clips align evenly along the mirror and it’s possible that the stud placement would leave the mirror looking off-center.

If your studs do fall in a position where you do not want to place the clips, use strong toggle bolts to attach the clips to the wall. Toggle anchors are my ultimate go-to.

4. Install the Bottom Clips

I started by installing the lower two clips first, measuring directly up from the already-level vanity. The mirror sits solidly in the cradle of the clip while the bottom clips hold the entire weight of the mirror.

Metal mirror clips to hang an frameless mirror without adhesive.

Mirror clips installed on the bottom support the full weight of the mirror.

5. Install the Upper Clips

The upper brackets keep the mirror upright against the wall. The design of the clip allows for a little sliding along the screw, and this wiggle room is essential. It allows you to raise the clip up when you lean the mirror in place. Once the mirror is upright and against the wall, slide the clip down and it’ll wrap around the top edge of the mirror.

Metal mirror clips (top clips) to hang a mirror without a frame.

Top mirror clips clasp around the top edge of an unframed mirror and hold it against the wall.

The mirror mounting clips are strong and eliminate the need for extra wall adhesives or mastics. Hanging a heavy mirror couldn’t be easier. Without adhesive, it is much easier to remove or replace the mirror in the future if necessary.

With the mirror in place, the room is suddenly functional again as a place to put on makeup and brush my hair. While 20″ might not seem like a big enough mirror, you’d be surprised just how much head and torso you can see without a problem.

How to install a big, frameless mirror using metal clips.

Frameless mirror installed in a bathroom.

We’re loving the space and how much reflective light the mirror adds.

To read more stories about this renovation:

Shopping for materials

Day 1: Demo day 

Day 2: Installing the bathtub

Day 3: Building custom shower shelves, moisture barriers, and cement board

Day 4: Replacing the shower valve and finishing the cement board

Days 5, 6, 7, 8: A 4-day tiling marathon

Day 9: Focusing on the walls

Day 10: Underlayment day

Day 11: Tiling AND grouting

Day 12: Floor and door trim, beginning to end.

Day 13: Hacking the vanity and hooking up the sink

Share

Bathroom  / DIY  / HGTV + DIY Network Projects

Emily
I'm a home improvement enthusiast living a very merry, DIY-filled lifestyle. As a freelance writer, you can find my work on many popular home and garden sites, including HGTV.com, HomeLivingHandbook.com, and other outlets. Follow me on social, or drop me a note.

3 Comments


Ashley @ DesignBuildLove
March 8, 2012 at 12:35 pm
Reply

absolutely LOVE the results Em! You’ve totally rocked this bathroom (and your kitchen)! :)


    Emily
    March 8, 2012 at 6:54 pm

    Thanks Ashley!

Mark Holmes
November 16, 2022 at 9:08 pm
Reply

Last week my wife said she liked a mirror hanging in the empty space in the living room, she said the mirror she likes is frameless and I’ve been looking for ways to hang it on the wall. The first way, which seems easy, is to use a frameless mirror hanger. Method 2. Use mirror putty. And the last way to do this is by using masking tape.


Leave a Reply Cancel reply

Your email address will not be published. Required fields are marked *

This site uses Akismet to reduce spam. Learn how your comment data is processed.

  • HI, I’m Emily

    Emily Fazio

    I'm a home improvement enthusiast, living a very merry DIY lifestyle. Follow me on facebook and instagram, or drop me a note if you'd like. I love notes.

    You can find me writing for Home Living Handbook, HGTV.com, and a handful of other websites.

    Thanks for visiting!

  • Instagram

    merrypad

    I’ll always say yes to a maker space experience, I’ll always say yes to a maker space experience, and The Shed at @timberland’s HQ did not disappoint ✌️🥾 @homelivinghandbook 

Final footwear design not shown 🙂

PS tagging some cute shoes they gifted from the Fall 2024 collection!
    I made the call and snapped off the elephant garli I made the call and snapped off the elephant garlic scapes yesterday evening. Who’s going to help us harvest and eat the next 1,000? 🧄🧄🧄🧄
    Hi! Boy, do I have things to share. 🎉 🫶 Fr Hi! Boy, do I have things to share. 🎉 

🫶 Friendly reminder to focus on balance and wellness: Pete and I lived abroad with our family for the entire month of August 2023. If you ever have the opportunity to work remotely, I promise it to be a worthwhile adventure that’ll change your POV in so many ways. And, If you need an in with an incredible AirBnB in Denmark, DM me. From new playgrounds and museums to the culture and design, making this trip a reality continues to be something we celebrate every day, and I wish everyone can experience it on some level.

💻 Friendly reminder to say yes to new (overwhelming) opportunities: The professional celebration happened upon our return. Last fall, I was approached to launch @homelivinghandbook, a new Pursuit channel for @mensjournal that highlights home improvement and DIY! It has been really fun to see it come to light, and truly one of the most exciting partnerships I’ve ever had. Timing couldn’t have been better, and I’m really happy to see how it grows over time. Please follow along — the team published 150 articles in two months, covering all kinds topics for home enthusiasts! So much more to come. #linkinbio #homelivinghandbook

✌️ the end, many thanks for your support!
    How much garlic is too much garlic? Maybe we’ll How much garlic is too much garlic? Maybe we’ll find out in 2024. Finished planting 1,005 cloves (and 19 shallots) in three new beds at the farm, and crossed one huge chore off my list 📝 #gardennotes #garden2024
    Instagram post 18003690670970980 Instagram post 18003690670970980
    We grew these fools. We grew these fools.
    pumpkin patch is doing great✌️#year1 #squashbl pumpkin patch is doing great✌️#year1 #squashblossoms #pumpkinpatch
    follow emily: @merrypad


  • Like Us On Facebook

    Facebook Pagelike Widget


  • Popular Posts

    • How to Dye Pasta Different Colors (Halloween Recipe) 65 views
    • The Easy Way to Hang Art on Brick or Stone 26 views
    • How to Hang a Frameless Mirror (Without Adhesive) 18 views
    • 7 Steps for Restoring an Old Midcentury Sideboard Buffet 17 views
    • Using Counter-Snap Screws to Fix Squeaky Floors 16 views
    • Retiring NuTone, Replacing with Atomic 16 views
    • Because Who Doesn’t Like A Good Knob Story 13 views
    • Create a Unique Spider Web Pumpkin 12 views
    • Designing a Durable Wooden Fence For Our Beautiful Backyard Garden 11 views
    • How to Make Your Own Barn Quilt 10 views


  • BROWSE POSTS BY CATEGORY:

    • Art Attack (7)
    • Backyard (92)
    • Barn (8)
    • Basement (27)
    • Bathroom (43)
    • Beach (13)
    • Bedrooms (73)
    • Being Thrifty (53)
    • Business-y (12)
    • Buying and Renting and Selling (23)
    • Casual Celebrations (36)
    • Closets (17)
    • Curb Appeal (44)
    • Dainty Details (8)
    • Deck (23)
    • Decor (286)
    • Dining Room (37)
    • DIY (578)
    • Dog-Related (24)
    • Entryway (59)
    • Flooring (58)
    • For the Kids (32)
    • Garage (17)
    • Gardening (70)
    • Helping The Economy (30)
    • HGTV + DIY Network Projects (283)
    • Holiday-Related Projects (80)
    • Home Safety (12)
    • Kitchen (87)
    • Lighting (31)
    • Living Room (77)
    • Merry Travels (21)
    • Office Space (21)
    • Organized (41)
    • Other Pads (14)
    • Outdoor Living (12)
    • Scooter Fun (8)
    • Stairwell (20)
    • Sunroom (22)
    • Supporting Sponsors (43)
    • The Art Room (3)
    • Tools (43)
    • Uncategorizable (1)
    • Wedding (28)
    • Windows (14)
    • Work-pads (10)


  • a little bit of everything, friends, DIY, and inspiration

    • Dadand.com < My husband and his BFF
    • HGTV
    • Home Living Handbook, a Pursuit Channel for Men's Journal
  • Some Legal

    Merrypad incorporates the occasional affiliate link to Amazon.com and Minted; we link to many other websites and products, but if it is in context of a paid sponsorship, it is always noted as such. Please review the privacy policy and contact me if you have any additional questions.

    Theme customized by Pete Fazio Creative, the guy from dadand.com.


© Copyright Merrypad