It’s official: We’ve been working on the bathroom for 2 months now. Color me happy though, because we’ve finally reached a point where it’s all about the finishing touches, no longer about removing plywood splinters from our barefoot heels, and we’re definitely beyond the point of having to take lousy baths. We’re really enjoying the finished bathroom floor (so much so that I just finished installing it in the kitchen as well – loads to come tomorrow on that scene), and I even picked up a bunch of new hand towels and a new bath mat recently to give the space a little somethin’ somethin’. Of course, you won’t see those newbies quite yet, because first I wanted to introduce you to this new friend, LILLANGEN the vanity, with her pretty ceramic sink top. And Sir GRUNDTAL, her watery-eyed faucet companion.
Vanity installation day was a joyous one, but not without its unique challenges. The installation has been a long time coming – since April 2011, to be exact, when I found the sale-priced vanity at IKEA during a trip to Washington D.C.. In typical form, I made just enough space for it in the car, brought it home, and stored it in the attic until I was ready to remodel.

Finishing touches, like this vanity installation, are really pulling the space together. Everyday now, it’s looking more sleek.
When you know you’re going to have to buy a vanity, it’s always a good idea to store the specs in your back pocket just in case the product finds you when you’re least expecting it. For the bathroom, I already knew I was looking for something <20″ deep and up to 60″ wide (the old vanity in the bathroom was 28″ deep and 32″ wide, which was a weird proportion for the space). Shown here as a display model, everything about this vanity made me happy, especially that it was sale-priced and had a companion 3-drawer set. Note that I didn’t need a double sink in my bathroom, but it sure looked good in IKEA.
Going into the shopping experience, I was undecided on the material finish was was open to adjusting the color palette of the room based on what I found and liked on the spot. The light birch finish of the vanity really won me over, despite typically preferring the darker brown-black option from IKEA. This particular sink was narrower and longer than the old vanity, and certainly a better fit for our bathroom.
I really love the vanity also because it’s well-proportioned for my 5’8″ frame; it’s taller than the old vanity.

Assembly itself was easy, but the kicker was, because of the trim, we couldn’t sit the vanity base legs flush against the wall without notching out the trim.

Instead, we made an executive decision used birch wood wedges to position the vanity evenly away from the wall, and secured through the hardware and through the wood piece and into the wall with toggle bolts.

Whether this IKEA model sink top was intentionally designed to have a flexible depth of overhang is beyond me; I believe the sink should have overhung by about 3/4″ but in how I decided to install, it now sat flush with the front cabinet doors, and still looked normal.
I used a tub and tile waterproof adhesive caulk to secure the sink top to the base cabinet.

With the vanity and sink now in position, I also caulked along the edges of the sink that rested on the vanity to help prevent any drops of water from causing harm to the veneer itself. In this picture, see what I mean about how the sink top is shifted back on the base of the cabinet to avoid having to remove the base trim to accommodate the legs of the vanity.

Installing the plumbing itself was a little tricky, mostly because we didn’t read the instructions for our GRUNDTAL faucet until after we had installed the sink. It had been advised to install that faucet onto the sink before attaching the sinktop to the vanity, so it may have taken us a little longer to get it in place and properly attached.
Because the vanity was wider, I was able to move it about 1.5′ to the right from where the old vanity sat, making it more centered on the wall and in the room. I only went as far as I was able given that the vanity still needed to enclose the plumbing. See how we were able to make the plumbing accommodate the uncentered incoming pipes? Win!
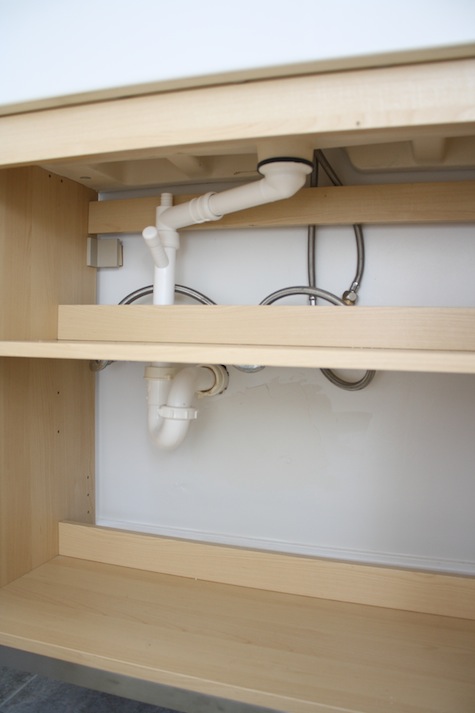
With the faucet installed, it was looking really great. We ran water through the pipes for a little while to ensure there were no leaks, and we were set.

OK, you’ve already gotten a few good glimpses of this new mirror. It’s huge, I’m aware, and I love every inch of it because it makes the bathroom seem especially deep. I’ll be back next week to give you the full scoop on how I found it and installed it myself. It’s one of those tutorials everyone needs to see.

To read more stories about this renovation:
Day 3: Building custom shower shelves, moisture barriers, and cement board
Day 4: Replacing the shower valve and finishing the cement board
Days 5, 6, 7, 8: A 4-day tiling marathon
Day 12: Floor and door trim, beginning to end.


Comment
Beautiful! Really love lill! At first i thought you were doing a post on my moms dog.