• Home
  • about emily
  • before + after
  • HGTV + DIY Network
  • good press
  • contact
  • Let’s Organize These Posts:

    • Art Attack
    • Backyard
    • Barn
    • Basement
    • Bathroom
    • Beach
    • Bedrooms
    • Being Thrifty
    • Business-y
    • Buying and Renting and Selling
    • Casual Celebrations
    • Closets
    • Curb Appeal
    • Dainty Details
    • Deck
    • Decor
    • Dining Room
    • DIY
    • Dog-Related
    • Entryway
    • Flooring
    • For the Kids
    • Garage
    • Gardening
    • Helping The Economy
    • HGTV + DIY Network Projects
    • Holiday-Related Projects
    • Home Safety
    • Kitchen
    • Lighting
    • Living Room
    • Merry Travels
    • Office Space
    • Organized
    • Other Pads
    • Outdoor Living
    • Scooter Fun
    • Stairwell
    • Sunroom
    • Supporting Sponsors
    • The Art Room
    • Tools
    • Uncategorizable
    • Wedding
    • Windows
    • Work-pads
  • Search

  • Hi, I’m Emily

    Emily Fazio

    I'm a home improvement enthusiast, living a very merry DIY lifestyle.

    You can find me writing for HGTV and DIY Network, follow me on facebook and instagram, or drop me a note if you'd like. I love notes.

    Thanks for visiting!

  • BROWSE POSTS BY CATEGORY:

    • Art Attack (7)
    • Backyard (92)
    • Barn (8)
    • Basement (27)
    • Bathroom (43)
    • Beach (13)
    • Bedrooms (73)
    • Being Thrifty (53)
    • Business-y (12)
    • Buying and Renting and Selling (23)
    • Casual Celebrations (36)
    • Closets (17)
    • Curb Appeal (44)
    • Dainty Details (8)
    • Deck (23)
    • Decor (286)
    • Dining Room (37)
    • DIY (577)
    • Dog-Related (24)
    • Entryway (59)
    • Flooring (58)
    • For the Kids (32)
    • Garage (17)
    • Gardening (70)
    • Helping The Economy (30)
    • HGTV + DIY Network Projects (283)
    • Holiday-Related Projects (80)
    • Home Safety (12)
    • Kitchen (84)
    • Lighting (31)
    • Living Room (77)
    • Merry Travels (21)
    • Office Space (21)
    • Organized (41)
    • Other Pads (14)
    • Outdoor Living (12)
    • Scooter Fun (8)
    • Stairwell (20)
    • Sunroom (22)
    • Supporting Sponsors (43)
    • The Art Room (3)
    • Tools (43)
    • Uncategorizable (1)
    • Wedding (28)
    • Windows (14)
    • Work-pads (10)
  • Search

  • Pages

    • blog
    • Good Press: Special Features, Freelance Projects, and Long-Term Clients
    • Privacy Policy
    • about emily
    • before + after
      • before + after – transforming my first home
      • before + after, our current home
    • contact me
    • choose a badge and share the merrypad.com love
  • Home
  • about emily
  • before + after
  • HGTV + DIY Network
  • good press
  • contact

Installing a Marble Threshold and Painting Window Trim

March 22, 2012

The window trim and door threshold really have nothing in common sequentially, but I squeezed them both in, same day, easy peasy, on Day 17 of our bathroom remodel.

Installing a marble threshold during a bathroom remodel.

There came a point in the last week when I finally hauled all of the power tools, wood filler, and scrap materials back down to the workbench in the basement and started honing in on the world of finishing touches. I thought this stuff would go faster, but I’ve been constantly asking myself why the little things take so long. Not as long as our four straight days of tiling, but still long.

I had a short list for this day of labor:

  • Painting the custom window trim
  • and installing the marble threshold over the doorway

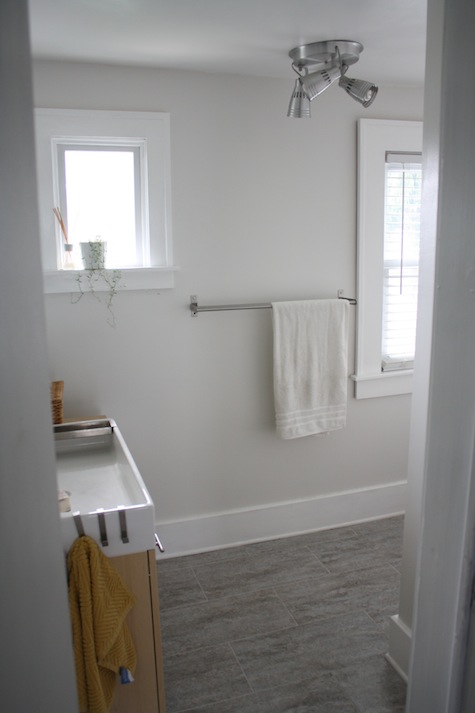
The natural wood trim looked amazing, and would have looked great stained, but to flow with the rest of the house, I decided to unify it as plain white. I started by sanding the wood down. It’s probably the most critical step of the whole process; if you’re painting trim at home, you’ll want to make sure that all nicks, knots, edges, and areas that were coated with wood filler become as smooth to the touch. I used a multi-tool with sander attachment because it did the heavy work more effortlessly than by sanding by hand, and let me get into corners really easily unlike one of the other palm sanders we have.

Sanding window trim for painting.

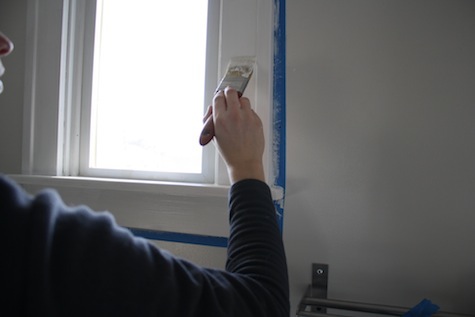
After sanding, I wiped down both windows with a dry cloth to eliminate any dust, and then primed them lightly. It was a nice day out, so I was able to keep the windows upstairs open and move the painting fumes out of the small space, though don’t ask me why I was clenching the towel rack like I was losing my balance; it’s a good thing that’s installed with heavy toggle bolts, I could probably stand on it without pulling it off the wall.

Painting wooden window trim.

After about three hours, the primer had completely dried, so I went straight for the paint can. Using the same semi-gloss straight-from-the-can white that I had used on the ceiling, baseboard, and wood trim. I started heavy-handed.

Painting wooden window trim.

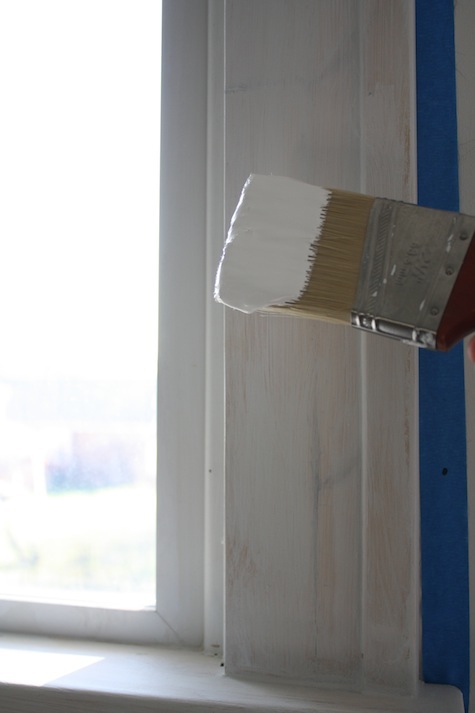
There’s something about laying it on thick, and then taking the time to smooth it out. I’m not talking thick-to-the-point-of-dripping, just thick enough to gradually hide the brush strokes.

Painting wooden window trim.

Mine took three coats of thick – there’s nothing quick about painting trim. It takes time and is precision-oriented. I only used one piece of painter’s tape this time around, on the underside of the trim that was more difficult to cut into at the angle I was painting.

Painting wooden window trim.

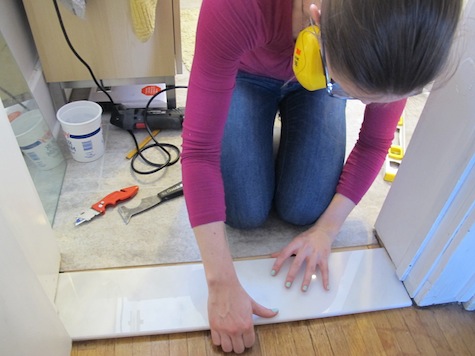
Three coats of paint (and the one coat of primer) meant that I was painting and doing touch-ups all day, but in between coats, I also got around to installing the threshold across the entryway. It’s marble, a $12 piece measuring 6″x36″ from the big box. The marble itself matches the custom shelf built into the wall of the shower, and even though I recently updated the threshold in the kitchen with metal transition, connecting the hardwood to the cement tiles with a stone transition felt very right.

Installing a marble threshold during a bathroom remodel between vinyl and original oak floors.

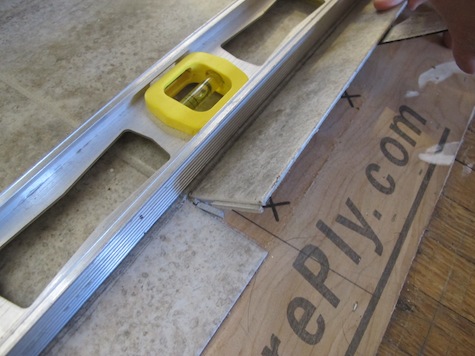
We quickly cut the marble to length with the wet saw–one of our bathroom renovation purchases that’s been totally worth the investment–and then had to cut away the brand-new installed tiles to make room for the 6″ width. I could have perhaps planned better to avoid needing to cut in this moment, but with the sharp utility blade and a pry bar, it came up easily. We could have also removed the underlayment, but it was very solid and we felt that by leaving it, we’d lessen the chances of the marble cracking as the home continued to age.

Installing a marble threshold during a bathroom remodel between vinyl and original oak floors.

We used a common construction adhesive to prepare the subfloor surface for the marble, spreading it as thoroughly as we could manage with the help of a notched trowel.

Caulking for a marble threshold during a bathroom remodel between vinyl and original oak floors.

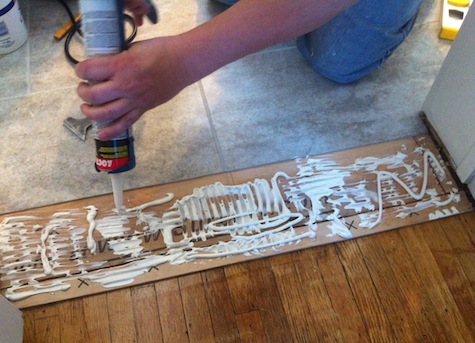
And then slid the marble into place carefully, forcing it into the adhesive tight.

Installing a marble threshold during a bathroom remodel between vinyl and original oak floors.

Immediately, I knew it was going to look pretty good. A nice transition from original oak hardwoods to a new, clean-lined sanctuary.

Installing a marble threshold during a bathroom remodel between vinyl and original oak floors.

It did need to dry overnight without us stepping on it or disturbing the adhesion process; I’ll go back another day to caulk lightly around the top of the marble that meets the trim, just to neaten it up, and also grout into this 1/8″ space between the tile and the marble to make it look more finished.

Installing a marble threshold during a bathroom remodel between vinyl and original oak floors.

Oh yes, and after the paint on the window trim dried, we were left with this wonderful sight:

An updated bathroom with new window trim.

To read more stories about this renovation:

Shopping for materials

Day 1: Demo day 

Day 2: Installing the bathtub

Day 3: Building custom shower shelves, moisture barriers, and cement board

Day 4: Replacing the shower valve and finishing the cement board

Days 5, 6, 7, 8: A 4-day tiling marathon

Day 9: Focusing on the walls

Day 10: Underlayment day

Day 11: Tiling AND grouting

Day 12: Floor and door trim, beginning to end.

Day 13: Hacking the vanity and hooking up the sink

Day 14: Installing a big mirror

Day 15, 16: Awesome window trim

Share

Bathroom  / DIY  / Flooring  / HGTV + DIY Network Projects  / Windows

Emily
I'm a home improvement enthusiast, living a very merry DIY lifestyle. I've been a freelancer writer for 10+ years and you can find my work on popular home and garden sites, like HGTV.com. Follow me on facebook and instagram, or drop me a note.

Leave A Reply


Leave a Reply Cancel reply

Your email address will not be published. Required fields are marked *

This site uses Akismet to reduce spam. Learn how your comment data is processed.

  • HI, I’m Emily

    Emily Fazio

    I'm a home improvement enthusiast, living a very merry DIY lifestyle. Follow me on facebook and instagram, or drop me a note if you'd like. I love notes.

    Thanks for visiting!

  • Instagram

    merrypad

    Merrypad // Emily Fazio
    pumpkin patch is doing great✌️#year1 #squashbl pumpkin patch is doing great✌️#year1 #squashblossoms #pumpkinpatch
    I’ve overdone it. #2023gardennotes I’ve overdone it. #2023gardennotes
    I’m not great at weeding my mulched beds, but I I’m not great at weeding my mulched beds, but I am very good at transplanting thousands of pachysandra like little bouquets so within 3 years they’ll consume the entire area ✌️ #earnyourallowance #pachysandra #gardening #merrypadathome
    One magic blossom from the peony roots transplante One magic blossom from the peony roots transplanted in April ❤️
    IT’S SCAPE SZN! IT’S SCAPE SZN!
    The biggest learning from my first year of pumpkin The biggest learning from my first year of pumpkin farming: no need to start seeds weeks in advance. These sprouted in 3 days indoors, and I was able to easily move them to the farm with minimal disturbance before they outgrew their tiny little upcycled egg carton pods. The seedlings I started in April in larger containers were very lanky at transplant and do not seem as hearty. They THRIVE when transplanted at this size! 📓 #gardennotes #garden2023 #pumpkinfarming #gourdfarming
    #2023garden pathways sponsored by pine tree bark 👩‍🌾👍 

#repurposedwood #merrypadathome
    Load More... follow emily: @merrypad


  • Like Us On Facebook

    Facebook Pagelike Widget


  • Popular Posts

    • How to fix an IKEA drawer. The Easy Fix For Broken IKEA Drawers 74.2k views
    • DIY sideboard rehab. 7 Steps for Restoring an Old Midcentury Sideboard Buffet 62.7k views
    • How to design and make a barn quilt. How to Make Your Own Barn Quilt 55.2k views
    • How to hang art on brick surfaces using specialty clips. The Easy Way to Hang Art on Brick or Stone 44.6k views
    • Our DIY flagstone patio. Building a Flagstone Patio in One Day 40.4k views
    • DIY driveway removal. How to Remove an Old Asphalt Driveway 36.9k views
    • Fix an ikea dresser drawer. Life Support For An IKEA Dresser 35.7k views
    • Tips for dying pasta different colors, and a Halloween Recipe for the kids. How to Dye Pasta Different Colors (Halloween Recipe) 35.2k views
    • Goodbye, gold fireplace covering. Less Is More: How to Remove a Fireplace Surround 31.6k views
    • After: Custom wooden garden fence. Designing a Durable Wooden Fence For Our Beautiful Backyard Garden 29.6k views


  • BROWSE POSTS BY CATEGORY:

    • Art Attack (7)
    • Backyard (92)
    • Barn (8)
    • Basement (27)
    • Bathroom (43)
    • Beach (13)
    • Bedrooms (73)
    • Being Thrifty (53)
    • Business-y (12)
    • Buying and Renting and Selling (23)
    • Casual Celebrations (36)
    • Closets (17)
    • Curb Appeal (44)
    • Dainty Details (8)
    • Deck (23)
    • Decor (286)
    • Dining Room (37)
    • DIY (577)
    • Dog-Related (24)
    • Entryway (59)
    • Flooring (58)
    • For the Kids (32)
    • Garage (17)
    • Gardening (70)
    • Helping The Economy (30)
    • HGTV + DIY Network Projects (283)
    • Holiday-Related Projects (80)
    • Home Safety (12)
    • Kitchen (84)
    • Lighting (31)
    • Living Room (77)
    • Merry Travels (21)
    • Office Space (21)
    • Organized (41)
    • Other Pads (14)
    • Outdoor Living (12)
    • Scooter Fun (8)
    • Stairwell (20)
    • Sunroom (22)
    • Supporting Sponsors (43)
    • The Art Room (3)
    • Tools (43)
    • Uncategorizable (1)
    • Wedding (28)
    • Windows (14)
    • Work-pads (10)


  • a little bit of everything, friends, DIY, and inspiration

    • Dadand.com < My husband and his BFF
    • HGTV
  • Some Legal

    Merrypad incorporates the occasional affiliate link to Amazon.com and Minted; we link to many other websites and products, but if it is in context of a paid sponsorship, it is always noted as such. Please review the privacy policy and contact me if you have any additional questions.

    Theme customized by Pete Fazio Creative, the guy from dadand.com.


© Copyright Merrypad